


Annual 2005: No Surprises

Checking the Annual progress just as the latest snowstorm
begins
What a Difference A Year Makes
 January of 2004 finished up our longest maintenance
binge. You may remember reading about it. In addition to the
routine FAA-mandated annual inspection, we
also managed to overhaul our 30 year old propeller and governor,
replace the governor oil lines, refurbish the airbox, overhaul the fuel tanks and
senders, and all told, generally take up residence in Marty's
shop for two months.
January of 2004 finished up our longest maintenance
binge. You may remember reading about it. In addition to the
routine FAA-mandated annual inspection, we
also managed to overhaul our 30 year old propeller and governor,
replace the governor oil lines, refurbish the airbox, overhaul the fuel tanks and
senders, and all told, generally take up residence in Marty's
shop for two months.
When we spoke to Marty later that year to schedule the 2005 Annual, we agreed that after last year's hurculean maintenance effort we shouldn't NEED to do much. So, after 150 hours of thrashing about the Northeast and Mid-Atlantic states, we brought the airplane back to Marty in mid January 2005.
Annual Inspection Reveals...
The interesting thing about the annual inspection part of this year's maintenance binge is that there wasn't anything interesting about the inspection. The airplane passed with flying colors.
Marty found some loose rivets on the refurbished airbox carb heat door hinge (we did everything BUT replace the rivets on that thing, so this is no surprise) and noted that we'd definitely need new brake rotors next year. Even this wasn't news, however, since he let us know last year that they were close to the minimum specifications.
Of course, the great thing about a no-surprises annual is that it's fairly inexpensive -- enough so that we were able to do a few extra things on our ever-present wish-list.
 New Propeller Cable
Installing a new propeller cable was a leftover job from the 2003 Annual that we had to defer while we waited for the FAA to grant us a field approval for a replacement McFarlane Aviation cable. After several paperwork snafus (some ours, some theirs), we finally received approval -- in August -- nearly 8 months to the day of the original request.
Rather than put the airplane back in the shop for a week or more during prime flying season, I decided that we'd wait until the 2005 Annual to install the new cable. Marty said he'd remove the cable first thing and get it shipped out to McFarlane so they could take exact measurements and confirm the cost. Bottom line? $150 + installation. McFarlane came through again.
The improvement with the new cable was obvious. To cycle the propeller using the old cable, we had to grab it with both hands to pull it fully aft. The new cable moves so freely that it requires only the light touch of a few fingers. We originally thought that the high pull force had something to do with the tight radius bend in the cable inside the engine compartment, but the new cable proved that theory incorrect, as we routed the new cable identically to the old. We took a close look at the old cable and could not find any obvious damage, so we figured that the inner sleeve of the protective metal sheath was damaged from repeated use in the area of the tight bend and the cable was binding where it had worn through the sheath.
The moral of the story is if you have to use anywhere near two hands' worth of force to move ANY engine control (with the control friction adjusted, naturally), there is something wrong with the control and it should be investigated and/or replaced as soon as practical. This is especially true if you lube the cable and nothing changes. Good quality engine control cables aren't cheap, but they're generally worth the money because they'll last a LONG time. And replacing a control makes even more sense if you can upgrade to a vernier unit, as we did with our mixture control last year.
Oh, and speaking of the mixture control, after a year of experience with it I can say that it's made leaning far more precise. I've found that I can now flirt with running lean of peak...a position on the mixture curve where rough operation may only be one or two turns of the mixture control away. The original detented control did not provide sufficient resolution to experiment -- it would either be too rich (too close to peak) or too rough (too far beyond peak on the lean side of peak). Now, truth be told, our engine is carbureted, so whether we're actually able to run lean of peak smoothly seems to have more to do with the prevailing environmental conditions and whether we pull on a bit of carb heat rather than the mixture control itself, but the new control certainly provides the a control precision we previously lacked.
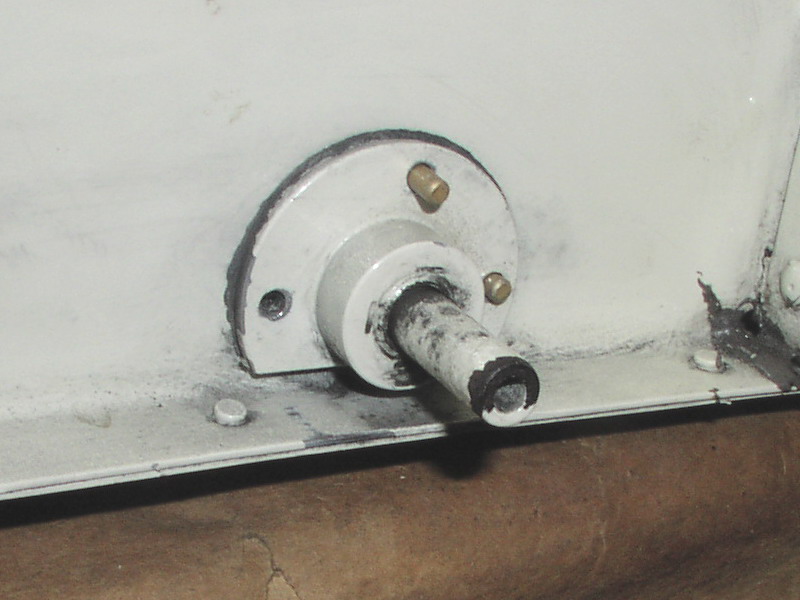
Removal of Belly Strobe
 Many years ago, a shop installed a second beacon on
the belly of the airplane. Why this was done, exactly, still
eludes me, but my guess is this. The shop that installed it was
primarily known as a Mooney shop, Mooneys have belly strobes, and
the guys simply didn't think anything of installing it on our
Cessna in the same location.
Many years ago, a shop installed a second beacon on
the belly of the airplane. Why this was done, exactly, still
eludes me, but my guess is this. The shop that installed it was
primarily known as a Mooney shop, Mooneys have belly strobes, and
the guys simply didn't think anything of installing it on our
Cessna in the same location.
The problem with this particular installation was that its flash caused bright reflections on our shiny wheel pants, which in turn illuminated the cockpit. This was so distracting we found ourselves turning off the beacon to keep our sanity. Of course, turning off our only anti-collision light in flight was slightly less than legal, if not unsafe. Some testing revealed that the strobe at the top of the tail was responsible for reflections on the wing struts, and those were nearly as annoying because they were always in our peripheral vision.
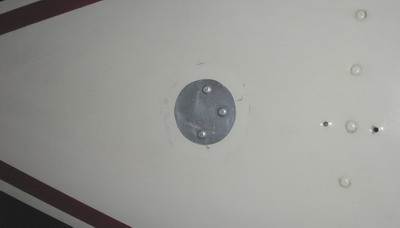
To fix the problems, I had Marty remove the belly strobe and patch the resulting hole, and I contacted Whelen to discuss options for the top strobe. It turns out that the top strobe was sold with some aluminum tape and STC paperwork that specified the tape was to be installed so as to prevent reflections. Apparently, it seems, the people that originally installed the top strobe didn't follow the STC installation instructions and didn't bother to install the tape. I asked Whelen for a solution, and they offered to send the tape out to me free of charge.
When I went to install the tape, it wasn't clear exactly how much tape I'd have to use (using too much naturally defeats the purpose of the strobe, while using too little increases the likelihood for reflections) so I developed a test section with electrical tape. After a few flights I had established the size of the patch required and then replaced the electrical tape with the aluminum. Job complete.
The one perk of this work was the realization that the strobe power supply originally installed is a three position Whelen unit (about $850 new), so when / if we decide to do new wingtips, we can install wingtip strobes without having to purchase a new supply.
ELT Antenna Replacement
A week prior to the annual we were flying back from New Hampshire when we encountered some mixed ice. When we got on the ground, a post-flight inspection revealed that we'd lost the ELT antenna.
Given that the antenna was almost two feet in length and made of an inflexible metal, it didn't take long to conclude that the ice caused an imbalance which caused it to vibrate to the point that it broke off. I was somewhat surprised that it happened now given that this wasn't our first encounter with ice, but I figured that metal fatigue played a role in its departure from the aircraft. On more than one occasion checking our six for traffic I'd noticed the antenna bouncing around back there. I guess this trip resulted in one bounce too many.
I requested Marty install a new antenna that would more easily flex and flop in the breeze, and he installed what I've come to know as a more traditional ELT antenna -- a thin black wire.
 Firewall-Forward Rewiring
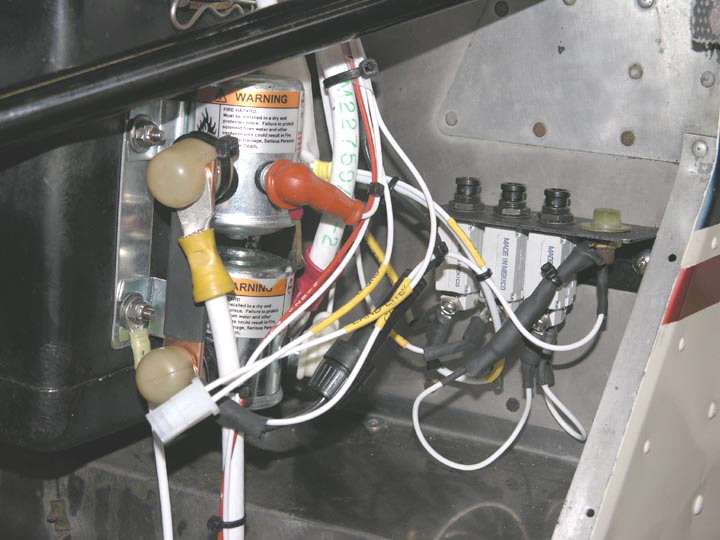
I had originally asked Marty if he could help us do some rewiring under the cowling, but he said that while he had no problem replacing a few wires here or there, he wasn't set up to do a wiring job of the magnitude we had in mind. So, the job at this point passed to the professional wiring team at our avionics shop
Our desire to rewire firewall forward was spurred by our charging system failure last summer. While the failure was indirectly caused by a failed alternator mount and likely wouldn't reoccur, we took a very close look at the wiring inside the cowling at that time and didn't like what we saw. The wiring was certainly functional, but looked every bit of 35 years old. The outer gasoline resistent coating was flaking off in several places and more than a few wires had mid-line splices. I also made note of a couple scary-looking solder joints, some old fuses, and more wire than required in some cases. I made a pledge at that point to replace what appeared to be THW insulation and some frayed fire resistant cloth covering with the latest Tefzel insulated and shielded wire used in new airplanes.
A few months after Marty returned the airplane we managed to get on the schedule at the avionics shop. I emailed them the list of items to be done:
- All wiring associated with the alternator and regulator,
including the #8 main bus feeder between the alternator and
main bus breaker.
- New landing light wires with a good-quality
quick-disconnect. I also wanted to eliminate some extra length
in the existing wiring -- some of it was needlessly
doubled-back on itself.
- Remounting of the battery and starter contactor to ensure
good grounding. We deemed this necessary because a poor ground
to the battery contactor once left us without electrical power
(during preflight at home base, fortunately). Also, I asked
them to use a copper bar between the contactors where possible
to eliminate a couple of terminals and possible failure
points.
- Replace the fuses located on the firewall with circuit
breakers, not only to eliminate the need to carry many
different replacements, but also to aid the preflight process
of these circuits.
- New #4 starter wires - Again, there was nothing wrong with
these cables as best we could tell, but they used old style
insulation and the connectors were, well...who knows how old.
Since the alternator failure resulted from a failed #8 cable
and the #4 starter cable is far more rigid and perhaps
susceptible to fatigue, the old wires had to go.
- New Magneto P-Leads - the existing ones utilized a shielded wire whose outer pvc coating had long ago started to flake off and the connectors just looked like they were on their last legs.
 I had hoped that the work would have been done in a
week, particularly because the following weekend was forecast to
offer some pretty nice springtime flying weather, but the shop
had to order some connectors and copper bus bar they didn't keep
in stock. This delayed delivery to the following week, but I
really didn't care. After all I told them at the outset I'd
rather have it done right than fast.
I had hoped that the work would have been done in a
week, particularly because the following weekend was forecast to
offer some pretty nice springtime flying weather, but the shop
had to order some connectors and copper bus bar they didn't keep
in stock. This delayed delivery to the following week, but I
really didn't care. After all I told them at the outset I'd
rather have it done right than fast.
As I've come to expect the shop, the results were outstanding. Every wire inside the cowling or that bridged the firewall was replaced, wrapped in spaghetti (looks more like linguini to me, but that's what the industry techs calls it!), and labeled. All terminals are now assured to be aircraft-grade, and I'm now assured that the Skyhawk's electrical system is up to our standards.