


BMW E36/E46
Power Steering Fluid Flush DIY
A power steering fluid flush can be messy,
but is essential to the health of your steering system!
Power steering systems are all too often neglected. I neglected mine and was forced to replace the steering rack after less than 100K miles in service. When my technician removed the rack, the oil in the reservoir was found to be pitch black. I realize that all oils darken with age as they hold contaminants in suspension (as they're designed to do) and black oil by itself does not mean the oil is beyond its useful life, but I've come to understand that BMW's "lifetime fill" recommendations are based more in marketing than engineering.
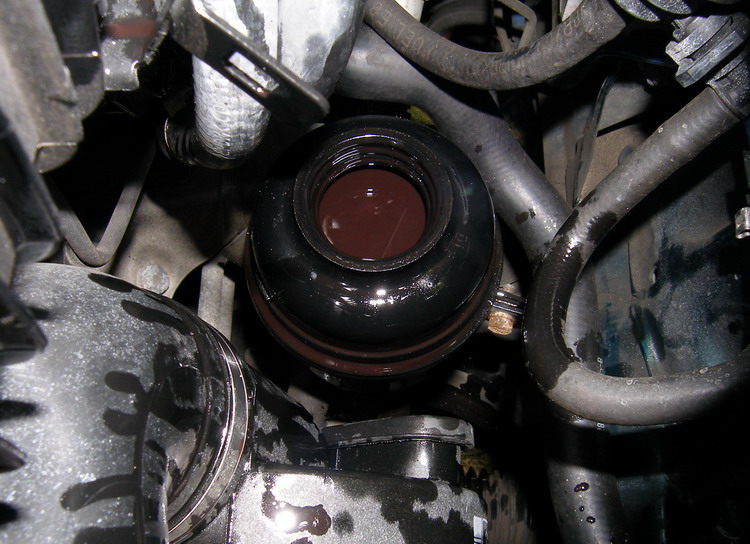
As evidence of this, I'll point out that at least one OEM of late-model power steering systems (ZF) recommends regular fluid changes to prolong the life of the components. Fortunately, BMW specifies common Dextron III / Mercon Automatic Transmission Fluid (ATF) for the E36 and E46 power steering system. This makes a fluid flush an inexpensive task. ATF is deep red in color yet transparent. Much like new engine oils, in small quantities you can see right through it.
If you open your power steering reservoir and can't see the bottom or it's been longer than 36K miles since the last flush, it might be a good time to flush the power steering fluid.
Integrity Check
Before flushing the system, you should verify the overall integrity of the power steering system and determine if you need to replace any parts. If you detect any problems, order those parts ahead of time and do the flush as a part of the repair.
There are a few things to look out for on BMW power steering systems.
- Hose Leaks - Leaks usually occur at each location where BMW uses a crappy crimped hose clamp during manufacturing. The crimped clamps do their job for a long time but they cannot be adjusted to compensate for shrinkage in the rubber hoses over time. Be sure to examine the two connections on the bottom of the reservoir and where the reservoir feed line (the short fat one) connects to the pump. It's possible to cure most leaks by replacing the clamps (BMW makes nice adjustable hose clamps, and they're really cheap so there's no excuse to use generics), but be aware that the leak may actually be due to the hose itself. In that case, you should replace the hose, but also keep in mind that disturbing the connections on the bottom of the reservoir may break off the plastic nipples. If this occurs the reservoir will need to be replaced. Make sure you have the necessary parts for that contingency.
- Rack Seal Failure - This type of leak is usually caused by simple wear and tear, but can be aggravated by a lack of fluid changes or persistent driving with unbalanced or defective tires or other suspension components that result in a shimmy in the steering wheel. The first sign of this problem is usually the pump wailing in turns as the low fluid level pulls air into the pump. If the seals fail, the tie rod boots fill up with oil. Give them a squeeze and a jiggle -- if you hear or feel any fluid in the boots, you need to replace the steering rack. That task is outside the scope of this article. Incidentally, if you are an enthusiast and you need to replace your steering rack, you may want swap it with the one originally provided on the Z3. The Z3 rack has a higher steering ratio that reduces the amount of steering wheel deflection required to produce the same turning performance. This upgrade will increase the sporty feel of the car and take some of the sting out of paying for it.
- Corrosion or physical damage of cooling coil / return line - The BMW power steering system fluid is cooled by passing it through a cooling coil built into the return line. This pipe must be exposed to cooling airflow to do its job so it is not behind any protective cover. This means it's exposed to road debris, salt, and moisture. If significant corrosion or dents are noted during the inspection the return line should be replaced.
Prerequisites
To perform a Power Steering system flush you should have the ready access to the following (exact list depends on method used):
- Jack (2 ton rating or higher)
- Jack Stands (3 ton rating or higher)
- 2 quarts Dextron III / Mercon Automatic Transmission Fluid (ATF). Do not use any other oil, including fluid marketed as "Power Steering Fluid". ATF and Power Steering Fluid are completely different animals.
- 22mm Box Wrench or Socket & Ratchet ("Optimal" flush method only)
- Torque wrench with pivoting head capable of 30ft*lbs ("Optimal" flush method only).
- One large ("irrigation-type") syringe or gear oil pump. Syringes are available from medical supply store, while the gear oil pumps may be obtained from any reseller of automotive parts or supplies.
- Crush washers for the pump banjo fitting (see realoem.com or your dealer's parts department)
- Minimum of 2 Quarts Dextron III / Mercon ATF (I used Castrol)
- A plastic bag or other flexible sheet plastic that can be used to cover the power steering pump pulley and belt ("Optimum" flush method only)
- Any other parts you may need to fix a problem discovered during the integrity check
- A friend or family member that doesn't mind blowing 15 minutes of their day with you ("Official" flush method only)
Flushing Methods
While BMW does not make it easy to flush the system (after all it's a "lifetime" fluid, RIGHT?), it is possible to flush the fluid in three ways I choose to call the Simple, Optimal, and Official methods.
The "Simple Flush"
The simplest solution to flush the power steering fluid is as follows.
- Optionally, jack up the front end.
- Use a syringe or gear oil pump to remove the fluid from the reservoir. Don't use a baster because they don't seal well enough and tend to drip fluid all over the place If you need evidence, the picture at the top of this article shows the results of using a baster.
- Fill the reservoir to a level between the minimum and maximum marks on the dipstick. Do NOT overfill it.
- Replace the reservoir cap.
- Start the car and let it run for two minutes.
- Lather, Rinse, Repeat until you've put 2 quarts through the system. This will take approximately six cycles to complete.
The downside to this method is that the reservoir only holds about 1/4 of a quart of fluid. Mixing new fluid with old dramatically increases the number of flush cycles and the amount of fluid required to complete the task as the percentage of old fluid gradually approaches (but theoretically never reaches) zero.
There really is no advantage to this method except simplicity and I don't recommend it unless you lack the tools and/or desire to tackle the "Optimal Flush" method, below.
The "Optimal Flush"
This procedure is what my technician recommended, with a few extra tips of my own:
- Turn off the engine.
- Jack up the front end and put the car on jack stands.
- Wrap some plastic around the pulley of the power steering pump and the nearby belt surfaces, as the close proximity of the pump fittings may otherwise result in ATF coming into contact with the belt, and this can cause the belt to slip.
- Open the reservoir and use a syringe or gear oil pump to remove the fluid from the reservoir.
- Open the M16 (22mm) banjo fitting on the pump and let the fluid drain out into a pan positioned below it.
- Turn the ignition key to unlock the steering wheel (but do not start the engine), then rotate the wheel slowly lock to lock a few times to push the old fluid out of the system. When done, the reservoir should be completely empty and no additional fluid should drain from the fitting.
- Remove the hollow bolt and install new crush washers on the banjo fitting. Note: You need not install new crush washers if you expect to repeat this procedure during this maintenance session to further flush the system. Just make sure you use new crush washers before you button the system up for good.
- Torque the banjo fitting to to 40Nm or 30 ft*lbs. At least on my car the bumper fairing gets in the way of using a torque wrench with a fixed head. My pivoting head torque wrench was able to do the job, but I had to adjust the torque for the offset. If you don't have a torque wrench, you can just tighten the bolt until you feel the crush washers start to absorb the torque and then STOP. Do not overtorque the fitting.
- Remove the protective plastic from the accessory belt, being careful not to contaminate the belt in the process.
- Refill the reservoir using the dipstick minimum and maximum markings as a guideline. Do NOT overfill it. You may notice some large air bubbles come to the surface in the reservoir as you fill it. This is due to the fluid displacing the air in the hoses and is expected.
- Rotate the wheel slowly lock to lock. As you turn the wheel, the level in the reservoir will drop. Continually add fluid so you don't run it dry, and do this until the level in the reservoir no longer drops. Fill the reservoir to a level between the minimum and maximum marks on the dipstick. Do NOT overfill it.
- Reinstall the reservoir cap and hand-tighten.
- Start the engine and rotate the wheel slowly lock to lock. The wheel should be turned at a rate that lock to lock is achieved in about 10 seconds or more. Do this 10 times and then center the wheel and shutdown the engine. Don't hold the wheel against the lock! When you reach the lock immediately reverse direction.
- Stop the engine, reopen the reservoir, and examine the dipstick. If the level is below the minimum, add fluid to reach the middle of the range indicated on the dipstick.
- Examine the fluid quality in the reservoir. If you see a lot of small bubbles you have successfully removed some of the air from the system. If the fluid is a normal dark red color and no bubbles are present, and/or the level has not dropped, you may have removed all the air. Even in this case, I recommend you bleed the system twice for safety's sake.
- Repeat the process from step 11 until the level in the reservoir no longer drops.
This is a better solution simply because it removes more fluid with each flush cycle, but the downside is that it requires a large socket or box wrench (in other words, the right tools for the job) and it's not very comfortable to do this without the car jacked up or on a lift.
This downside to the procedure should be obvious -- it will let air into the system. This is especially true if you have replaced any parts prior to the flush. The BMW power steering system is self-bleeding, so a bulk of the air should come out after the first bleeding cycle. That said, my advice is to do this work when you are not under time pressure to drive the car.
My technician recommended doing this flush twice for maximum effectiveness, which in itself is a vast improvement in the number of flush cycles required by the "Simple Flush". Note that even after a fluid flush using the "Optimal" method, it's unlikely that the fluid will be transparent as it is fresh out of the bottle as it's impossible to remove all the old fluid.
The "Official Flush"
ZF specifies a procedure that involves removal of the return line from the reservoir, securely piping it to a catch basin, starting the car to let the pump develop pressure, and continually refilling the reservoir so it won't run dry.
 I
ran this by my technician and he recommended I avoid doing it this way because
the running pressure is around 400 PSI and the pump will suck down the fluid
very quickly, even with the engine at idle. If the fluid is not added to the
reservoir fast enough the pump may run dry and suck air into the system that
may be difficult (read: time consuming) to bleed. The method also requires
a helper to turn the wheel while you literally dump quart after quart into
the reservoir to keep up with the high flow rate. Done properly, however, this
is clearly the most efficient method to completely flush the old fluid.
I
ran this by my technician and he recommended I avoid doing it this way because
the running pressure is around 400 PSI and the pump will suck down the fluid
very quickly, even with the engine at idle. If the fluid is not added to the
reservoir fast enough the pump may run dry and suck air into the system that
may be difficult (read: time consuming) to bleed. The method also requires
a helper to turn the wheel while you literally dump quart after quart into
the reservoir to keep up with the high flow rate. Done properly, however, this
is clearly the most efficient method to completely flush the old fluid.
I've seen others use this method, but generally on the E46 because the position of the reservoir provides easy access to the hoses. The brainiac who designed the E36 put the reservoir in a very annoying spot. It's too low to get to from the top of the engine bay, and yet difficult to reach from underneath unless the car is on a lift and you can get your arm all the way up there.
If you choose this method, keep in mind that fluid flows in the system as long as the pump is turning -- not just when you turn the steering wheel -- so expect to see fluid flow out of the return line immediately upon engine start.
Belt Contamination
The first time I used the Optimal method I unwittingly contaminated the main accessory belt with ATF. I never discovered physical evidence of the contamination, but it only takes a drop on the pulley to spread to the entire belt and cause intermittent power assist. This can be mistaken for air in the system. While BMW recommends the belt be replaced if it becomes contaminated with any coolant or oil, in a case of a light contamination it's possible to clean the belt with some brake cleaner in aerosol form to restore it to normal operation.
My technician taught me to clean the exposed areas of both the power steering and water pump pulleys with the engine off, and then to start the vehicle and direct a stream of cleaner at the power steering pulley and the exposed inner portion of the belt. This is best accomplished while shooting vertically downward from a position just in front of the airbox for anywhere from 10-30 seconds, depending on the degree of contamination.
Do yourself a favor -- cover the power steering pulley and belt to the extent possible before you begin the Optimal flush method and avoid this headache.
Conclusion
I got a good look at the ATF fluid after 30K miles and it was still in pretty good shape. It was milky-red in color, and my technician confirmed that as long as it wasn't dark brown or black or smelled burnt it was still in good shape. Apparently the milky-nature of the fluid is caused by aluminum particles in suspension and flushing the fluid helps rid the system of those contaminants.
Based on the condition of the fluid at 30K miles, I believe that 36K miles or every Inspection II is a good time to do this service if you use the "optimal" or "official" flush methods. If you use the simple method, you should do it more often, especially if you only go through one quart of oil each time -- every 18K miles would not be out of the question. The good news is flushing it too often won't hurt anything, and the fluid is ridiculously inexpensive (I paid less than $3/qt).
The power steering reservoir contains a non-removable 100 micrometer particle filter. I find it as no surprise that BMW does not specifically recommend replacement of this filter considering they don't recommend changing the oil. However, the OEM of the power steering system (ZF) suggests the filter be replaced in the event of component failure or after "many years" in service because the filter can plug up with contaminants which can in turn cause component failure. I think a safe replacement interval is 100K miles.
The moral of the story? Perform regular preventative maintenance on your power steering system to help minimize the chance for failure and the need to replace some very expensive components.