


Fuel Tank Repair
Searching for a fuel leak with the tank cover removed
Stains and Leaks
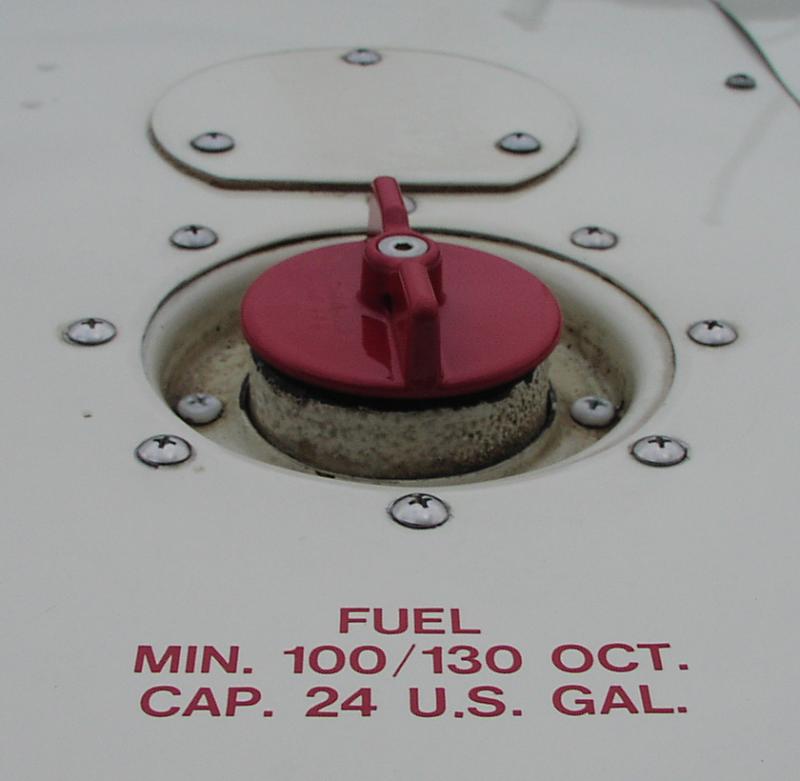
Over the course of the last year, my crew partner and I had come to accept fuel stains aft of the fuel caps. It's a common problem, and the simple result of an imperfect seal between the cap and the filler neck. Sometimes the solution is to simply replace the cap gaskets.
Replacing the gaskets doesn't always solve the problem because the problem isn't the gaskets, per se, but irregularities in the face of the filler neck caused by corrosion or dings and other damage caused by fuelers unable to control their nozzles.
And, of course, fixing the face of the filler neck isn't exactly easy either. It's not like you can take a grinding wheel or even a piece of sandpaper to the steel while the tank is full of fuel. Can you say, "Ka-BOOM!" and "aluminum in all quadrants"? Knew you could.
 As you
may recall from Part 2 of the Annual 2003 series of articles, we
decided to replace the cap gaskets because they were cheap (about
$5 each). While looking at the tanks more closely, Marty caught a
more substantial leak that seemed to saturate the area behind the
wing root filler panel. It was difficult for us to figure out the
precise source of the leak without taking the fuel tank cover
off, but the tank fitting was visibly wet, so we figured that
would be a good place to start.
As you
may recall from Part 2 of the Annual 2003 series of articles, we
decided to replace the cap gaskets because they were cheap (about
$5 each). While looking at the tanks more closely, Marty caught a
more substantial leak that seemed to saturate the area behind the
wing root filler panel. It was difficult for us to figure out the
precise source of the leak without taking the fuel tank cover
off, but the tank fitting was visibly wet, so we figured that
would be a good place to start.
Replacing the fitting was somewhat inconvenient, in that it required us to drain the tank, but the job went quickly and from what Marty and I could tell after a short test hop with less than full fuel, we reasoned that the problem was no more. (Silly us!)
Deja Fuel
Given that the airplane had just returned from the annual inspection and being in a zillion pieces, I decided to fly a series of "shake-out" flights designed to keep us within reasonable driving distance of our home base, just in case something came up that required us to leave the airplane at a remote airport.
The first flight and post-flight inspection went off without a hitch, but following the second flight I noticed a fuel stain and visible fuel moisture trailing aft of the tank drain, covering the bottom of the flap and the area on the fuselage just on top of the rear window. Clearly we still had a leak.
After a couple more flights with less than full fuel, I determined that the leak largely ceased, so that seemed to indicate a problem with the top of the tank, either with the fuel sender or a problem with the filler neck.
 Hello,
Marty?
Hello,
Marty?

After a string of bad-weather days and work schedule conflicts, I finally managed to get the airplane back to Marty for a more thorough evaluation of the problem while I was in to do a few other small maintenance tasks.
He first removed the inspection panel covering the fuel sender, just aft of the filler neck, to see if the sender was causing the problem. He found the entire area wet with fuel and suggested that fuel could have been leaking through a faulty seal around the wires leading to the sender elements, but added that the area just aft of the filler neck was also wet, so that could be the culprit as well. How, you ask?
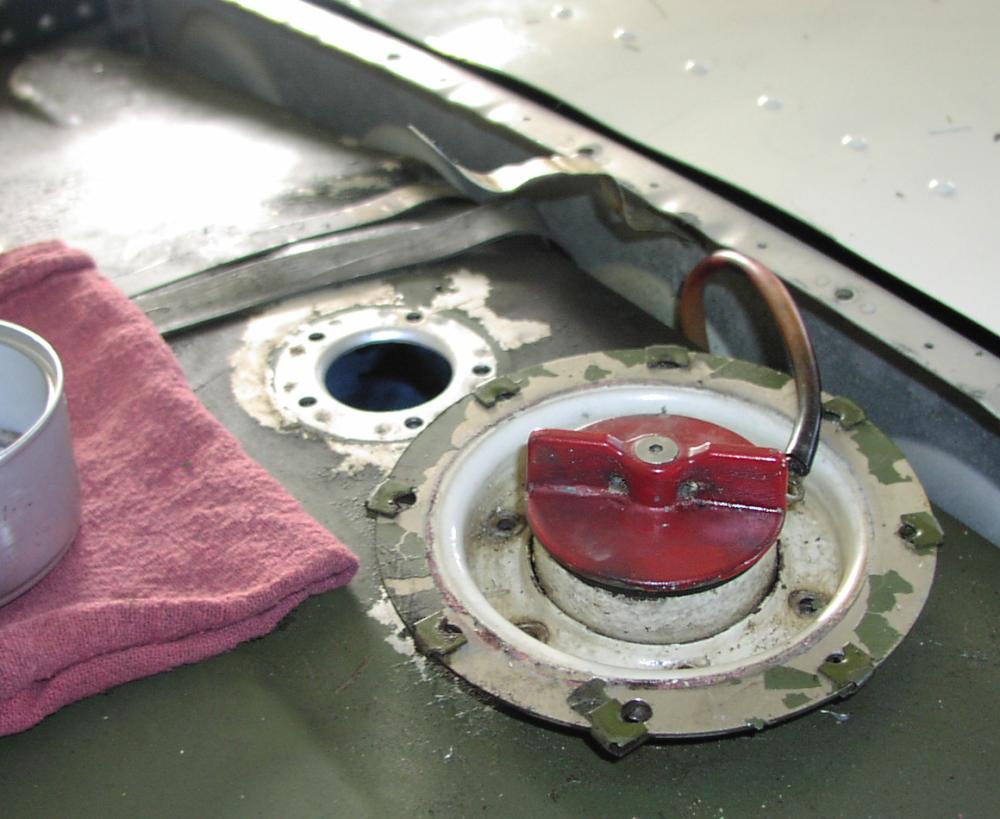
First, the tank and filler neck are two separate components. A gasket is placed between the two to seal the interface, and gaskets last only so long. We were not sure how old this gasket was, but we did know that the tanks had been removed almost 15 years earlier, just before the aircraft was painted.
Second, these tanks are retained by what I can only describe as huge band clamps, combined with some decidedly low-tech wooden spacers that snug up the fit of the tank in the wing bay. If those spacers become dislodged or the band clamps loosen or fail, the tank will move in the bay during flight, which will put stress on the tank where it connects to the filler neck. This stress can lead to cracks that no gasket will ever mask, and the result will be a substantial leak, most evident when the tanks are full.
 At that point,
Marty suggested I leave the airplane with him for the purpose of
pulling the tank covers, and a couple weeks later I did exactly
that. Marty also suggested we ship the senders out to AirParts of
Lock Haven, PA to fix any leaks, recalibrate them, and give them
a good mechanical check. For $125 each and a 5-7 day turnaround,
it seemed like good insurance. I mean, how often do people look
at their tanks and overhaul their senders? Is 15 years a
long-enough overhaul interval? I think it is.
At that point,
Marty suggested I leave the airplane with him for the purpose of
pulling the tank covers, and a couple weeks later I did exactly
that. Marty also suggested we ship the senders out to AirParts of
Lock Haven, PA to fix any leaks, recalibrate them, and give them
a good mechanical check. For $125 each and a 5-7 day turnaround,
it seemed like good insurance. I mean, how often do people look
at their tanks and overhaul their senders? Is 15 years a
long-enough overhaul interval? I think it is.
As an aside, Marty also mentioned that he would fix the blunder committed by the last mechanic to work on these tanks. He would reorient the filler necks so the caps lock with the handles parallel to the airflow...not canted at a 45 degree angle. I told Marty that I figured that fix would be worth at least five knots, so it was critical that we do it! :-)
Initial Findings
Marty called the following week to tell me that he had pulled the skins and found the problem -- a bad filler neck gasket. Fortunately, there were no cracks in the tank. This was a relief because it meant we didn't have to pull the tank to have it welded, and incur the associated costs and delays.
 In spite of work
performed on the band clamps and rub strips back in 1995, one of
the clamps was noticeably loose and the rub strip separated from
the metal in a couple locations, particularly on the underside of
the wing skin. Some of the rub strip material was dry rotted, so
I told Marty to install new where appropriate.
In spite of work
performed on the band clamps and rub strips back in 1995, one of
the clamps was noticeably loose and the rub strip separated from
the metal in a couple locations, particularly on the underside of
the wing skin. Some of the rub strip material was dry rotted, so
I told Marty to install new where appropriate.
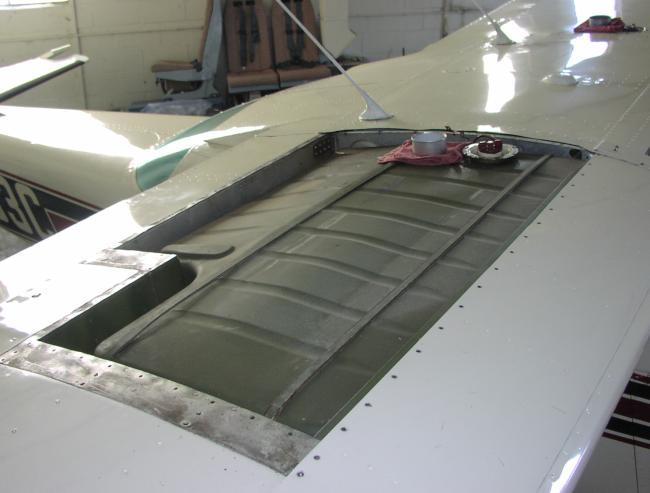
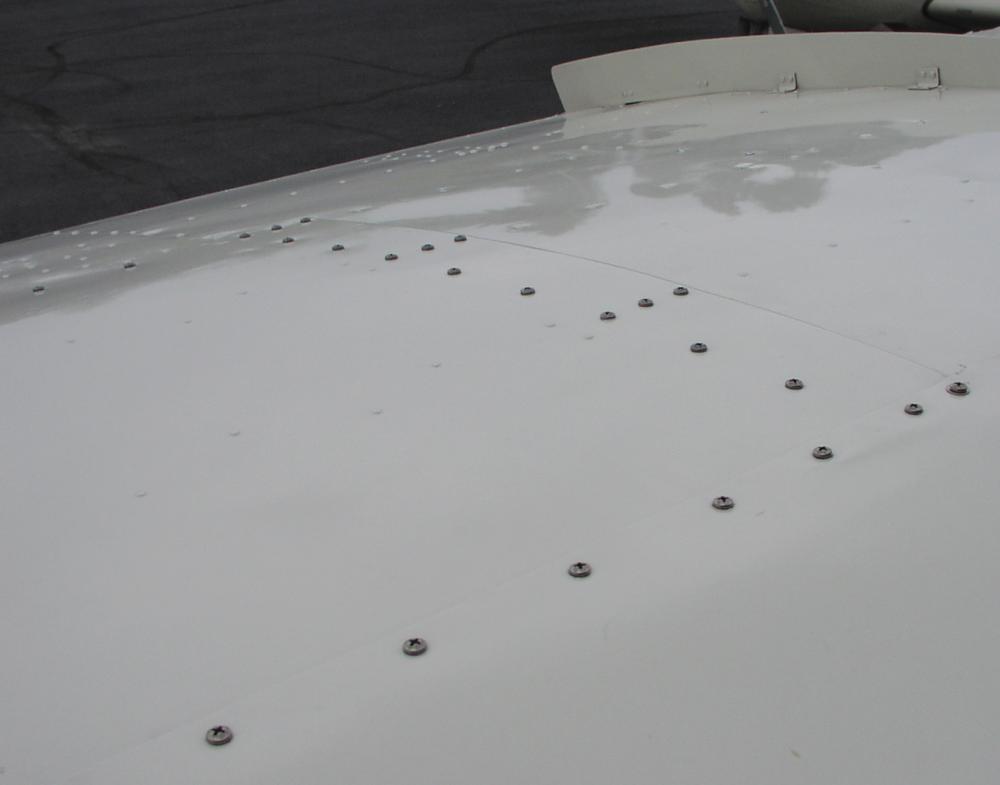
If you look closely at the picture of the tank as viewed from the rear of the wing, the telltale signs of the leak are obvious. The outboard section of the tank is perfectly dry, while the dust and dirt on the inboard section is visibly wet.
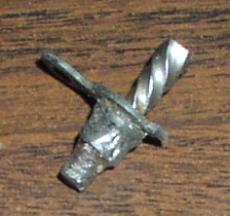
One surprise came about when Marty tried to remove the left tank cover. He had removed all screws but the cover seemed attached in the area of a single screw. It turns out that the goofball mechanic who pulled the tanks prior to painting in '95 obviously had problems removing a screw, so he tried to drill it out. Problem is he drilled it off-center and broke the bit off in the nutplate. Rather than FIX the problem, he just sanded it flush with the wing surface, drilled a new hole beside the bit, installed a new screw and allowed some filler and paint to cover his tracks. Talk about a half-ass job!
Marty had to do some fancy drilling of his own to get the tank cover panel to come off, and then he had to remove and replace the nutplate. Leave it to Marty to do the job RIGHT!
A Week Later...Senders In House
The following weekend, I was planning to be in the neighborhood visiting a friend, so I took a chance and drove out to the airport to see if Marty was around, with the express purpose of getting a pic or two of the fuel senders and other parts before they were installed.
 As luck
would have it, Marty was at the airport attending to other things
and he told me that the senders had arrived. We pulled them out
of the box and I was immediately impressed with the results of
the overhaul. Airparts of Lock Haven, Inc. did a beautiful job on
these senders...I didn't even recognize them. They had clearly
been dismantled and cleaned up nicely. The wooden float had also
been replaced and resealed. And, yes, you read that right --
these Stewart Warner senders actually use WOOD as the float
material. I had been expecting a sealed metal float like they use
in carburetors, but no such luck.
As luck
would have it, Marty was at the airport attending to other things
and he told me that the senders had arrived. We pulled them out
of the box and I was immediately impressed with the results of
the overhaul. Airparts of Lock Haven, Inc. did a beautiful job on
these senders...I didn't even recognize them. They had clearly
been dismantled and cleaned up nicely. The wooden float had also
been replaced and resealed. And, yes, you read that right --
these Stewart Warner senders actually use WOOD as the float
material. I had been expecting a sealed metal float like they use
in carburetors, but no such luck.
All I can say is that if you have a 172 and haven't looked at your senders in 15+ years, you really need to pull them and have them overhauled. I'd hate to have this wood break off and find its way to the tank pickup. I'm not so concerned about fuel starvation (our fuel selector has a "Both" position and we have access to another tank, after all) but rather the need to pull the tank to remove the errant float. That's a lot of work, and far more costly than $125 per sender.
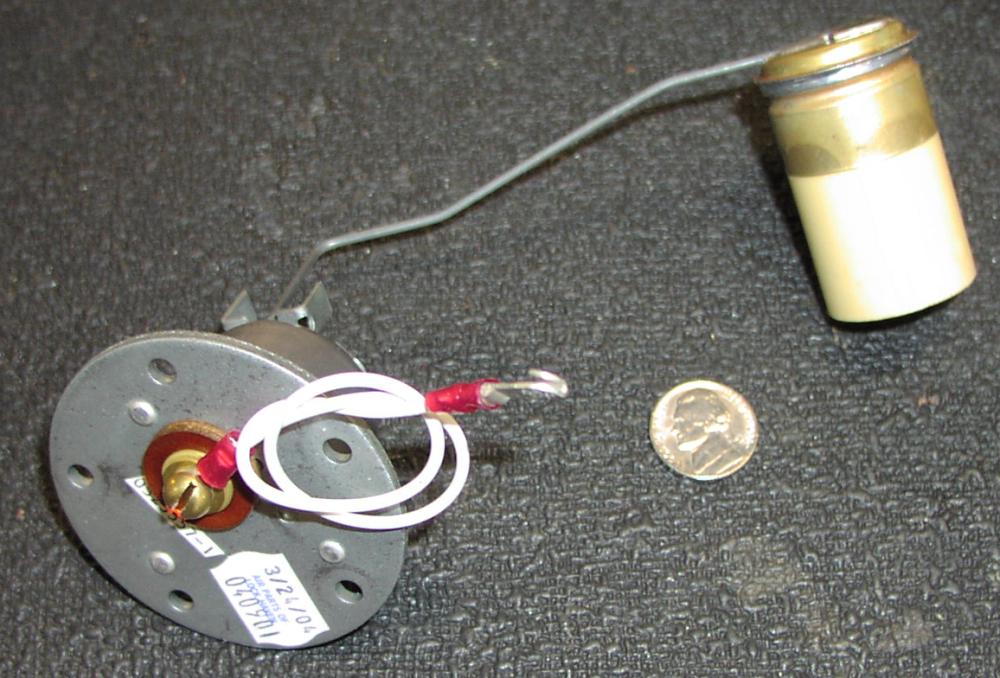
If you look closely at the body of the sender, you'll note that a jumper lead has been attached to the terminal, the screw has been torqued, and inspector's lacquer applied. According to Air Parts, this is now done to prevent leaks that result when mechanics over-tighen the screw during installation. And speaking of installation, we asked Air Parts to supply new rubber gaskets for both senders, so we'll be installing those as well.
 The
OEM Cessna fuel gauges have always sucked. They provide
predictable readings (so we could diagnose a gross fuel leak from
an open fuel cap, or whatever) but I've never relied on them
beyond that. The gauges themselves are probably at fault here,
but a gauge is only as accurate as the sender. For that reason, I
was glad that the senders were calibrated as part of the overhaul
procedure.
The
OEM Cessna fuel gauges have always sucked. They provide
predictable readings (so we could diagnose a gross fuel leak from
an open fuel cap, or whatever) but I've never relied on them
beyond that. The gauges themselves are probably at fault here,
but a gauge is only as accurate as the sender. For that reason, I
was glad that the senders were calibrated as part of the overhaul
procedure.
Since a panel upgrade with all new engine instrumentation is not out of the question, and ordering of new fuel gauges requires knowledge of the senders' resistive characteristics, Marty suggested I use his volt-ohm meter to test the senders and record the information for later use.
With one test lead touching the body of the sender and the other the brass screw leading to the resistive element, I moved the float arm to a position representing a full tank and measured about 32 ohms. With the arm positioned to show an empty tank, 230 ohms appeared on the meter. So it appears that this is an industry-standard 220 ohm sender whose resistance varies with the inverse of the fuel level.
If you're wondering what "high technology" the sender uses to produce the change in resistance, you're going to be disappointed. The float arm is connected to a simple wiper arm that moves across contact points of a resistive element that looks a lot like a high-power rheostat. I tried to take some pictures of it, but was unsuccessful. Trust me...like everything else on this airplane sans the GPS, this is 1950's tractor technology. No super-accurate capacitive fuel senders here, folks!
Delivery Day
The parts we'd been waiting for, including fuel caps / gaskets, filler neck gaskets, structural stainless steel screw kits, and new rubber rub strips for the tank straps, finally arrived mid-week.
Marty got to work and managed to finish up in time for a Saturday delivery. Unfortunately he wasn't able to do a test hop (the delivery flight down to Old Bridge WAS the test hop), so during the post-flight inspection he and I were both surprised to find a bit of a fuel stain aft of the right tank fuel drain. Fortunately, the top of the wings were perfectly dry, so it initially appeared that while we had fixed the leaks at the top of the tanks, fuel was still leaking from somewhere on the right tank. We decided to continue the trip back to Sky Manor and take a closer look at it.
 My crew
partner and I took some time to have a late lunch at the Sky
Manor restaurant while Marty pulled the wing root panel to have
another look at things. On the flight over, we noticed moisture
trailing off the relatively new flush fuel drain replaced during
a recent 50 hour inspection, so Marty suggested replacing that
drain again. I agreed.
My crew
partner and I took some time to have a late lunch at the Sky
Manor restaurant while Marty pulled the wing root panel to have
another look at things. On the flight over, we noticed moisture
trailing off the relatively new flush fuel drain replaced during
a recent 50 hour inspection, so Marty suggested replacing that
drain again. I agreed.
After Marty buttoned everything back up and I took a few pictures, my crew partner and I flew home and touched down a half hour later. After we reacquainted the airplane with its hangar, we found the right fuel drain completely dry.
My heart sank a bit as I noticed some gooey blue/green staining exiting one of the seams in the skin just aft of the fuel drain, but I quickly realized that this was not raw 100LL -- rather, it was leftover fuel dye mixed with preservative oil Marty sprayed throughout the area. I expect that it will seep out of the wing panels for some time, just like the anti-corrosion chemicals do.
Final Thoughts
This fuel leak was actually several leaks disguised as one:
- Fuel Caps: The fuel caps were old and would not seal properly. This caused fuel to stream out of the cap vents and back over the wing. Misalignment of the caps caused the vents to be open to ram air flow. I'm not sure if this had anything more than a cosmetic effect, but at least now they're aligned properly.
- Filler Collar Gaskets: These simple cork gaskets obviously don't last forever. I'm not sure why they're cork rather than rubber, but it may have something to do with the use of dissimilar metals (aluminum tank, steel collar) and rates of expansion.
- Fuel Senders: The rubber gasket around the sender's mounting flange as well as a leak through the hole provided for the sender wire contributed to the leak on the top of the tank.
- Fuel Drain: 100LL evaporates quickly, so if you see a droplet of gas hanging around a fuel drain in flight, it's leaking continuously. We thought the fuel was coming from the top of the tank (and some of it obviously was) but the drain was leaking after all.
Fixing a fuel leak of this sort is very much an all-or-nothing deal. If you have to go through the pain associated with removal of the tank covers, common sense dictates that you inspect and overhaul everything that won't see the light of day for another 15+ years.
 When you
replace the tank cover screws, note that they MUST be structural
screws. You can't find these at Home Depot. Buy them from an
aviation parts distributor.
When you
replace the tank cover screws, note that they MUST be structural
screws. You can't find these at Home Depot. Buy them from an
aviation parts distributor.
If you're about to paint the airplane, you can get away with cadmium-plated steel screws, as the paint will protect them from exposure to the elements that will invariably cause them to rust. If, on the other hand, you are replacing the screws during a repair such as ours, then you'll need to use stainless screws. Note, however, that stainless screws (even the structural type) aren't as resilient as cad-steel, so you may damage a greater number of the screws on any subsequent removal. Fortunately, tank removal isn't done every day, so this should be a non-issue for most aircraft.
In retrospect, I think we should have pulled the right tank and had it bench checked just to be sure it was 100% leak free. If it turns out that we merely cured a few of the larger leaks and the tank is cracked somewhere, we'll need to pull the right side cover again. Granted, we saved some money by not pulling the tank, but we'll easily lose more than we saved if we must pull it after all.
Finished Just In Time
On the drive home from the airport, the airplane safely back in its hangar, I reflected on the fact that over the last six months, the airplane had been in the shop or restricted to local area operations for slightly over half that time.
While that kind of downtime is enough to drive any airplane owner crazy, (after all, the fixed costs keep coming, whether it flies or not) I was glad that we'd accomplished everything during the winter months. I missed out on some good winter flying, but the airplane is ready -- just in time -- for the summer flying season.
In fact, we'll be kicking things off with a trip down to Jacksonville, Florida to see my sister married in early May. Naturally, I've offered to give airplane rides to willing family members, and it will be comforting to know that I've done everything in my power to ensure a safe flight for all involved!