


Deer Hit
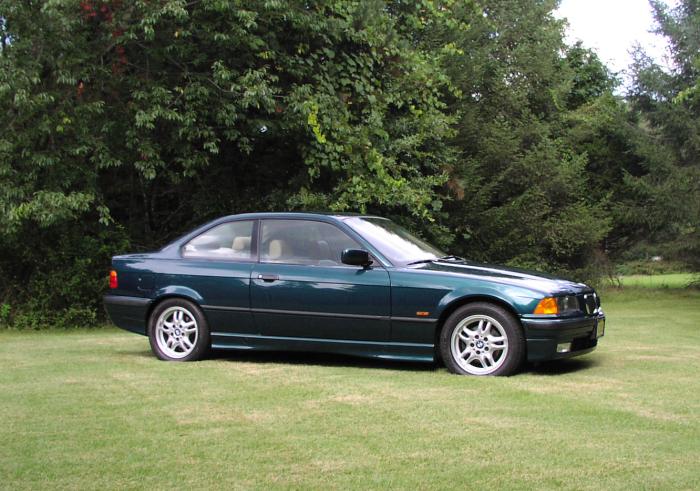
A chance meeting with a deer on a dark road provides
an opportunity to give this six year old car a needed facelift.
Nothing Lasts Forever
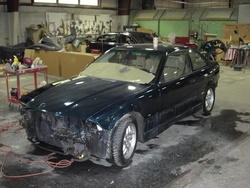
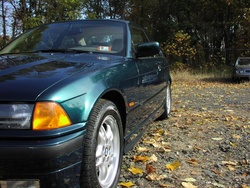
Over the past six-plus years I've owned a BMW, I've driven past them a hundred times. Almost hit them at least a half dozen times. It was only a matter of time. A week ago my luck ran out, and a deer decided to leap (at full speed mind you) into the left side of my beautiful BMW.
Long ago I came to the realization that my BMW was no longer perfect. It had its share of sandblasting from the morning commute, and then there was the ding on the rear put there by a careless monkey tire changer while I was pinching pennies on tires. However, after all this time, the sides of this car were PERFECT. All those years of using what I've semi-jokingly referred to as "BMW approved parking" (a parking space away from crappy cars, uphill of shopping carts, and out of earshot of minivans with lots of screaming kids), had paid off. Not a scratch or a ding on the sides of this car. Until now, that is.
Oh, S***
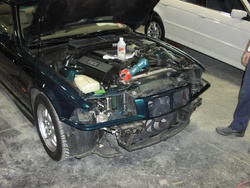
Within about 5 seconds of the strike, I had completely written off the car. Given the force of the impact, I thought the entire left side of the car was trashed, and convinced myself that I would be going to the dealer the following morning to put my deposit down on a new 330ci. I was only about 1000 feet from the end of my driveway when it happened, so I drove up to the house to get out and take a close look at things. I couldn't believe my eyes. I was only missing the left rear view mirror cover and for the life of me I couldn't find any damage. I went back to the scene and managed to find the mirror cover and popped it back on. Aside from a small chip in the plastic and a few broken attachment clips, it held remarkably well.
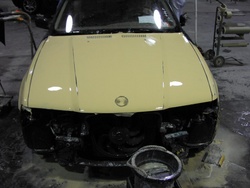
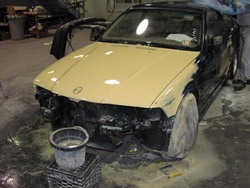
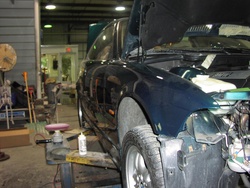
Of course, that was at 11PM at night. Lack of light can hide many sins, so it didn't really surprise me when, under the bright light of day the following morning the damage became evident. It included a couple of small dings on the top of the front quarter panel and near the rear of the driver's door, and a scratched / distressed rear rim. There were also a lot of fine scratches in the clear. After a full wash and wax, I managed to compound out most of the fine scratches, but the depressions in the metal were unmistakeable.
Pass on paintless dent removal
Since the damage wasn't that bad, and the car does have over 105K miles on it, I wasn't expecting perfection in any repair, so I considered going with a paintless dent removal service. My goal was to get the car back to normal as quickly as possible, so I made arrangements a couple days later with the same company that does my dealer's work to take a look at it.
To make a long story short, I wasn't favorably impressed with their assessment. As it turns out, the biggest dent on the car was too close to the rear reinforced edge of the door to be correctable, and several other dings were in long, but subtle lines (apparently where the deer's ribs slid as the car moved past). The chance of adding ripples to the metal rather than removing the dents made me rethink this option almost immediately.
Like a Good Neighbor...
I had earlier made a claim with my insurance company for the damage, not really thinking that I'd get anything out of them. However, as a matter of procedure, they said they'd send out an adjuster and he would make an assessment of the damage.
I made arrangements to meet the adjuster in the parking lot at work. I mentioned that I had obtained a quote for paintless dent removal for approximately $150, but related that the largest dent could not be repaired in that manner. He agreed with me and proceeded to take close snapshots of the damage. "Don't worry. We'll fix it the right way", he promised.
I walked with him around the car and pointed out the other damage, including a scratched/gouged rear left rim. I also told him that the one-touch up feature of the driver's window no longer worked reliably -- the window would stop in various positions. It was still possible to close the window by holding the button down, but, hey -- this is a BMW, not a Ford. I don't have to tolerate that!
When the adjuster caught his eye on the ding on the rear of the car I told him how it had been created earlier and that I had planned to have the body shop fix that on my nickel while they had the paint mixed. He said "oh, don't worry about that...that's really quite minor and the estimate will include enough extra padding in labor and materials to cover that". He then went back to his van and proceeded to work up a quote to repair the damage using, interestingly enough, the same software body shops use for their estimates.
By the close of our meeting, I'd learned that he'd provide enough money in the claim to effectively paint the entire side and nose of the car. Why paint that much, you ask? Well, they have to paint both the driver's door and a portion of the front quarter panel to fix the obvious damage, then blend it into the surrounding panels. The problem is that all the existing damage from road debris would make it difficult to blend the paint properly. If this had happened in the first six months of ownership, they probably could have painted the door and a small portion of the quarter panel and been done with it. Such is the price for repainting an older car. Done correctly, it's an all-or-nothing affair.
Choosing the Shop
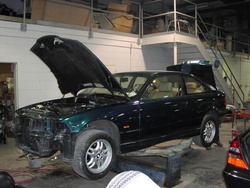
Once I had an estimate in hand, I had to choose a shop. I'm somewhat fortunate in that my brother has repaired more of his cars than I can count (so he's been down this road before), and I know of two shops that could have done the work. In other words, I know people in the biz and how the biz works. The downside is that both of the shops were relatively far away and I really wanted to keep an eye on the shop's progress. I also didn't like the idea of body shop personnel doing things a trained BMW mechanic should do, like swap the damaged rim, spin the new one up on a road-force balancer, and troubleshoot the problematic driver's side window motor.
I had known for some time that there was a body shop behind my dealer. They weren't owned by the dealership, but did a lot of their repair work. I asked my mechanic about them and he didn't have anything bad to say. I checked the BBB for negative reports and found none, so in the interest of convenience I ultimately decided to give them the job. I knew at that point I could stop by on my way to work every day to check on the progress, take pictures for the site, and have my very own mechanic that I've come to know and trust take care of the critical mechanicals.
Another important criteria for the shop was that they used computerized color matching to achieve the best match. Years ago, color matching was very much a trial and error process, and all too often resulted in the need to paint the entire car to effectively circumvent the matching process. Today, modern body shops utilize computerized color matching and auto-mixing systems to achieve a color almost indistinguishable from the original.
The owner of the shop did caution me that there was something he couldn't match -- new clearcoat to 6-year-old clearcoat. Seen in good light, it would be relatively easy to distinguish the newly painted surfaces from the old. I accepted that as a matter of course, but discounted it somewhat due to the fact that I have taken very good care of my paint so I knew the original clear was in pretty good shape for its age. I also asked them to buff out the entire car to clean up minor imperfections and effectively repolish the old clearcoat.
After this discussion, the shop owner asked me to bring the car by the following Monday...a bit earlier than his original 2-week leadtime estimate.
Week One
I dropped the car off Monday morning as they requested and came to find out Tuesday morning that they had just started work that morning. That kind of irritated me for a few seconds because while my insurance company was reimbursing me $16 a day for the rental car, I elected to upgrade to something more than flea power (a 2005 Toyota Corolla) for $25+various fees per day. In other words, I was paying about $15 a day for the privilege of driving a piece of junk while my car sat idle.
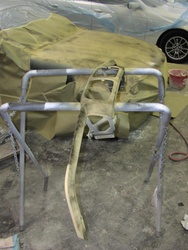
Fortunately, once they got started, things happened pretty quickly. I arrived Wednesday morning to find they had completely disassembled the components that would be repaired or removed to facilitate repair of an adjacent area. I found they had also prepared and started to fill and sand some of the more obvious damage areas yesterday, and had just put some filler on the dings in the top of the left front quarter panel. As my father used to say...progress is our most important product!
Week One Highlights
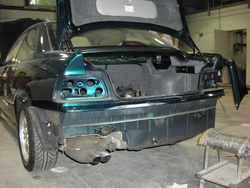 The tail lamps had to be removed to prevent overspray problems while painting the panel immediately below the trunk. That area, incidentally, had nothing to do with the deer hit. It just made sense to pay extra and do it now while they had paint mixed. |
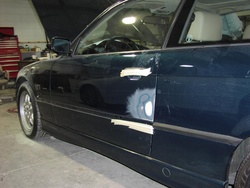 The most obvious damage was on rear of the driver's door, but there were also ripples and subtle dimples in the metal farther forward on the door as well. |
 I love the smell of fresh body filler in the morning! In this case, we were covering two really obvious dings. These were in many ways worse than the door dings because the sunlight really highlighted them. |
 I made the decision to buy new headlamp lenses (my $$$, not the insurance company's). I figured that the pitted, slightly foggy lenses would really look like garbage against the backdrop of new paint. |
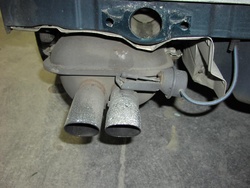 If you've heard a noise from the rear of the car shortly after starting the engine, this is it...a solenoid that closes off one of the muffler exhaust paths to increase backpressure and improve idle performance. |
 The next day, I saw masking. A lot of it! Here's the rear panel following primer and the application of a guide coat used to aid wetsanding the surface smooth. |
 Here's their first attempt at a door repair. While looking at these pictures that evening, I realized that the tech working on the car might not have picked up on the damage further forward on the door, so I reminded them about it. |
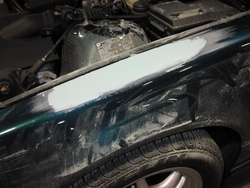
 When I said we were going to paint the front of this car, I wasn't kidding. Even in this state, I could see 105000 miles worth of highway pitting going, going, GONE! |
 The front grill assembly was also pitted fairly heavily. so I insisted we paint this in addition to the hood. The difference betweeen the two would have been unmistakeable otherwise. |
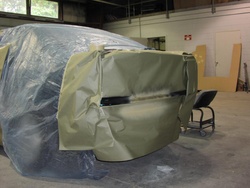
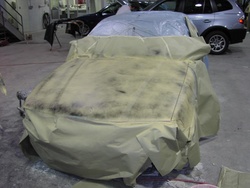
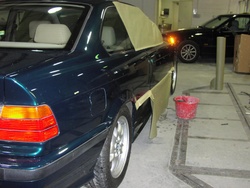
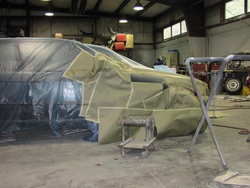 It's critical to ensure the remainder of the car is covered and masked properly to prevent overspray. |
 Fortunately, my BMW wasn't the only one in the shop. In fact, BMWs seemed to outnumber every other make. That certainly made me feel a bit better, since they use the same paint system BMW uses on the assembly line. They're used to blending that paint. |
 And on the fourth day, there was WET SANDING. Notice that the guide coat is gone, which highlights the fact that the entire surface has been sanded to at least a small degree. |
 Just another perspective on the state of the car during wet sanding and how they try to keep the sanding water off of stuff like the rims and tires. |
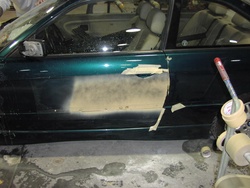 Here's attempt number two at the door repair. Filler, primer, guidecoat, lather, rinse, repeat. This portion of the damage was pretty subtle...the shop owner had to step back about 25 feet and allow the light from the shop windows reflect off it "just so" to see it. |
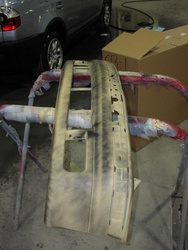 When I saw the front bumper cover off the car, it really looked terrible. The bottom was a bit chewed up and the paint was horribly pitted. When he told me it would be $200 extra to do this, I gladly took the hit. It made absolutely no sense to NOT do this now. |
Week Two
The start of week two began in a promising light. It turned out the car spent a good portion of Friday in the paint booth. Monday through Wednesday were spent buffing out the car, while on Thursday it emerged from the body shop for the first time in almost two weeks...only to wind up in my mechanic's bay to replace the faulty window motor.
After checking my records, I realized almost 5000 miles had elapsed since my last oil change in August, so I asked my mechanic to do a mid-cycle oil service while he was at it. Since the body shop often sticks cars into the dealership's schedule where appropriate, I figured that would save me an appointment and a couple hours one morning.
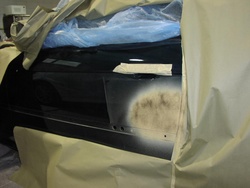
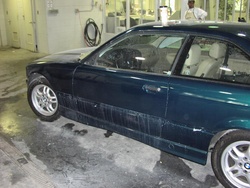
Unfortunately, while buffing out the car the body shop personnel found a couple imperfections in the paint and tried to buff them out. That didn't work, so they wound up stripping, repriming, and repainting a couple areas. Again, not news I wanted to hear, but better than them trying to pawn a bad job off on me. I arrived Friday morning to find the car locked up tight in the paint booth, along with my hopes to have the car returned to me for a weekend trip.
Week Two Highlights
 I interrupted the guy doing the buffing for a moment to take some pictures of the fresh paint. During the buffing process, the clear is polished from a hazy appearance down to a mirror like shine that people associate with a finished paint job. |
 A closeup of the fresh paint. The surface is dirty with buffing compound, so it's nearly impossible to tell how good the final result will be until it's totally cleaned. |
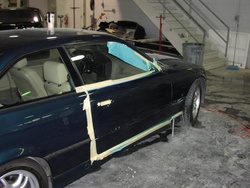 Another indication of how much masking goes on to keep the paint where it should be. Notice that they had to remove the rear view mirror to effectively blend into the door. |
 The light was a bit better on this side, so I figured I'd take a first snap of the door. They removed the door handle trim prior to painting. |
 The most striking difference came when I noticed the grill section and front bumper cover. The results made all the work worth it. They looked great, and they weren't even buffed yet. |
 Something fell off a slammed Honda Civic a year or so ago and damaged the bumper cover. They repaired that damage and the cover looks as good as new! Never thought I'd get that fixed properly, but now was the time. |
 The next day, I arrived to find the car on the lift they used to make the task of reassembly a bit easier on their backs. The damaged left rear tire was also removed and sent to my mechanic to refit the tire on the new rim. |
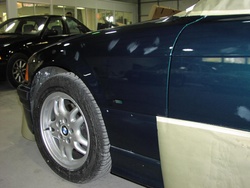
 I sighted down the car to ensure the finish was as I would expect. The driver's door didn't look that great at this point, but I didn't want to pronounce judgement until delivery day. |
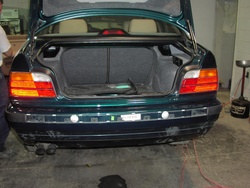 Assembly is underway. Here the work on the rear panel below the trunk is done, so the tail lamp lenses are reinstalled. |
 The car left the body shop briefly only to find it's way to my mechanic's bay for troubleshooting of the window one-touch-up feature. The result? A new window motor. The new one is installed and the original is in the background. |
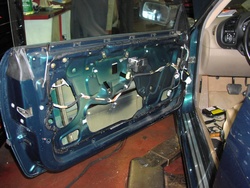 Access to the window motor follows removal of the door panel (pretty easy) as well as a glued-in insulation panel. The regulator assembly is reinstalled with large blind rivets. |
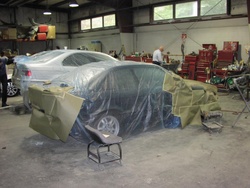
 First picture of the new nose. New headlamp lenses (my nickel), new grills (because the shop accidentally broke the retaining tabs upon removal), and, of course, new paint! It looks like the day it came out of the showroom. |
Week Three
Although I'm a pretty mellow guy most of the time (it's in part how I deal with stress), I found once again this week that my patience has limits.
This was underscored in two ways. First, I really wanted my car back and was getting a bit tired of seeing the car "close, but no cigar". Second, and perhaps more disturbingly, I also found myself dreading driving that POS Corolla. It had no power, handled like crap, didn't even have ABS, and (here's the kicker) was equipped with the most ANNOYING safety belt reminder system.
I felt like I was 2 years old and I was driving with my mother in the car. BUCKLE UP, BUCKLE UP, BUCKLE UP. The car literally wouldn't let me forget that I hadn't buckled my seatbelt once the car started moving. Now, I do wear my seatbelt all the time, but this was totally f'ing ridiculous. As if the three beeps immediately after start aren't enough of a reminder to buckle up.
Worse yet, the car lacked the intelligence to determine if the driver was no longer "violating protocol". If I got out at the end of my driveway to pick up the mail, and then hopped in for the short drive to my garage without buckling in, the car would incessantly beep and flash a light in the cluster at me. It would continue even if I reached the garage, put the car in park, and got OUT), as if to say "you're too f'ing stupid to think for yourself, so we, Toyota, and our attorneys will think for you".
In retrospect, I spent way too much time considering how I might defeat this stupid feature if I actually bought one of these cars. Fortunately, I eventually I woke up and thought "well, Toyota, thanks for the test drive. I won't be buying any of your POS, non-performing, nanny cars". Way to boost sales, dumbasses.
Sorry for the rant. It's been a long three weeks. On to the highlights.
Week Three Highlights
 Here we are back in the body shop. One of the guys burnt through the clear trying to repair a small section, so it was back to the paint booth with her. |
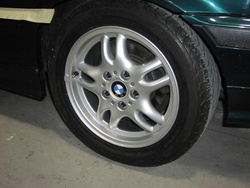 I love the look of the new rim. Now I wish I had three others just like it. But, I may get my wish after all...I may buy that set of M3 17's I'd been looking at for next season's summer tires. |
 Tthis is immediately after shooting the clear. The surface has tons of irregularities and LOTS of orange peel. All par for the course before sanding and polishing. |
 Those small scuff marks are the result of sanding to remove small dirt particles and other surface irregularities from the clear. |
 The morning of delivery day, the entire side of the car had swirl marks leftover from buffing, and one area below the quarter panel moulding hadn't been fully buffed out. |
 The door also needed some additional buffing, as I could see a lot of waviness in the surface. |
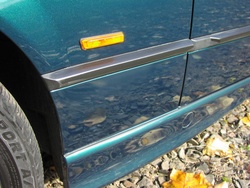
 The right side of the car was pretty well perfect (or at least as perfect as it was originally). The front quarter was painted, of course, so gone is the pitting from the morning commute. |
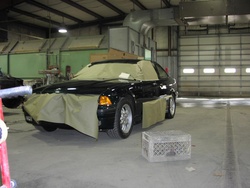
 3PM on delivery day. They had just completed hand glazing the car and aside from some leftover glazing material on the surface, the left side of the car looked a LOT better. |
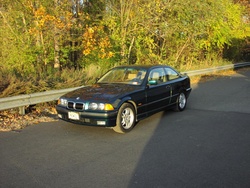
 Okay, ready to ride. Let's avoid the deer AND the police for a while, eh? |
Conclusions
As I write this, I haven't yet had the time to fully detail the car and look at it very close up, so I don't know if there are still flaws that I may need to have fixed. However, I can say that from a 10000 foot view the car looks much better than it did. One thing is certain -- the front of the car looks like the day it rolled off the showroom floor.
Preparation is the key to a good paint job. It takes 99% of the time. My car was painted and cleared in a few hours...after a week of prep. When it comes time to paint, laying the base coat is as critical as ever, but most of the guesswork has been eliminated by color matching systems. It's possible for a reasonably modern shop with reasonably experienced personnel to match paint pretty well today. Years ago, even the top guys had trouble matching paint exactly, especially if it wasn't listed in the color book and they had to shoot lots of test pieces.
Equally, if not more critical, in my opinion, is the second part of the paint process -- application of the clear coat. Clear gives the car the "wet look" shine, however, when clear is first applied it has a lot of ugly texture and looks relatively dull. To achieve the final result, the clear is sanded to a near opaque haze that is smoother in texture, and then polished to a mirror-like shine. If the clear is sanded irregularly, you'll see that as either orange peel (surface texture mimicing the well-known fruit) or just an uneven surface when viewed just the right way, in just the right light. The guys reworked areas of my car a couple times to get it just right.
The best place to examine a paint job is under high intensity white indoor lighting...like that produced by mercury vapor or metal halide fixtures. High pressure sodium fixtures produce that classic puke orange color of city streetlamp fame, and can be used to see surface imperfections, but it won't necessarily help you see color variations because the light quality doesn't render colors (and color differences) very well.
My greatest concern about body work is that I think there are very few artisans left in this business, and those that do great work charge for it -- in fact far more than the insurance companies will pay for. So, unless you don't give a crap about how your car is repaired, you're likely to pay out of pocket a bit more than your deductable.
The total costs for this little side trip? Approximately $3400 for body work. Insurance paid $2800 of that. The $600 difference included my $100 comprehensive coverage deductable and $500 of extras I ordered when it became clear that there was only one right way to fix the car...insurance coverage be damned. I returned the loaner at the end of the 17th day, and paid $230 of the $500 bill. Needless to say, I highly recommend having rental car coverage on your policy. Mine certainly paid for itself.
Conclusions Part 2 -- [Updated 2/2007]
At the time I wrote this article I felt the need to be diplomatic about the results of the work but the car has been repainted (twice, actually) since then and any warranty the shop may have provided is long since expired. So now I think I'll speak my mind. I learned several important things from this experience (and truthfully, the later work by another shop) that hopefully will help you pick the right body shop when the time comes:
- Make a point of telling the shop owner or estimator that you expect a perfectly smooth finish and transparent clear. If the shop suggests orange peel or any hazy or grainy texture in the clear is normal or acceptable, consider that a red flag and find another shop. Clear can and should be mirror smooth. Sighted from any angle, you should not see any irregularity or defects in the finish and the basecoat should appear as if wet. The problem is doing this properly takes time, and time is the shop's enemy.
- Insist the shop tint the primer to the body color. This shop failed to do that and I didn't know any better. The result? Over the next six months the daily sandblasting received during the commute caused the front of the vehicle to develop many very small nicks which exposed the contrasting primer. This made the car look worse than it had over the prior seven YEARS of service. I'm not exaggerating. It really looked like crap. When I hit a second deer head on in 2006, I considered it a blessing because I knew I could finally justify repainting the front of the vehicle and eliminate the eye sore.
- Insist that the shop apply a spray-on, water-soluble protective film on the parts of the car that will NOT be worked on in order to protect the car against overspray and the usual dirty body shop environment. These protectants are expensive, which explains why average shops use sheets of plastic to cover the car. If the shop says they don't use those films or refuse to, tell them they're being penny wise and pound foolish -- as you walk out the door to find another shop.
- Replace body panels rather than refinish them if at all possible. One possible exception might be the rear quarter panels which are far more difficult to replace due to the way they tie into the roofline. The time (labor) necessary to strip parts and properly prep them for repainting will almost always be more than the cost of new parts and the cost of labor to prep the new parts. The hippie in me also suggests that the less chemical stripper we release into the environment, the better. Even if it costs me money out of pocket, I'll do my part to save the earth.
- Don't ever trade quality for convenience. I thought I'd do myself a favor by choosing a local shop because the shop I oringally wanted to use was over an hour from my house. I wound up screwing myself big time, as the job resulting from the local shop was so bad I could have done a better job with a rattle can....and a clogged spray nozzle.