


July 9, 2006
Power Steering Flush
Ever since I realized that BMW's recommendation for "lifetime" fluid on both the transmission and the power steering system was based more on marketing rather than engineering, I decided that I would flush the fluid at an interval BMW recommended before the advent of "free" scheduled maintenance, or around 30K miles.
In the process of creating my BMW Maintenance Schedule Worksheet, it dawned on me that it had been almost 30K miles since I replaced the steering rack and had the power steering fluid flushed. Flushing the fluid is easily a DIY project, so I bought the necessary tools and materials and did it myself. The lessons learned are in a DIY article.
Replacement of Fuel Tank Stone Guards
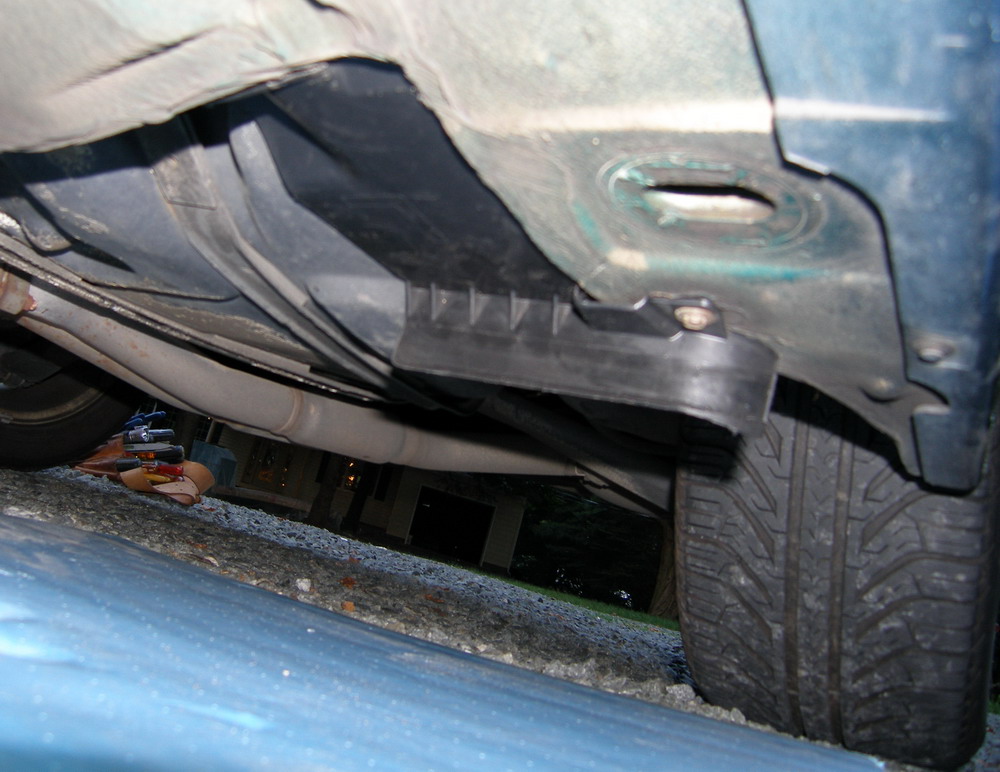
If you've ever looked under a BMW, you may have noticed some out-of-place plastic strips about a foot in front of each rear wheel. They are about 6" wide and extend about 1" below the bottom of the vehicle. The reason I noticed mine more lately is that they were broken almost in half and hanging down.
 I
must admit I speculated a while about the true purpose of these things. My
initial thought was they had something to do with deflecting the water stream
that forms behind the front wheels in deep water, but they didn't seem positioned
properly to serve that role. I quickly gave up and asked my technician for
the scoop. He told me they serve two roles...
I
must admit I speculated a while about the true purpose of these things. My
initial thought was they had something to do with deflecting the water stream
that forms behind the front wheels in deep water, but they didn't seem positioned
properly to serve that role. I quickly gave up and asked my technician for
the scoop. He told me they serve two roles...
Apparently, BMW research revealed that the vast majority of flat tires occur on the rear tires because the front tires pick up whatever debris is on the road (like a stone or nail) and tend to rotate it to the vertical, pointy edge facing upward, just in time for the rear tire to run it over. The guards act as a vortex generator of sorts and create localized airflow turbulence necessary to help deflect the debris. Always the amateur aerodynamist, I'm seen my share of vortex generators and I know they really do work wonders...on airplanes...but I remain skeptical of this application.
Of course, the large horizontal surface of the guards also serve the completely legitimate and practical role of protecting the sides of the fuel tank from road debris, and it's for that reason that I decided to replace them.
The only thing that made this difficult is that I couldn't find the part numbers in the usual places, so my technician told me that I'd have to pull the parts to find them. That turned out to be very easy -- they're only held on by a 10mm bolt and what I believe to be a 6mm nut holding each part on. Incidentally, I didn't have any metric sockets below 9mm, so I used a 5/16" socket on the smaller nut and it worked fine. If you don't want to bother removing them, the part numbers on my 1998 coupe are 51 71 8 130 071 and 51 71 8 130 072 (yes, they're one digit off). The part numbers for your specific vehicle can be found in the BODYWORK->SIDE PANEL / TRIM section of realoem.com or your dealer's parts software.
Replacement of Miscellaneous Parts
While under the hood one day I noticed that the filter on the secondary air pump inlet tube (runs along the far right side of the engine bay near the top of the fender) was missing. Unfortunately, BMW only sells the entire tube, so I picked up one of those and installed it.
I also noticed that the hose connecting the intake manifold to the brake booster was a bit dried out, so I replaced that out of concern for a vacuum leak that would affect both engine performance and brake booster operation. It only cost a couple of bucks including two new clamps, so that was a no-brainer.
And, while I was looking at the brake booster hose, I got a close-up look at the flexible intake pipe that connects the throttle body to the mass airflow sensor. Cracks in the material were apparent adjacent to the large band clamps, so I figured I'd replace that as well. At $35, this was the most expensive of the miscellaneous parts, but necessary to prevent an intake leak and the many problems that would result from one.
Prep for A/C System Fix
While having some fun during a spirited drive, I had the windows open to vent the interior and heard a strange whining noise coming from the engine bay that varied with engine speed and was most noticeable above 4000 RPM. I initially thought it might have been the power steering pump given that I'd just worked on the system, but on instinct I turned off the A/C compressor and the noise went away. Upon coming to a stop, I heard the usual rattling noises coming from the compressor...only this time they were louder. I resolved at that point to replace the compressor. Another big bill, that's for sure, but it's all part of the restoration process.
Two different OEMs produce compressors for the E36 and there's no way to tell which one is appropriate for the vehicle without looking at the unit. Unfortunately, the information I needed was in a hard-to-reach spot (on the bottom near the rear of the compressor body), so my technician offered to put the car up on the lift. Within 30 seconds we found "Denzo" on the unit and asked the parts department to put one on order. Thanks again to my tech for taking time out of his ridiculously busy schedule to make all our lives easier come installation day at the end of the month.
Total Mileage: 129990, Parts: $92, Labor: $0, Total: $98, Labor Savings: $150