


Friday, September 7, 2007
Hood Hydraulic Lift Cylinder Replacement
 I opened the hood to check fluids last weekend when I realized
the hood wouldn't stay up on its own. It didn't fall quickly under its own
weight so I knew that only one of the lift cylinders had failed, but given
their age I decided to replace both. The units cost $34 each + $6 shipping
from Tischer and arrived in a day. Can't beat that service.
I opened the hood to check fluids last weekend when I realized
the hood wouldn't stay up on its own. It didn't fall quickly under its own
weight so I knew that only one of the lift cylinders had failed, but given
their age I decided to replace both. The units cost $34 each + $6 shipping
from Tischer and arrived in a day. Can't beat that service.
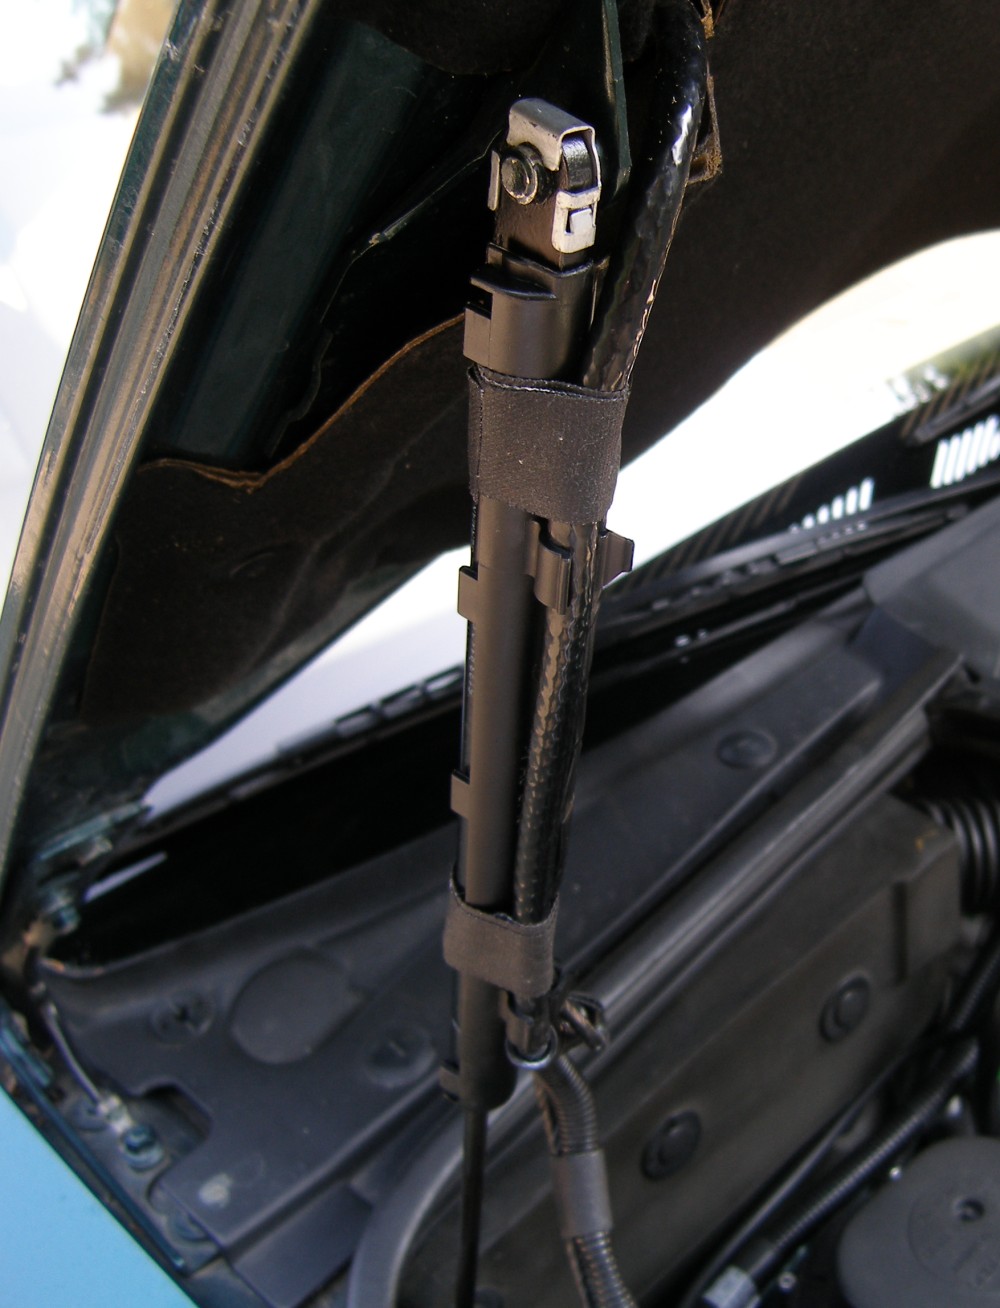
Installation was simple. First I had to figure out a way to prop up the hood while I worked on the lift cylinders. A broom wasn't high enough when put on the floor so I used one of my ramps (about 6" high) along with an inverted oil drain pan (about 4") to elevate the bottom of the broom to the needed height.
To remove the old cylinders I had to unlock the clips holding each end of the cylinder to its respective mounting point. The outer edge of the mounting clips digs into a recess into the mounting rod to lock the cylinder to the car, so I used two small flat-blade screwdrivers to slide the clip up just enough to get it out of the way. With both upper and lower clips loosened, I gave the cylinder a good tug and promptly removed it.
When I removed the right cylinder I found it covered in oil and without any compression. The other cylinder seemed to have pretty good compression, but it wasn't as firm as the new cylinders, so I'd say it was a good call to replace both at this time. Incidentally, the new cylinders came with new mounting clips so there was no need to preserve the old clips but it's important to keep an eye on them because the clips can fall off and wind up wedged in one of the many hard-to-reach areas in the engine bay.
To prep the new cylinders I simply positioned the clips such that the mounting holes were unobscured and then pressed the cylinder onto the car. I twisted the cylinder accordingly to put the "open" end of the clip toward the end of each mounting rod (see the picture for the correct fit on the upper mounting point...the lower mounting point is installed in the opposite direction). This is so the extension on the clip digs into a recess in the rod and locks the cylinder to the car. I pressed the units on and the clips snapped in place. I then tugged a bit on the mounting points to make sure they were tight.
The hood now opens with a vengeance I haven't seen in years and takes quite a bit more force to close. To clean things up I used some fabric tape (similar to that used when the car was new) to secure the wires to the lift cylinder and punched out on that job. The bonus? I saved about $30 sourcing the parts from Tischer and saved $75 in labor doing the job myself.
New Battery
The weather Labor Day weekend was easily the best I'd seen all year. Perfect temperature and humidity, calm winds and clear skies. I had plans to fly the Skyhawk to New Hampshire and even had a friend drive over an hour to join me. When the battery failed a preflight check, I became irritated because we're fastidious about maintenance and rarely have to cancel a flight for a "squawk" (pilot lingo for a maintenance discrepancy). But the preflight runup is designed to provide the pilot with the information he needs to make the critical go/no-go decision and last weekend was a no-go whether I liked it or not.
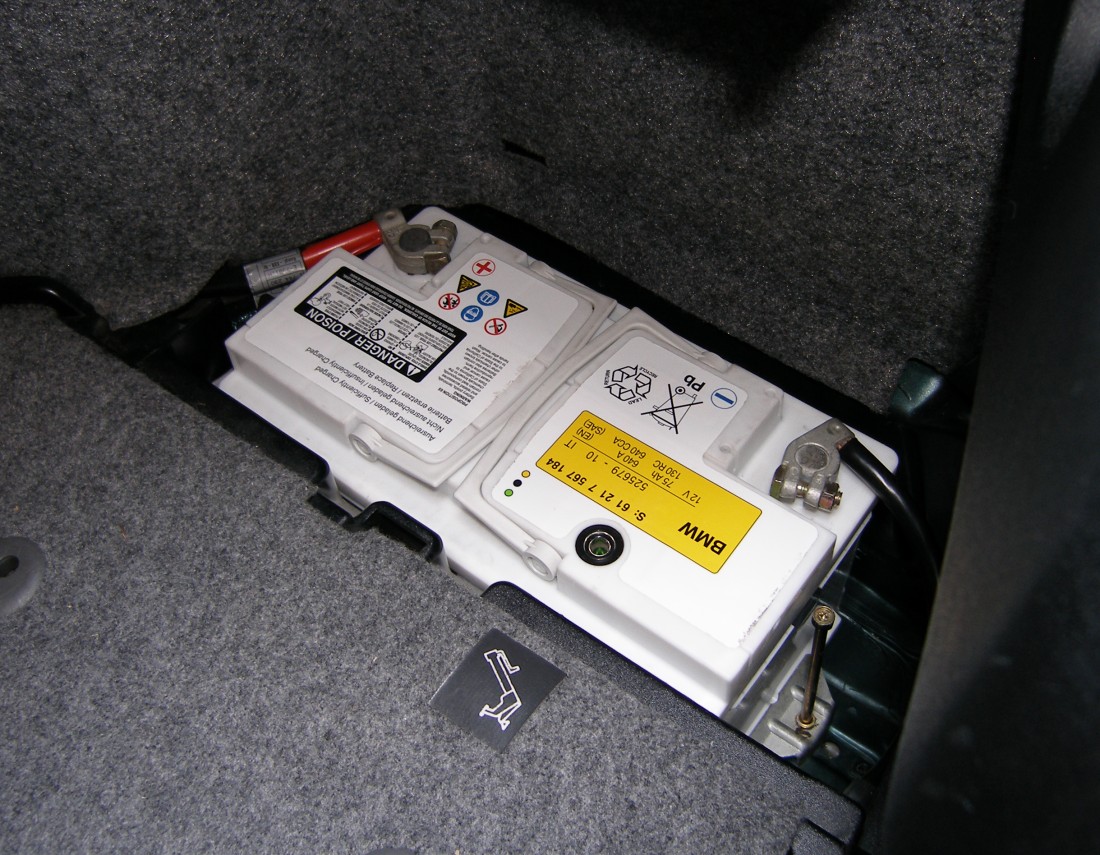
That adventure served to remind me that it had been over five years since I last replaced the battery in the E36. Because BMW puts the battery in the trunk away from the destructive heat of the engine bay it's fairly common to get 5-7 (or more) years out of the OE batteries, but that's not to say a five year old battery is the same as a new one if it gleefully turns over your engine every morning, however.
First of all, all batteries lose ampacity over time due to normal and unavoidable chemical processes, so older batteries simply don't provide the same energy storage as new units. Secondly, and perhaps more importantly, individual cells within the battery can weaken to the point that the battery will no longer take a full charge. If this occurs, the vehicle's charging system will overcharge the battery and hasten its demise while at the same time it places an unnecessary load on the vehicle's alternator. Given the cost of parts and labor to replace an alternator and the potential for physical damage to the car as a result of battery leakage (just because it's "sealed" doesn't mean it will always be so), it's generally better to replace the battery before trouble sets in.
 The
E36 takes a Group 92 battery but very few aftermarket manufacturers make
or stock Group 92 batteries (or so I found). The E36 body can also accept
a smaller Group 48 or 91 battery (originally specified for
318's) but those smaller batteries usually sacrifice some ampacity. Since I
doubt BMW put a larger battery in the 328 just for fun, I decided to go with
a Group 92. That meant buying another OE battery.
The
E36 takes a Group 92 battery but very few aftermarket manufacturers make
or stock Group 92 batteries (or so I found). The E36 body can also accept
a smaller Group 48 or 91 battery (originally specified for
318's) but those smaller batteries usually sacrifice some ampacity. Since I
doubt BMW put a larger battery in the 328 just for fun, I decided to go with
a Group 92. That meant buying another OE battery.
I emailed Jason at Tischer and found that they consider even AGM (so called "starved cell") batteries HazMat, so they could not ship one to me. I placed calls to my local dealers and found widely varying prices. Circle BMW in West Long Branch, NJ gave me the best quote so they earned my business. As luck would have it, they are located a couple miles from my office, so I went over at lunch yesterday and picked up the new unit. When I got home, I took the Battery Tender off of the E46 and put it on the new battery to top it off overnight so as not to put a heavy load on the charging system when using it to start the car the first time.
To remove the old battery I removed the vent tube from the front side of the battery and set it aside. Then I followed the same technique recommended to disconnect the battery for any electrical system maintenance -- I removed the negative cable (black) first, followed by the positive (red) using a 13mm socket. After I hauled the heavy battery out of its compartment and set it aside, I decided to clean up the area first with some moistened paper towels to remove the dust that had accumulated over the last 10 years. Then to ward off any corrosion I sprayed the floor compartment with a couple light squeezes of WD-40 and wiped up the excess with a paper towel.
To install the new battery I secured it with the clamp and then replaced the vent tube, followed by the positive and negative cables (in that order). When I reattached the negative cable and heard the CD player start to cycle through the discs, I knew I was in good shape. After the battery was reconnected I entered the unique security code into the radio as well as the time and date into the OBC, and reset the one-touch up power window sensors by pressing and holding each window up button for approximately a second after the window fully closed.
Shopping around and leveraging my BMWCCA discount saved $50 in parts while doing the job myself saved $75 in labor.
Mileage: 149000, Parts: $190, Parts Saved: $80, Labor Saved: $150