


Thursday, November 22, 2007
Microfilter
 As I got up this morning I looked over at my outside temperature gauge and
was surprised to see it hovering in the low 60's. I took this as a
sign that I needed to wash and prep the car for winter so I went outside
to do exactly that. I did some essential detailing, including applying
touch up paint to some chips on the front of the hood and bumper,
polishing in selected areas to remove some water spots, and then applying
a full coat of Menzerna FMJ sealant to protect the finish during the
upcoming crappy weather.
As I got up this morning I looked over at my outside temperature gauge and
was surprised to see it hovering in the low 60's. I took this as a
sign that I needed to wash and prep the car for winter so I went outside
to do exactly that. I did some essential detailing, including applying
touch up paint to some chips on the front of the hood and bumper,
polishing in selected areas to remove some water spots, and then applying
a full coat of Menzerna FMJ sealant to protect the finish during the
upcoming crappy weather.
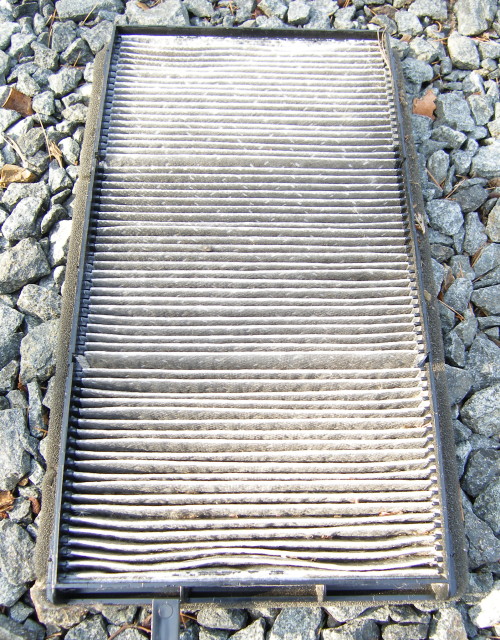
I also decided to replace the microfilter today, about 1000 miles ahead of schedule, because of the nice weather. I mean, why do the job when it's 20 degrees outside when you can do it in short sleeves?
Last time I did this (also the first time I did it as a DIY) I obtained access to the microfilter through the footwell rather than pulling the glove box as the TIS and other more "official" instructions dictate. So this time I figured I'd try to do it via the glove box route, if for no other reason than to document it. Unfortunately, I couldn't get past step 1: removing the glovebox. It takes six screws and I removed them all -- to no avail. The glovebox appeared loose, but would not disconnect from the dash no matter what I did. This may have something to do with the fact that it's only been removed once in the 10 years I've had the car, but I think it had more to do with the fact that there is no real convenient way to get a firm hold on the thing. You can only tug on the door so much before you risk breaking the hinges.
So, the downside is that I didn't manage to get the pictures I was hoping for, but the upside is that I finally learned how to disconnect the wiring harness block necessary to clear a path for removal and reinsertion of the microfilter. As none of the instructions I read (including the TIS) indicated precisely how to disconnect the harness block in question, I made a point of taking pictures of this. My Microfilter DIY article has been updated accordingly. The end result of this newfound knowledge is twofold: I can now replace the microfilter in about the same time as it takes my technician (10 minutes or so) and I now have proof that accessing the microfilter by removing the glovebox and such is a total waste of time.
Incidentally, I found the microfilter a bit cleaner than last time, but I attributed that to the fact that the car hadn't visited any body shops during the service interval. Body shops are extremely dusty and dirty places, and turning on the ventilation system in the shop is a sure way to contaminate the filter. In fact, if you have to bring your car to a body shop, I would consider it essential that you replace the microfilters once the car is back in your possession. They do serve a purpose, but they can't it very effectively if they're clogged with sanding dust.
The microfilters retail for $36 and are best purchased online. This filter was an "impulse" buy at my local dealer while purchasing some other stuff, so I only got 10% off and had to pay the state their unfair share. So I saved only about $5 on it, but that's better in my pocket than anyone else's. As far as labor is concerned this is still a 0.6 job, due mostly to the fact that BMW's own instructions advocate doing it the hard way even though no technicians I know do it that way. Doing this job oneself therefore saves about $80 in labor. Hmmm. $80 + $5 savings for 10 minutes of my day and the satisfaction that I did it myself. Is it worth it? Survey says "YES"!
Winter Tires
Recently I've been throwing around the idea of putting my old 16" wheels back into service cladded with winter rubber. I have a few reasons for this:
- I have six wheels doing nothing right now. My technician told me one of them is bent and I think it is the spare, but spinning them all up would clearly identify it. This would allow me to toss it and reduce clutter in the garage. The cosmetic quality of all the wheels leaves something to be desired, which is why I bought the CSLs in the first place, but in winter service who cares what they look like?
- The Pilot Sport A/S tires are great in snow when new at least, but they are a compromise in dry weather vs. a true summer tire like the Pilot Sport PS2. Here in NJ we typically have only 3-4 months where snow is a possibility, so for a majority of the year I'm sacrificing performance.
- I presently have no snow-worthy tires for the E46. If I put the 16" wheels back on the E36 for the winter, I can put the CSLs with still viable Pilot Sport A/S rubber on the E46 in case the E36 goes down for maintenance unexpectedly and the white stuff is everywhere. Of course, this was one of the reasons I used to justify the CSL wheels in the first place -- they will work on both cars.
- After hauling the original 16" wheels out for a thorough cleaning, I realized that I should have been removing the wheels and cleaning them annually all along. One of the wheels is newer than the others and it cleaned up nicely, but the paint on the interior of the original wheels is stained badly from nine years of road grime. Swapping wheels every winter would provide the opportunity to keep all of my wheels clean and thus preserve my investment.
I haven't figured out if I'm going to go through with this but if I do I'll have to pull the trigger by next month or risk losing stock on the needed tire sizes. It's only late November and Tire Rack is already sold out on one of the few tires available in the needed size.
Mileage: 152170, Parts: $30, Parts Saved: $5, Labor Saved: $80