


Sunday, April 30, 2017
Drivetrain Overhaul Parts List
As a pilot and engineer I have been programmed to not so much as fart without a plan. So this week I adapted a copy of my Parts Worksheet to catalog all the parts, tools and equipment I'll need to execute the drivetrain overhaul project. My primary motivation was of course to facilitate the ordering process but am I also secretly hoping that showing a huge list of parts to my dealer's parts department will make my case for additional (volume based) discounts. They are usually quite accommodating but I'll have to see what happens.
The downside to this effort is that I now have a realistic estimate of the total cost of this project with my routine discounts applied. The slap in the face is that this estimate exceeds my original guestimate by about $3K and the total is well into the five figure range. That said, nearly two thirds of that $3K is tools and equipment and the list presently includes some items for which I can and probably will find cheaper alternatives. Conservatively speaking, I expect to shave at least a grand off the current estimate but even with that adjustment we're talking real money here.
Engine Blueprinting Spreadsheet
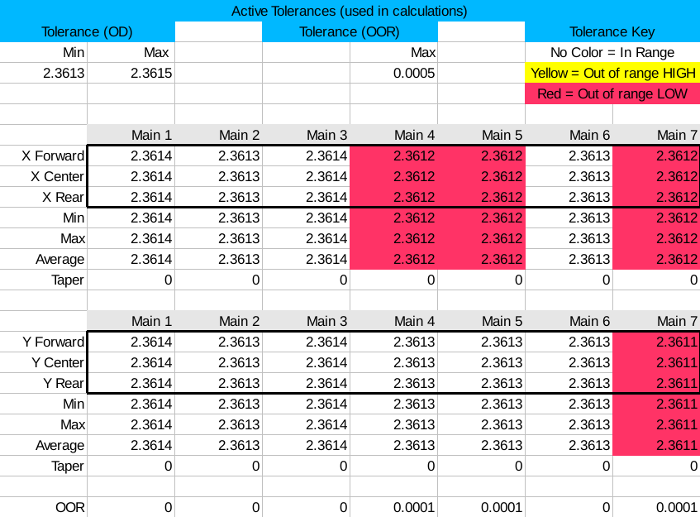
Faced with the need to collect a bunch of measurements and make a lot of simple calculations during the engine build I decided to build a blueprinting spreadsheet in OpenDocument format that would accept the measurements, calculate the various parameters (taper, out of round) required to determine if the parts are serviceable, and validate all tolerances and clearances to ensure the engine is assembled correctly.
I followed 50sKid's blueprinting videos and used his measurements and M54 clearances as the initial inputs to validate the calculations. Interestingly, my spreadsheet instantly proved its worth by revealing a simple math error in his OOR calculation on one of his cylinders. And as intended, it highlights the tolerance and clearance numbers that were out of spec on the engine prior to the rebuild.
If you see any bugs in the worksheet or wish to provide other feedback, kindly let me know.
Update 12/31/2017: The spreadsheet link now points to the version of the document I used during the project and is now specific to the M52.
Transmission Rebuild: DIY or Not?
Years ago I made a statement on this site that I would be willing to try to repair almost anything on the car but when it came to the engine and transmission I would "gladly hand over my credit card" to professionals. How times change. Faced with an estimated $2500 cost to have a professional rebuild my BMW A4S-310R / GM 4L30E this week I contemplated the previously unimaginable -- the possibility of overhauling the transmission myself.
Although the 4L30E, like most automatic transmissions, is a surprisingly complex device, given that most overhauls are nothing more than a IRAN (an aviation maintenance term meaning Inspect and Repair As Necessary) with replacement of all "soft" components (frictions, gaskets, seals, etc.) I think this work is within the realm of a determined DIYer. Watching 50sKid's ZF overhaul videos inspired me to look for some equivalent 4L30E videos but the ones I found were either extremely poor quality (this teardown was posted in 2016 and yet renders in 360P and is taken roughly a half mile from the workpiece so the detail sucks) or taken by Russians who did not caption them in English so I could understand their commentary. Frustrated, I continued my search.
The low hanging fruit turned out to be the reprinting of the GM documentation available for a mere $17. However, despite providing procedures and pictures sufficient to ensure the unit is disassembled and reassembled correctly I think it's safe to say the book is no match for an HD video showing the process or the experience a professional would leverage to judge what if anything beyond the consumables should replaced. For example -- the book shows you how all the clutches fit together but doesn't say anything like "if you see bluing or burn marks on the steels, or they are below XX thickness, they must be replaced". I surmise this is because they assume you will buy all new steels, which is not entirely inappropriate for a remanufacturing process but I'd still like to have this information so I could replace parts on condition and rebuild the unit at a lower cost.
I then found Hans Verhoeven's 4L30E assembly manual (last updated in 2008). That was helpful in clarifying a few more elements of the assembly process but again, as it provides only very low resolution pictures that make it difficult to discern orientation of some of the parts, it is no match for HD video.
One concern that resulted from reading Hans' manual stems from the fact that he fabricated a thrust washer that goes between the second clutch and the oil pump. I'm not sure why he had to do this. Perhaps the washers are no longer available, but given that they are made of plastic and quite famous for melting or cracking I can't imagine this to be the case. A brief search turned up a replacement thrust washer / shim assembly but it is not applicable to all years of production of the 4L30E so your guess is as good as mine whether it would apply to my rebuild.
One other interesting point of note is the fact that one of the special tools (J-23085-A) used to determine the thickness of the thrust washer is no longer available from GM. I did, however, find several used versions on ebay when searching for "J-23085" (no -A). It's probably the same tool. Incidentally, in these same ebay listings the tool is listed as for the 3L30E, which is the three-speed predecessor to the 4L30E (the first number, of course, representing the number of gears). GM took the 3L30E and added a 4th gear (overdrive) to the 3L30E. The overdrive would not fit in the existing case so they extended it, hence the "overdrive section" and separate oil pans.
At this point I'm still undecided as to whether I will bother to add a transmission overhaul to the laundry list of tasks ahead of me. If I proceed I'll have to do additional research to find suppliers for an overhaul kit as well as selected sub-assemblies (oil pump, torque converter, band, etc.) that may need to be replaced before I crack the case. On the other hand, if I decide to say "uncle" (or chicken out, as the case may be) I suppose the upside of all this research is that I now have enough knowledge of the inner workings of the unit to ask the overhaul shop the right questions and specify the parts I want replaced.
More Questions for JE Pistons
This week I wrapped up my research of the JE pistons so I could place the order. This research resulted in a few more questions to the JE rep:
-
I notice that you recommend a minimum clearance of 2.0 to 2.5 thou. If I am doing a completely stock, normally aspirated build with a cast iron block could I get away with 2.0 thou as the minimum clearance or should I increase it a bit? I see some BMW builders advertise 2.2 thou with their custom (forged high silicon) pistons.
As the range is .002 to .0025 going with .022 is right in the middle...There will be no noise or negative effect at .0025 vs. .002 so I would give it the little bit more as a safety measure. Running the 4032 at .002 is fine for a stock street engine. I have zero issue with that. I go .0025 as an extra safety margin because there is no negative effect doing so.
-
Would a thermal barrier coating give me any margin with respect to piston to bore clearance and if so, how much could I reduce the clearance with the coating?
No. Thermal Barrier coat will not give you any advantage with clearance.
-
If I had you simply provide the pistons with no coatings at all (so I can have them coated locally...SwainTech is close to me) would there be any price difference vs the $1150 quoted?
Yes but I would not do it that way...in [the quoted] price it is $109 for our permanent Skirt Coating and it is engineered into the piston as it has a measurable thickness to it. [There would be] no savings having Swain do it.
-
Would you be able to do a thermal barrier coating in addition to the anti-wear skirt coating? If so, how much more would that cost? Also, would the lead time still be 1 week?
Yes we can. Add $138 for the Thermal Barrier if you want it. [Lead time is the same].
Through this process I learned a few things:
I have two options with respect to bore size. If I choose to bore all the cylinders to the same size I will probably use 2.5 thou as this is at the upper limit of the JE-recommended minimum clearance range and is close to the numbers Metric Mechanic uses to accommodate the cooler-running nature of the outer cylinders. Alternatively, I could select 2.2 thou as the minimum spec on the inner two cylinders and widen the clearance as Metric Mechanic does for the outer cylinders. The latter scenario will likely result in more consistent clearances at operating temperature.
Some manufacturers coat the entire piston in a temporary moly-based coating that is designed to prevent scuffing of the cylinders during the first critical moments following the first start of a new engine. BMW/Mahle is one manufacturer that does this, and this explains why BMW pistons are a dark gray/green color rather than raw aluminum out of the box.
That temporary coating is not to be confused with the "permanent" skirt coating applied by some manufacturers, including Mahle and JE. JE appears to provide this coating by default unless you ask that it not be applied, but as the response above indicates it's probably unwise to go without it as they are taking the thickness into account in the engineering of the piston and the recommended clearance numbers. Could Swain apply the coating? Sure. But it would be more expensive ($25/piston + shipping).
After reviewing a bunch of pictures of JE's work I also researched thermal barrier coatings, mostly for curiosity. To apply this coating the top of the piston is roughened with aluminum oxide media, the coating sprayed on, and then the pistons baked in an oven to cure the finish. A thermal barrier coating allegedly provide several benefits:
-
It provides the piston with an effective layer of insulation from the combustion process, which causes the piston to absorb less heat and run cooler overall. Less heat in the piston means less expansion, which should reduce the need to accommodate the expansion in the cylinder bore clearances.
-
The reduced heat absorption by the piston results in the bottom of the piston being cooler. As the oil squirters cool the rear of the pistons with a stream of oil, this should result in less heat transfer to the oil and hence lower oil temperatures.
-
The coating reflects heat back towards the combustion chamber and this increases the temperature of the charge and hence the efficiency of the combustion process. I found one article that suggested this boosts overall fuel efficiency by a small amount (think low single digit percentages). That's in the noise as far as I'm concerned, but it's interesting nonetheless.
-
The increased heat / energy in the combustion process burns the charge more completely. This apparently helps to prevent the formation of carbon deposits on the face of the piston and combustion chamber which can, in extreme conditions, lead to preignition.
I'm a little surprised that JE does not recommend tighter clearances if the pistons are coated with a thermal barrier but this likely has to do with the liability associated with recommending tighter clearances and the reality that stock engines like mine don't operate at the temperature extremes where expansion of the piston becomes a significant threat to the piston to bore clearance.
I think it's safe to say that my build does not require a thermal barrier coating on the pistons but I also think the coating does provide some benefit. Given the cost of the pistons $138 seems like a small price to pay for the option so I am likely to select it.
Incidentally, if you want to know what the pistons will look like with the various coatings applied, check out this photo gallery. The gallery also includes a few good shots of the Pauter crossbeam rods I plan to use in the event my factory rods are not serviceable.
Mileage: 265600