


BMW E36
Fuel Filter Replacement DIY
Often overlooked due to its location on the vehicle, the fuel filter hangs
on
to the bad stuff while it delivers the good stuff to your engine.
Introduction
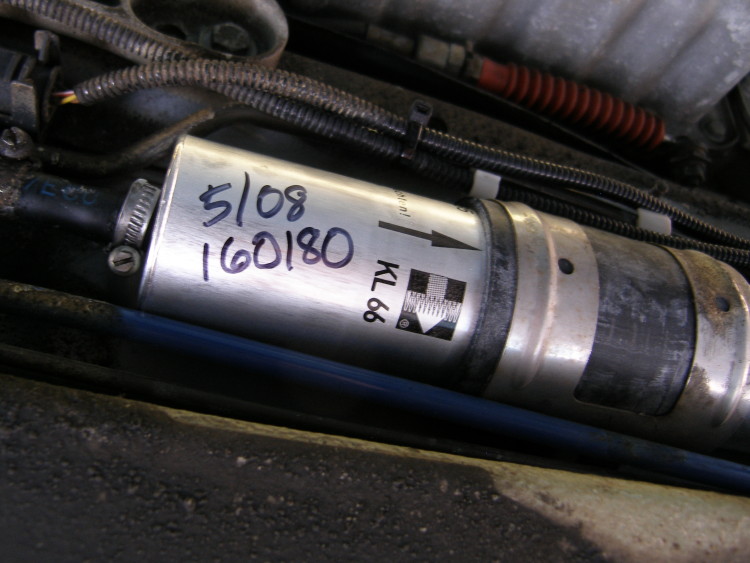
The fuel filter is an often overlooked maintenance item because it's installed on the underside of the vehicle behind a protective cover. Out of sight is out of mind. On the BMW E36, the fuel filter is nothing more than a large paper element filter housed in a cylindrical aluminum extrusion. That's a good thing because it is easily replaced by the DIY technician at a reasonable price. On the E46 and later vehicles the fuel pressure regulator is integrated with the filter and costs significantly more. How's that for progress?
The recommended replacement interval for the fuel filter on an E36 is every Inspection II, or every 36K miles. If you don't know when your fuel filter was last replaced, now would be a good time to replace it.
Prerequisites
Replacement of the E36 fuel filter requires:
- Fuel filter (E36 part number 13321740985)
- 3/8" drive ratchet
- 3/8" drive, 10mm six or twelve point deep socket or 3" extension with shallow socket
- 3/8" drive, 8mm or 5/16" six or twelve point deep socket or 3" extension with shallow socket
- Flat blade screwdriver with tip roughly 1/4-3/8" wide (in other words, a standard screwdriver...not too big, not too small)
- A few cable ties (ty-wrap or similar)
- Full coverage eye goggles (simple safety glasses are not sufficient in this application)
- Gasoline resistant gloves (nitrile rubber or equivalent), preferably ones that cover the forearm as well.
- A Class B fire extinguisher (for flammable liquids) just in case
- 1 hour of your day
You may optionally purchase the fuel hose and clamp kit (BMW part number 13311703490) just to prevent a problem if the fuel hose is damaged during the process.
Procedure
Removing the Fuel Filter
- Jack the car up. It's preferable that the car be up on all four corners for optimum clearance, but jacking just the front will work as long as it's up sufficiently high (jack stand set to 12" or slightly higher). One thing is sure...the more height you have, the easier the job will be. My kingdom for a lift.
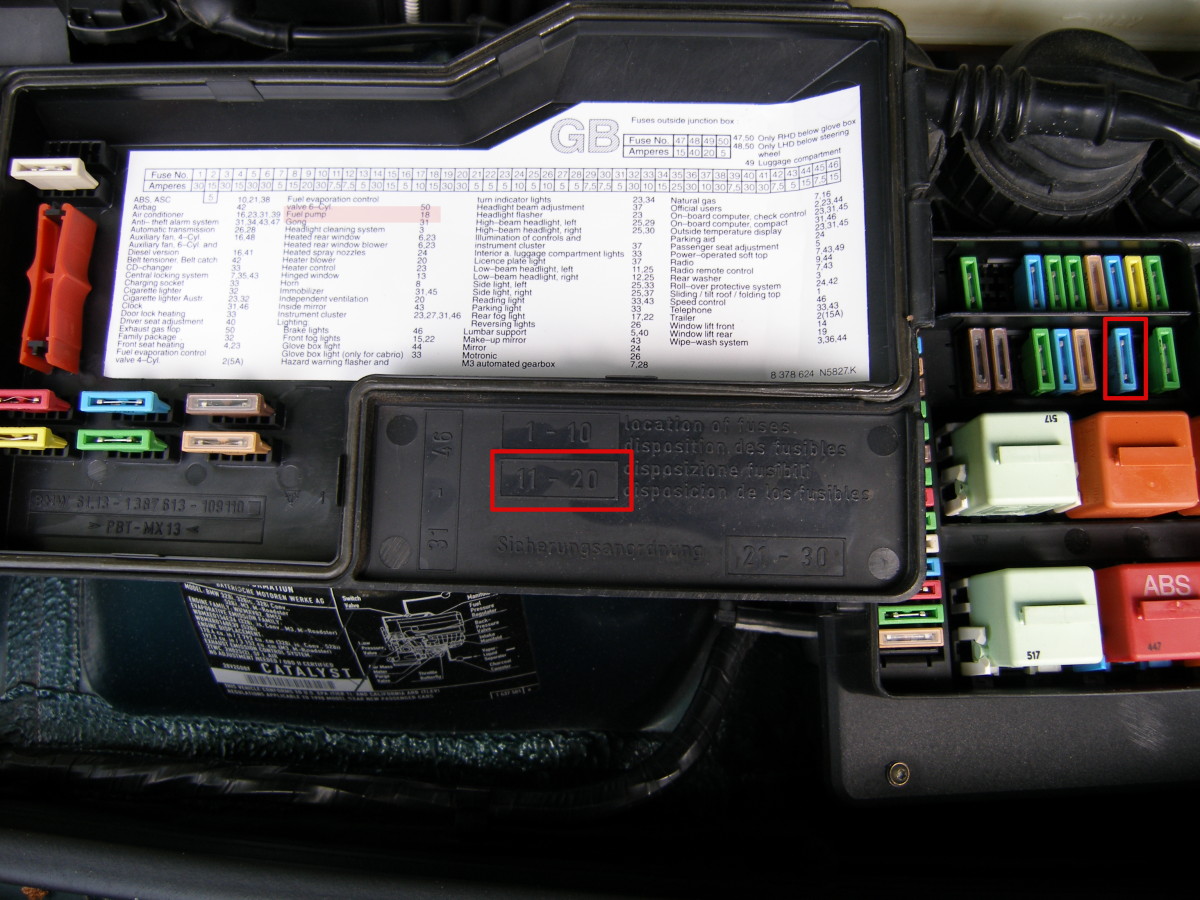
- Identify the fuel pump fuse. Open the hood, remove the fuse box cover, and identify the fuel pump fuse. On my car it was fuse #18.
- Depressurize the fuel system. The M52 engine fuel injection runs at roughly 50 PSI. If we fail to depressurize the fuel system before we remove the fuel filter you will wind up spraying fuel everywhere. To depressurize the system start the engine, walk around to the fuse box, and pull the fuel pump fuse. You should notice an almost immediate change in the character of the idle before the engine dies completely in a few seconds due to insufficient fuel pressure.
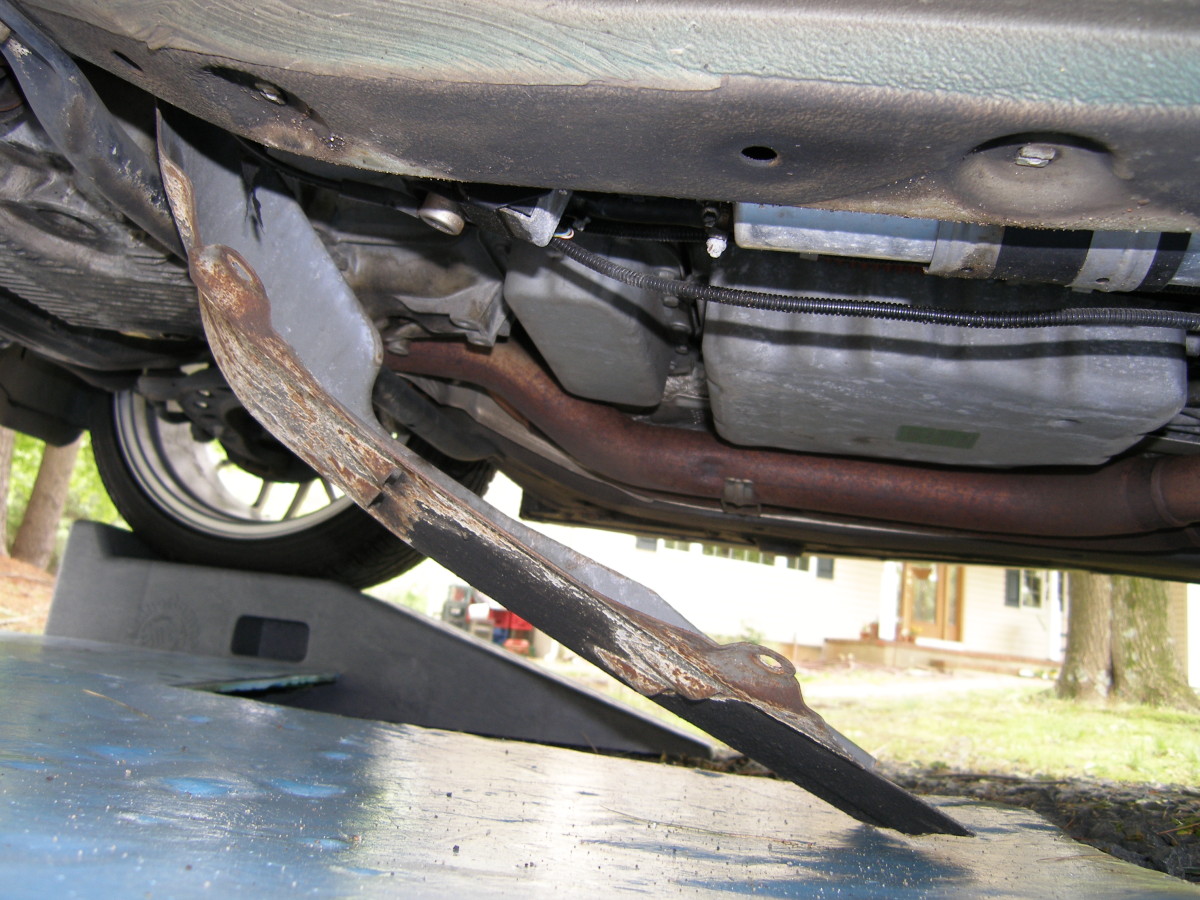
- Identify and remove the fuel filter cover. The fuel filter is installed underneath the car, adjacent to the frame rail, under the driver's footwell and is installed behind a metal cover to protect it from foreign object damage. This cover has four fasteners, all of which may be removed using an 8mm or 5/16" socket. You may note that two of the fasteners are common 6 point hex head screws, while the the other two are a strange type of nut that screws onto a stud in the body. They are all easily removable, but the forward-most fastener is located in an area that makes it difficult to swing the ratchet. Of course it will come off in short order, but patience is a virtue. A fine toothed ratchet would help here.
- Don your safety equipment. Put on your rubber gloves and full coverage eye protection. Seriously. From this pont forward you may come in contact with gasoline and you really need to keep the stuff off your skin and out of your eyes.
- Remove the fuel hoses from the filter. Loosen the clamps sufficiently so they can be pushed back on the hose well clear of the flares built into the filter nipples, and then use the screwdriver to push the hoses off each nipple. This may take some time and can may be aided by grabbing the hoses and trying to rotate them on the nipples. As the hoses release, expect some gas to pour out of the filter and the hoses...unless, of course, you failed to depressurize the fuel system as suggested above. In that case, you'll be greeted by a shower of fuel at around 40 PSI courtesy of the check valve in the fuel pump. Of course, if you have purchased the fuel line kit or a suitable length of replacement fuel line you may make this job a bit easier by using a pair of diagonal cutters or equivalent to cut the hoses a 1/2" or so from the end of the filter nipples to release the old filter. Then all you have to do is grab the ends of the hose that remained behind with a pair of pliers and twist back and forth until they release from the hard lines.
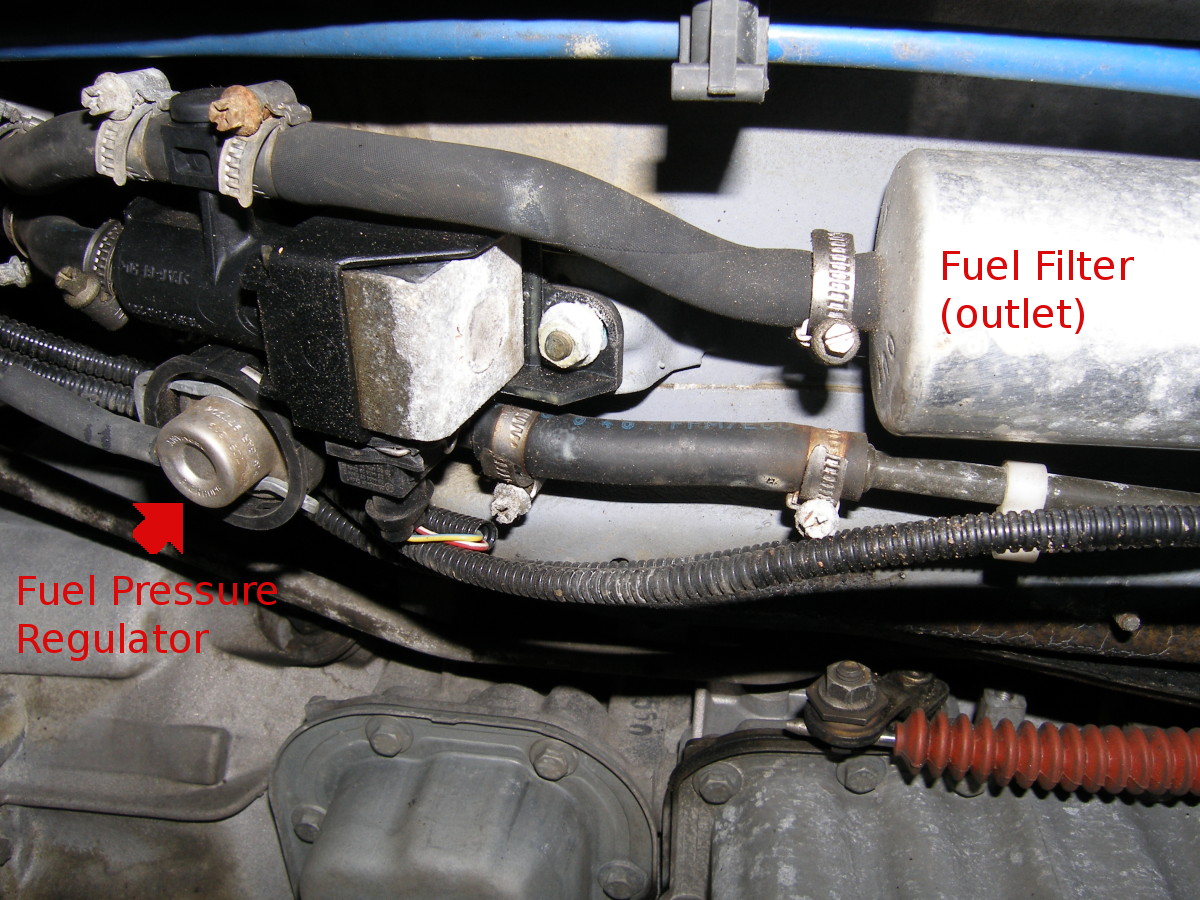
- Unclamp and remove the fuel filter. The filter is held in place with a metal clamp and a 10 mm nut. To gain access to this nut you may need to unclip the fuel lines that run parallel to the filter and maybe remove a few ty-wraps to get the oxygen sensor wiring out of the way. Some other online articles I read about this procedure suggested it would be possible to simply loosen the 10 mm nut rather than remove it, but that didn't work for me because the clamp seems to "stick" to the filter's protective foam rubber sleeve. I had to completely remove the nut to get the clearance required to separate the clamp from the filter. Once I did that, the filter slid right out.
Installing the new Fuel Filter
- Insert the filter into the clamp . Work the filter into the clamp and then put the 10 mm retaining nut back on the stud. Spin it on a few threads so it's secure but do not tighten it down yet.
- Attach the fuel hoses. Press the hoses on to the nipples and fasten the hose clamps snugly. I recommend installing the short hose first as the long hose is more flexible. Then fasten the filter clamp to tighten the filter down to the car.
- Restore the wiring and fuel lines. Return the adjacent fuel lines and wiring to their original locations using a couple cable ties as necessary.
- Mark the filter with the in-service data. Optionally, using a permanent marker, label the filter with the current date and mileage for future reference.
- Reinstall the fuse. Reinstall the fuel pump fuse and close the fuse box cover.
- Start the engine. Put the key in the ignition and turn it to position 2 (just before start). The gauge cluster should light up. Wait approximately 10 seconds, and then turn the key to the start position. Hold the key in the start position until the engine fires or about 15 seconds, whichever comes first. If the engine fails to start, wait five minutes and repeat this step once before conducting additional troubleshooting.
- Check for leaks. While the engine is running, examine the fuel filter installation for any leaks and tighten the clamps as necessary.
- Shut it down and clean up. Turn off the engine and then reinstall the protective cover, and be sure to clean any and all parts of you that were doused in gasoline.
- Have a beer, 'cause you're done.
Incidentally, if you're wondering why you should wait 5 minutes between start attempts it's primarily to get the pump to turn on again in order to prime the system another time. This is necessary because the fuel pump is programmed to turn on for the "first" start only. While it's certainly possible to turn the key to position two several times in quick succession the fuel pump will only activate the first time. Per my technician, you need to wait at least two minutes for the "timer" to reset, but I'm suggesting five minutes to help the starter cool down as well, since 15 seconds of cranking a high compression engine will heat it up quite a bit.
Highlights
 The four fasteners on the fuel filter are easily removed. The front nut has limited access for a ratchet, but it works with a little patience. |
 With the fasteners removed, the fuel filter protective cover is removed. The front of mine was ty-wrapped to some wiring so I just let it hang down. |
 You'll need to depressurize the system by starting the engine and removing the fuel pump fuse (#18). |
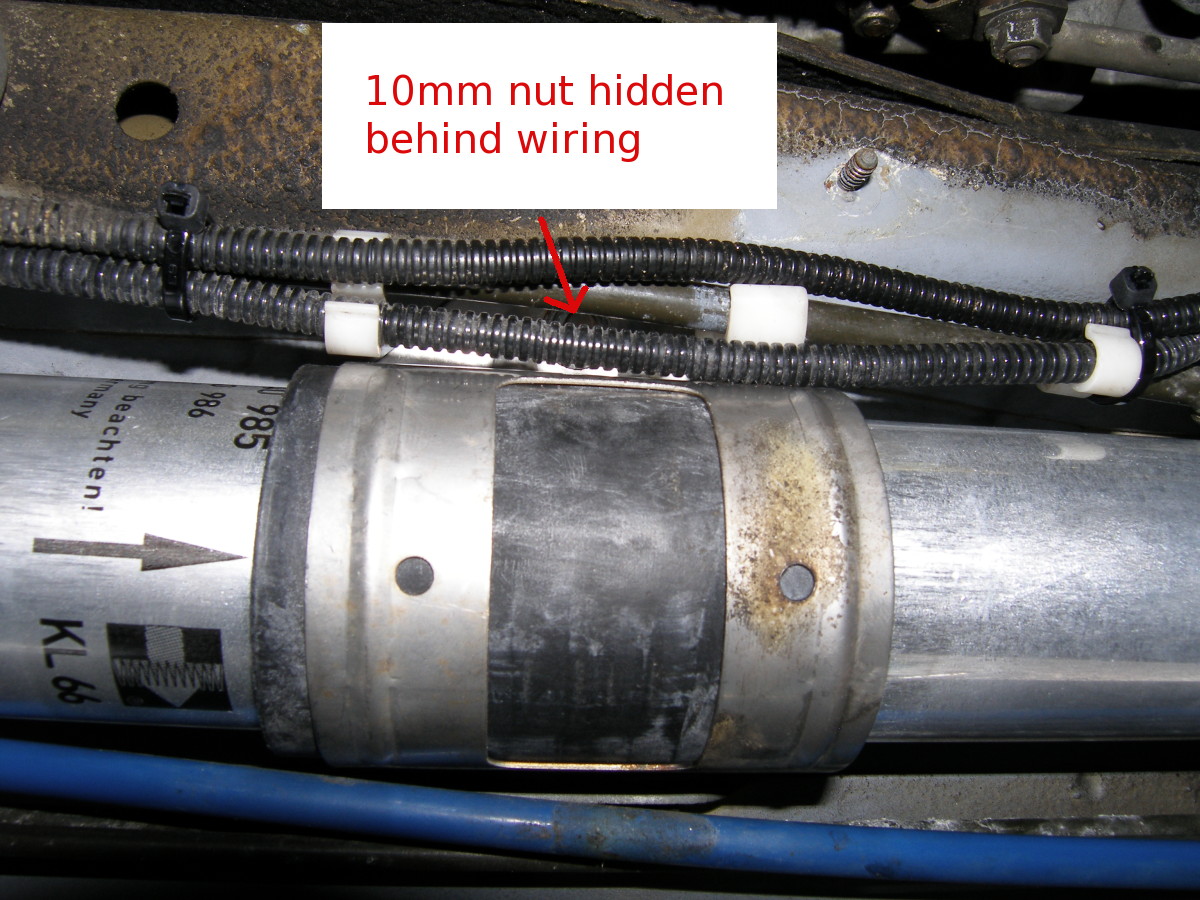 Then remove the filter clamp by removing the 10 mm nut. You may find it hidden behind the O2 sensor wiring and fuel hard lines. Just unclip them to gain access. |
 It's easiest to remove the longer, more flexible hose connected to the outlet (engine side) of the filter first. |
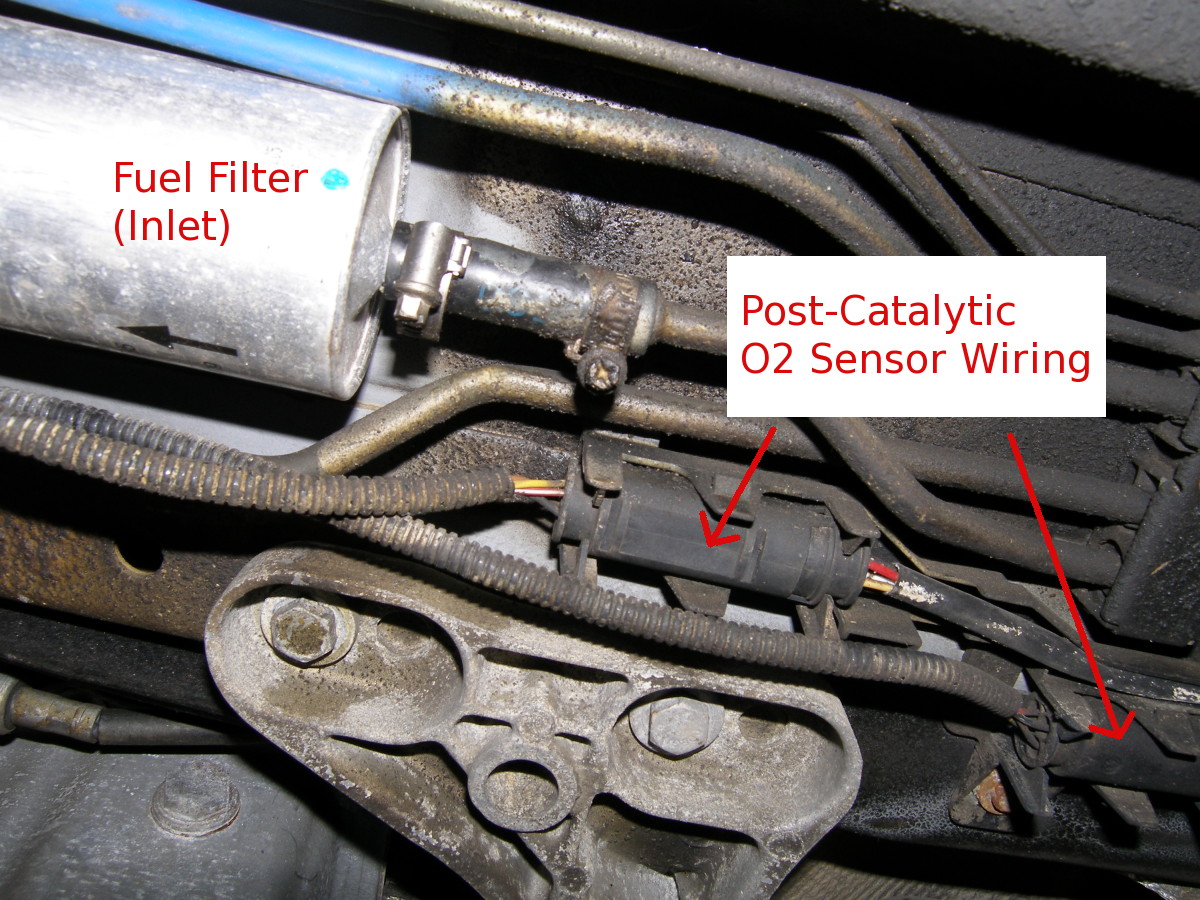 Then you can loosen the filter clamp and rotate and pull the filter out of the stubby hose that is attached to the inlet side of the filter. |
Conclusion
This is a very simple process. So simple, in fact, it's almost not worth a dedicated DIY article. However, given the need to depressurize the fuel system I felt this might be of some help.
This can be a messy process and should be done outside if possible so you won't stink up the garage or create a fire hazard with the inevitable spilled gasoline. I also recommend you do this when the car has cooled down -- you don't need gasoline spraying on hot engine or exhaust parts. Also make sure you have a Class B fire extinguisher handy just in case.