


BMW E36
HVAC Blower Replacement DIY
Page 1 of 4
The sound of crickets on a warm summer night can be a comforting
thing...unless you're in
a BMW with the windows rolled up and the air conditioning
on.
Introduction
The Heating Ventilation and Air Conditioning (HVAC) blower motor is located at the top of the airbox under the black cowl cover at the base of the windshield. It provides airflow over the heater core to generate heat in the winter and over the evaporator to provide air conditioning in the summer. If the blower fails the vehicle will not provide heat or air conditioning.
Troubleshooting
The blower motor is a robust part and rarely fails completely or without warning.
Failing bearings typically start making noise well in advance of the failure of the motor. The typical noise is a periodic high pitched chirping sound that varies with the speed of the blower and sounds a lot like crickets. Keep in mind that the fan can run noisily for a long time (on the order of years), so that in itself is not a reason to replace the motor. In that case a quick and dirty solution is, as my technician suggested, to turn up the music.
The motors can also fail due to worn brushes. When I pulled my blower motor due to bearing noise I noticed the brushes were nearly completely worn out, so that pretty well confirms that these motors simply wear out and must be replaced, albeit after a respectable lifespan.
Many problems with the HVAC blower are misdiagnosed and may, in fact, involve a much simpler solution. For example, if, on manual climate control equipped cars, the fan only runs on the highest setting the blower motor resistor pack is the cause. Replacement of the resistor pack is relatively simple.
Cars equipped with automatic climate control like my 98 328 are a bit more problematic to troubleshoot but there are usually a few common failure modes of the system:
- If the display of the climate controller flickers randomly the unit must be replaced or repaired. I replaced my head once when the car was five years old and managed to repair it myself when the problem happened again many years later. The new units cost over $400, while the repair can be done for a couple dollars if you have the requisite skills and patience. If you wish to repair it yourself, check out my HVAC Controller DIY.
- If the HVAC controls seem to work but there is either no airflow OR the speed of the fan is erratic AND the blower motor has not made any undue noises recently, the problem is likely with the final stage unit. Think of this part as the automatic climate control equivalent of the manual climate control resistor pack). The final stage unit usually costs less than $100 and is easy to replace.
If the blower motor is intermittent and none of the other symptoms match, consider swapping the blower and horn relays using this relay location diagram. If that still doesn't fix the problem, plan to replace the blower motor.
Recommended Parts, Materials and Tools
- Blower motor with detachable squirrel cages **
- Optional: Blower motor retainer clip
- Optional: Metal airbox assembly clips (BMW Part Number 64118390714)
- Optional: Black cowl cover. If yours is original and faded or cracked, this is the time to replace it.
- Cowl snap-fit connectors. Four are used and it's best to replace them all but it's not strictly necessary unless they break.
- Small ratchet. I used a fine-toothed 1/4" drive unit so I didn't have to swing it far to use it.
- 13 mm deep and shallow 6 or 12 point socket for wiper arm retaining bolts and battery terminal
- 10 mm shallow 6 or 12 point socket for the engine covers and wiper motor assembly
- Adjustable open end wrench or Channel Lock pliers for removal of the wiper motor shaft lock nut (deep 27 mm or 1 1/16" socket works too)
- 7 mm shallow 6 or 12 socket for the 3 cowl bowl
- 2 or 3" extension for hard to reach areas
- Long nose pliers to R&R the terminals on the fan
- Magnet tool (you won't need it until you need it)
- Philips screwdriver
- Small flat-blade screwdriver
- Adjustable pliers or open end wrench
- A few cable ties (ty-wrap or similar)
- A short length of tape (blue painter's, black electrical, take your pick)
- 4 hours of your day.
Blower Motor Part Note **
The blower motor is available in two forms -- one with removable squirrel cages and another with the cages pressed on the shafts (what I call the "fixed cages" version). While everyone is attracted to the "fixed cages" version because it is considerably less expensive, installing it requires bending the metal body flange directly above the blower and/or removing the wiper motor assembly to install it. Most vendors, including BMW, don't allow returns on electrical parts so I didn't want to take the risk of buying the wrong part, hence I bought the OE version. Please do not request details on the installation of the "fixed cages" version. I did not use it and can provide no other information than what is specified in this article.
Disassembly
- Make sure the wiper blades are at their normal resting location at the base of the windshield. To make sure they're in the correct position simply flick the wiper control down momentarily to cause the blades to swipe once and return to their resting location at the base of the windshield.
- Close the recirculation air doors and disable electrical power. Insert the ignition key, turn it to position 2 (where the radio and climate control turn on), hit the recirculation button and then go around to the trunk and disconnect the ground terminal from the battery. Do not simply hit the button and then turn the ignition key off. That won't work because the vehicle will automatically open the doors again and they must be closed to continue. Before stepping away from the battery, put the ground terminal in a spare work glove (as I did) or wrap it with some foam or a thick cloth to make sure the terminal does not come into contact with the vehicle's body or the battery terminal.
- Mark the resting location of the wiper blades on the window with tape then open the hood. This will make it easier to return the wiper blades to the correct detent on the wiper motor shafts when the system is reassembled.
- Remove the wiper arms from the wiper assembly shafts. Remove the protective caps with a small screwdriver and then remove the nuts with a 13 mm socket. Wiggle the arms loose or use a wiper arm / battery terminal puller if they are particularly stubborn and won't come off the shafts.
- Remove the black cowl cover. There are three plastic retainers on each side while the center section uses snap-fit connectors and must be pulled up carefully. The clips are semi-captive and may come off the cowl cover during the removal process. The fasteners can also break, but this is most likely if they are original. Mine have been replaced a few times during windshield replacements. Have extra fasteners.
- Remove the fuel rail cover and engine head cover by carefully prying off the small closures and then using a 10mm socket to remove the bolts / nuts.
- Remove the DME cover insulation. The top three fasteners simply pull off with the help of a small flat blade screwdriver to get them started, while the bottom two plastic nuts require a 10 mm socket. Use of a short extension may come in handy.
- Remove the DME cover. It's securely fastened to the body with four coarse-thread phillips head screws. While these appear to be captive I fully removed them to make sure they didn't drop out of the cover while I was moving it around.
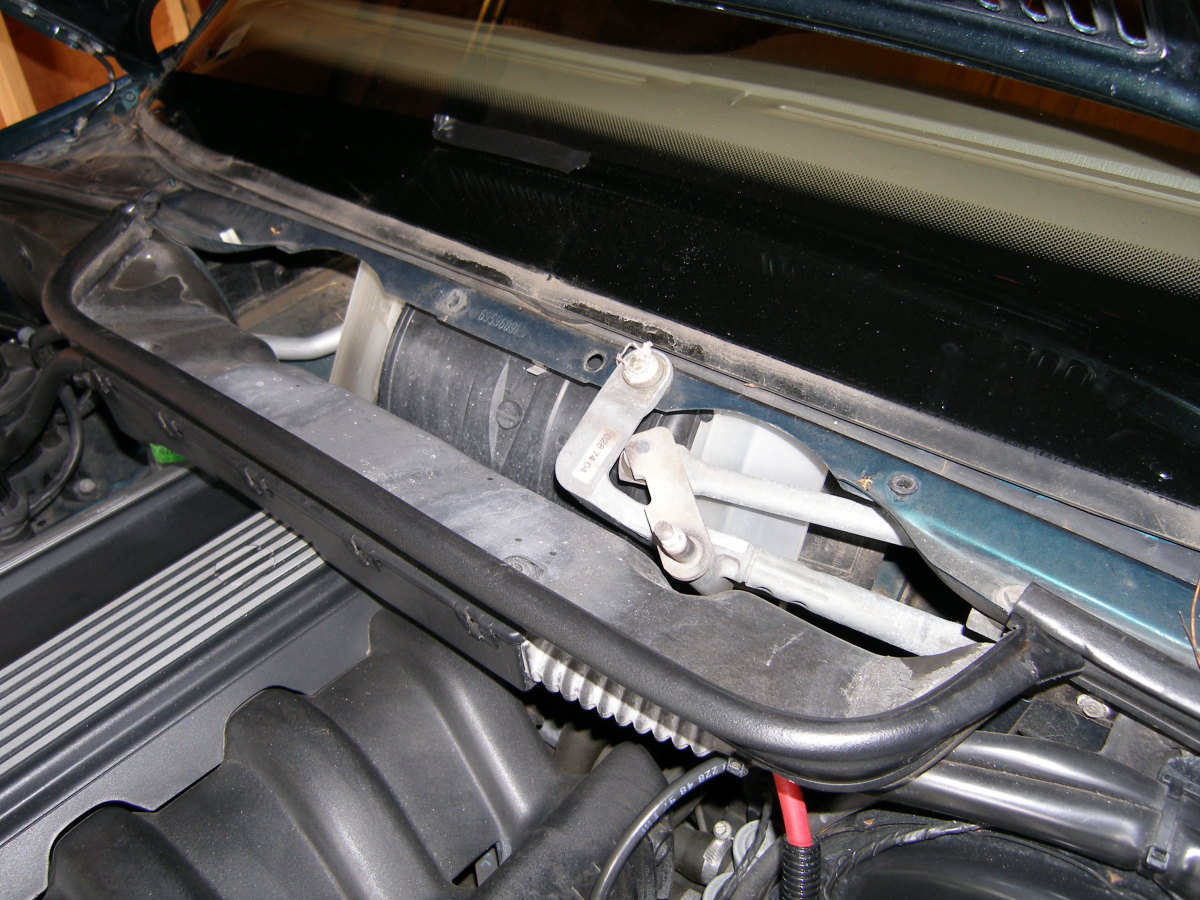
- Remove two phillips head screws from top center of the cowl. This will release the wire harness channel so it can be pulled away from the body (toward the front of the car).
- Clip the ty-wrap holding the set of electrical harnesses leading to the electrical connectors near the fuse box. Then, after the entire harness has been pulled away from the body toward the front of the car, use a new ty-wrap and temporarily secure one of the harnesses to the brake booster vacuum line where it connects to the intake manifold. Don't go crazy here....just pull it tight enough to help keep the harness pulled back from the firewall / cowl and out of the way.
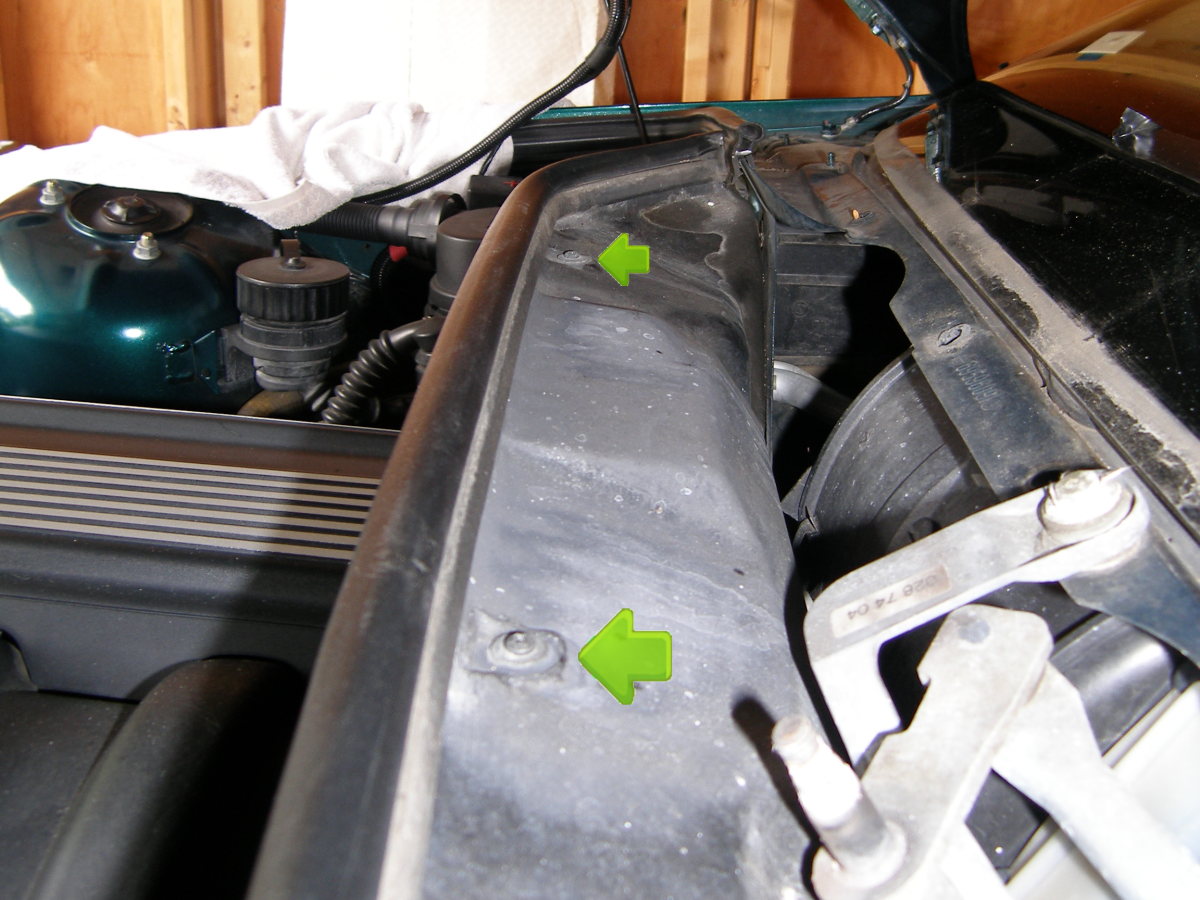
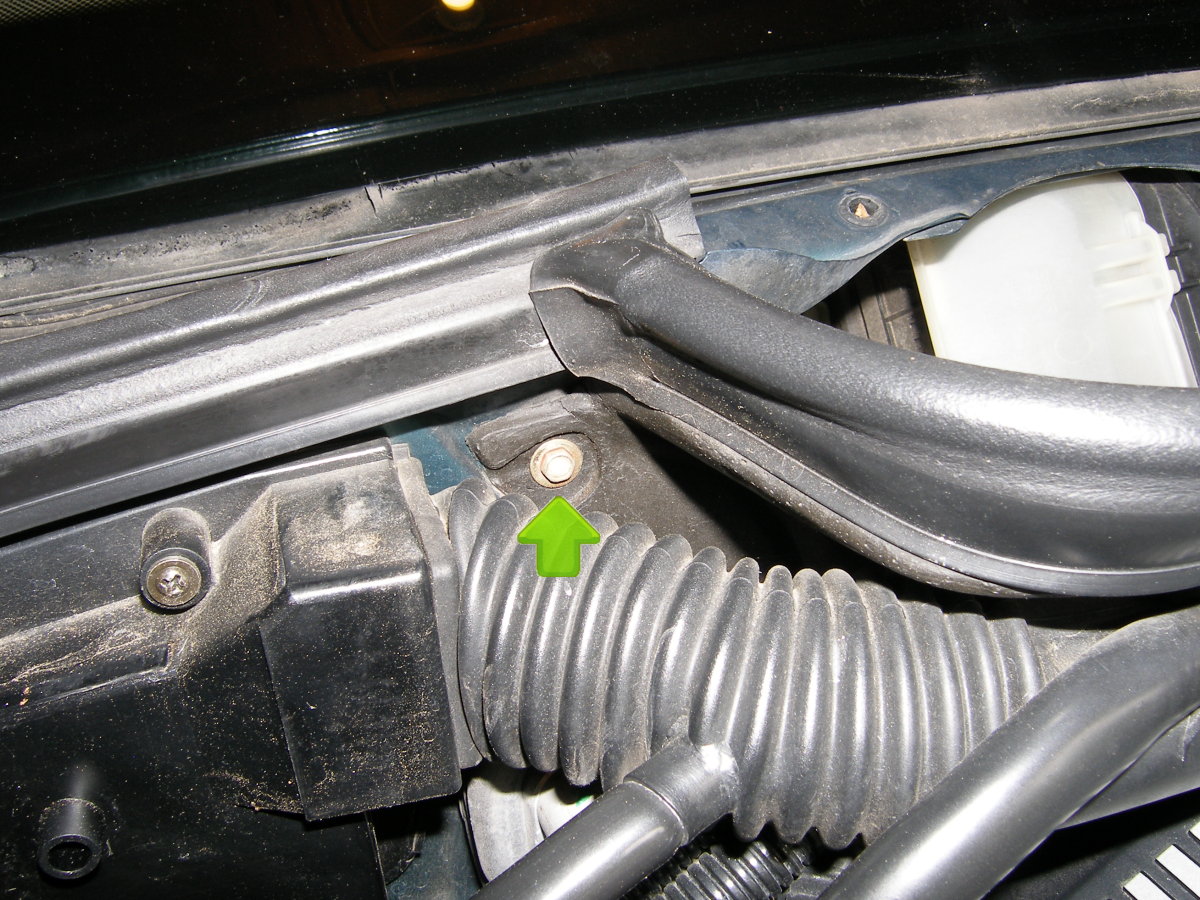
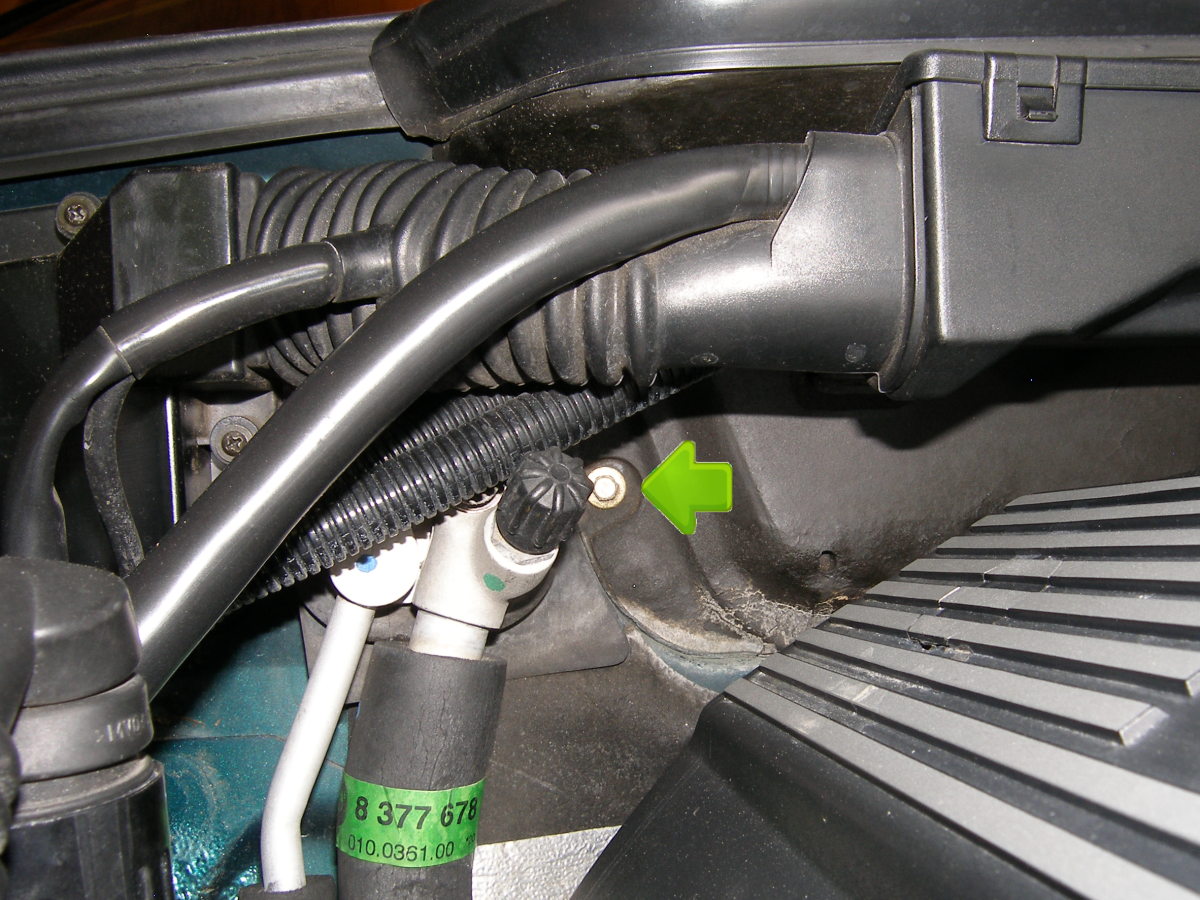
- Remove the cowl. This is mounted using 7mm screws. Two are located on the right side of the cowl near the firewall penetration of the air conditioning lines. One is on top and one is sort of hidden underneath. The remaining screw is easily found near the top of the left side of the cowl.
- Remove wiper motor assembly. Three 10mm bolts fasten it to the body on top. The left-most wiper shaft is held in place with a large nut that is easily removed with adjustable pliers or open end wrench. I used a pair of Channel-Lock pliers. A deep 27mm (or 1 1/16") deep socket will work too if you have one. Lastly, the bottom support piece, which is separate from the wiper arm assembly, must be removed to work the assembly out of the cowl area. Remove one 10 mm bolt to unfasten the support from the body and the 10 mm nut that secures the support to the wiper assembly. The nut is a little tricky to get to, but it's reachable with a small 1/4" ratchet and a 2 or 3 inch extension. BMW was kind enough to leave enough of a service loop in the wiring to allow the motor assembly to come almost completely out of the body, so that makes it relatively easy to pop off the electrical connector and remove the assembly from the car.
- Remove the front cover of the airbox. Remove the three clips: one on top, two on bottom. Note that the clips are NOT captive and are spring loaded so keep a good eye / hand on them as you pop them loose with a small flat blade screwdriver. If they go flying you'll need to find them or buy new. For this reason I recommend buying a couple extras ahead of time. Then remove the 90 degree twist lock screw in the center to release the cover. Grab the bottom of the cover and carefully rock it side to side as you pivot the bottom upward as if it were hinged and pull it toward the front of the car. It may not come out easily, but try to be careful with it.
- Remove the left side of the airbox to expose side of fan. Two small clips, one at the top and the other at the bottom, hold the piece to the airbox. These clips pop off relatively easily, but they are also spring loaded and may want to get away from you as they are removed. Have a magnet tool handy just in case they fall into an adjacent nook or cranny. I used mine twice. Note that the right side of the airbox is NOT removed because (at least in my car and as depicted in the ETK) the right side is molded into the top portion of the airbox, and that is not removable from what I could ascertain. No matter. As long as the wiper assembly is removed removal of the left side of the airbox provides the necessary access.
- Remove the electrical terminals from the motor using long nose pliers. Wiggle and pull.
- Remove the motor retaining clip. Pull from bottom using a hook tool. This may take a few tries and may permanently deform the clamp, which is why I recommend the purchase of a new clip in the parts list.
- Cut the left side squirrel cage from the motor and remove the cage from the cowl area. A pair of diagonal cutters made very quick work of this.
- Work the motor and remaining squirrel cage out of the cowl area. I did not find it necessary to cut off the remaining squirrel cage but if you want to do it, feel free. You can take some liberties with the old squirrel cages that I would NOT take with the new cages, so if you have to bend and generally abuse the old squirrel cages to get them out, feel free. Just don't break any part of the airbox in the process.
Installation
Once you've removed the old motor, putting everything back together is mostly common sense. So rather than regurgitate the removal technique in reverse or hang you out to dry with a "installation is the reverse of removal", I'll simply point out some highlights of the installation process. These are in no particular order. Please read and absorb everything I'm about to say here before you start the installation process.
Clean the Cowl Drains
Before you put anything back together remember to clear out the two cowl drains. The drains are located in the forward-most part of the cowl and allow water that enters the cowl to exit just behind the valve cover. Over time these drains tend to fill up with small twigs, pine needles, leaves and any other debris that might be sucked into the cowl. If the drains become plugged and do not allow water to drain from the cowl the water level will eventually rise up to the level of the DME compartment and flood the DME (and on automatic transmission equipped vehicles, the transmission control unit as well). Needless to say, that is a very bad thing and almost always results in a multi-thousand dollar bill.
New Motor Installation Technique
Orient yourself to the task before you disassemble the new motor. The black wheel goes on the right side of the airbox and the motor itself must be positioned such that the electrical terminals are accessible. The motor will "lock" or "key" into the airbox center support but it is technically possible to mount the motor in two positions -- one of which orients the motor terminals facing the back of the airbox where they are inaccessible. Ask me how I know. Fortunately, the solution to this little goof is simple -- rotate the motor 180 degrees and make sure it keys in place within the support.
The trick to installing the motor is to pull both squirrel cages off the motor armature, insert the black cage into the right side of the airbox, then insert the motor into the airbox, leaving it free of the center support for now. Since the right-side of the airbox has not been removed, the new motor and black cage must be tilted forward (toward the engine) enough to mount the cage on the armature and secure it with the clip. This sounds complex but is quite simple. Once the black cage is fastened to the armature, push the cage and motor back into the airbox where it would normally sit and then pull the assembly toward the left side of the airbox as far as it will go (the black cage will hit the center part of the airbox, but that's far enough). Then orient and install the other cage and fasten it with the clip. This will be far easier due to the clearance available on that side.
If you are using a new motor clamp and have clipped the ty-wrap that held the wires securely to to clamp you'll need to orient the clamp properly and fasten the wires to it with a new ty-wrap before you secure the motor with the new clamp. I would avoid pulling too tightly on the ty-wrap at this point as it helps to have the wires loose to secure them to the motor terminals. And speaking of the motor terminals, be very careful doing this. The terminals are NOT well supported and unless you get in there with both hands (or more specifically, two fingers on the motor terminal and two fingers on the power supply terminals) and mate them properly you may do damage to this very costly motor. If you have ogre-sized hands you may be able to supplant one hand with a pair of long nose pliers. Remember to clip the ty-wrap flush before you close up the airbox as you don't want that getting into the cages.
Wiper Motor
While the wiper motor is out I recommend lubricating the various joints of the wiper motor arms with some spray-on lithium grease. My wipers were mostly silent up to this point, but they are dead silent now.
After the wiper motor assembly is reinstalled and secured make sure you reinstall the ty-wrap that prevents the wiring from contacting the moving parts of the assembly.
Testing...Testing...Testing
My technician warned me to make sure I tested in stages before I put everything back together, and this great advice I pass unto you. The first test I ran was of the motor itself. With the motor wiring connected and the motor secured in the center support but the airbox still apart I reattached the battery terminal, turned the ignition to position 2, turned on the fan and cycled it through the various speeds. I got out of the car and watched the motor spin quietly and securely. I noticed little airflow through the cabin vents during this test, but that's normal because the airbox is not closed and pressurized.
Once I had the airbox back together and the "front door" reinstalled I reattached the cross-tie cable so that the outside air doors would operate as a single unit. Then I repeated the same test as above and toggled the recirculation button several times to exercise the doors. I confirmed that both doors were closed with recirculation enabled (led on) and open with it disabled (led off). Pretty simple, really.
I did one more sanity test after I reinstalled the wiper motor assembly and was about to install the cowl, just to make sure everything worked as expected, since this was my "point of no return". I flicked the wiper control down momentarily to cycle the wiper motor and make sure that the motor assembly was back at the "resting position". After this test, I decided to leave the battery connected and secured the terminal with the 13 mm socket.
Reassembly of the airbox
When it comes time to assemble the airbox there is only one trick. When the front cover of the airbox is reinstalled, position it almost horizontally (as it was when it was removed) and then insert the back of the cover into the top of the airbox before rotating it down and "closing the door" so to speak. This will help it mate with the top of the airbox. The body metal obscures what we're trying to see here but a flashlight and some head craning may help.
It's important to mate this properly as it is possible for the lid to appear as though it is properly mated with the top of the airbox and it's certainly possible to secure the cover with the clips, etc. and yet have the cover not fit correctly at the top. The sign of an improperly mated top cover is more obvious at the top of the cover and less so at the bottom. There should be no gaps where the top cover meets the side pieces of the airbox. If there are, refit the cover before continuing.
Conclusion
I think the scope and difficulty of this job were overstated in the various articles I read about it online. It's not a difficult job. It's just tedious and requires patience...which is something sorely lacking in people today...particularly the younger element who expect everything done at the snap of a finger.
While visiting the dealer after the job was complete a technician asked me how long it took me. When I responded with four hours he seemed impressed, particularly given that this was my first time. Apparently he's seen BMW trained techs take longer than that the first time through. I'll take that as a complement, but I think a lot of this has to do with preparation and research. Time spent up front will reap dividends later, and this article is proof.
I'm glad I did this job myself and hope I've helped debunk the myth that this job is too hard for the DIYer. As with all DIY work, I find the experience and the sense of accomplishment worth more than the money I save, but the extra $515 in parts and labor that is still in my pocket isn't exactly weighing me down if you know what I mean.
Highlights
 The job starts by using a trick my technician taught me to ensure the wiper arms go back on the shafts in the correct location. Some electrical tape works, but I'd recommend blue tape to reduce any residue it may leave behind. |
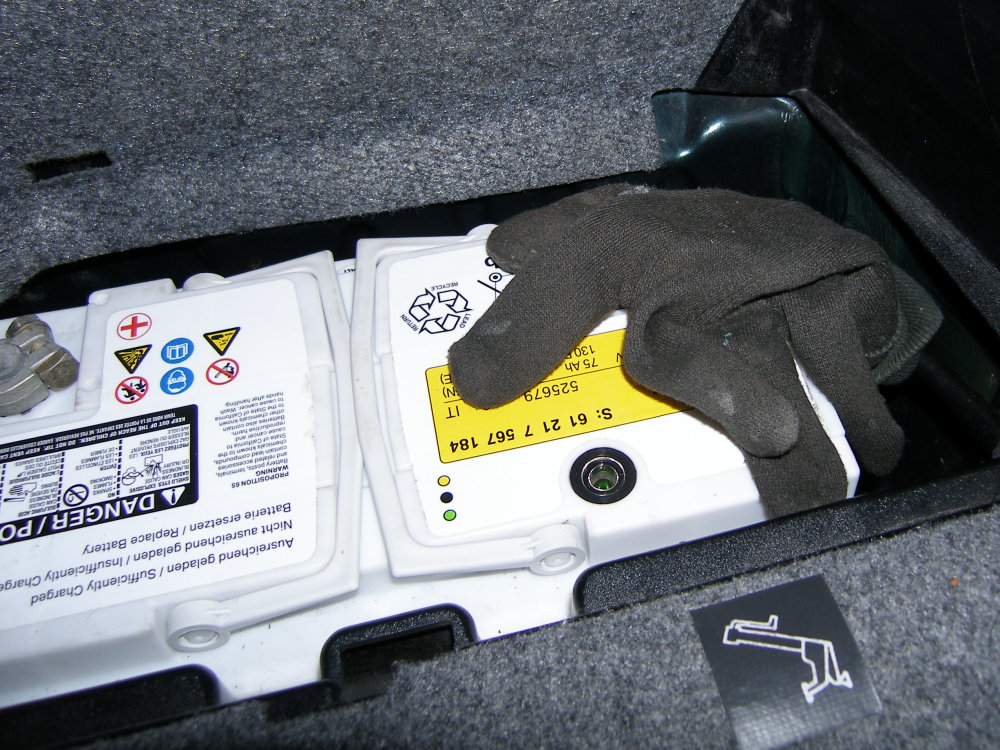 I used a spare glove to insulate the ground terminal once it was removed from the battery. This ensured power did not return to the system until it was time and also made it easy to reinstall and remove the terminal for testing. |
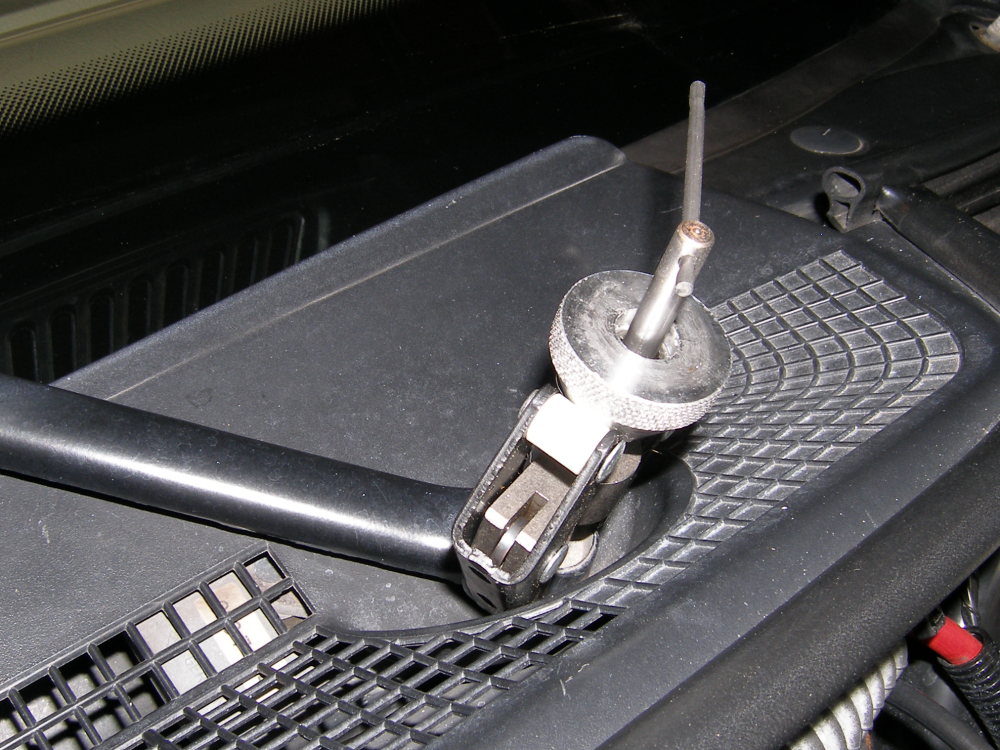 While not strictly necessary, I used my wiper arm puller tool simply because it was handy. |
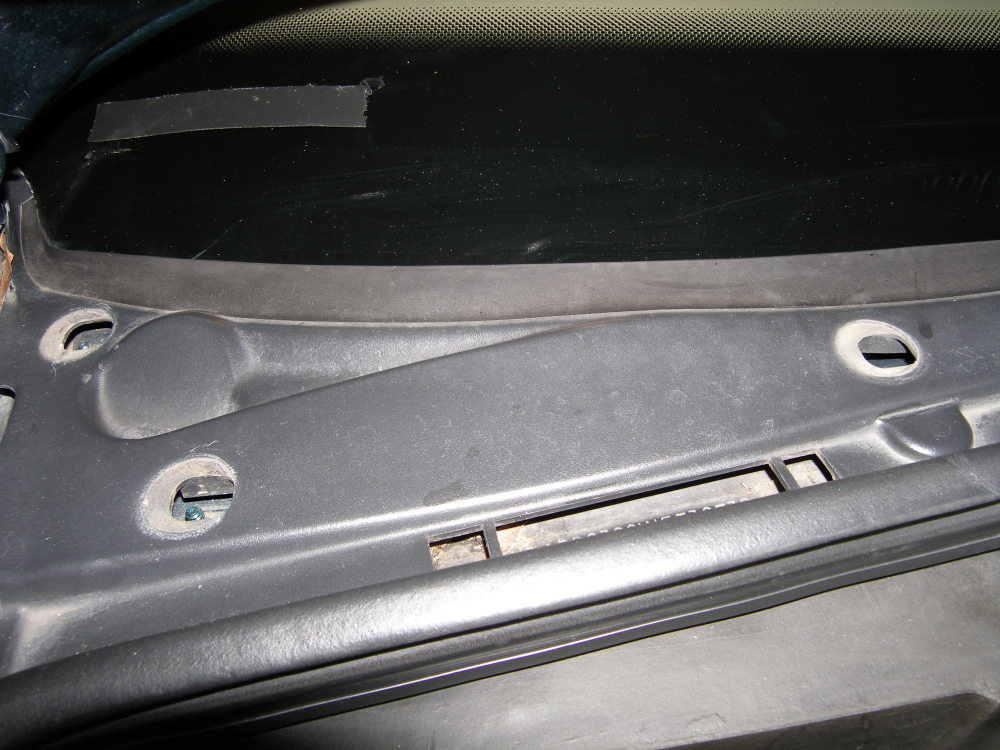 Three plastic nuts retain each side of the cowl cover to the vehicle. The center of the cowl cover uses press-fit connectors to keep the cover close up against the windshield. |
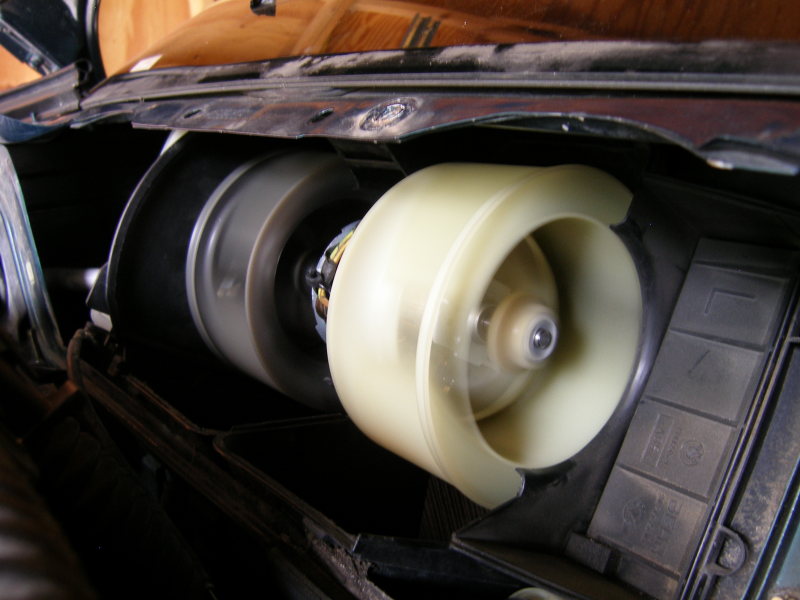
 When the cowl cover is removed, this is what you'll see. Right now the fan isn't particularly accessible, but we'll fix that soon. |
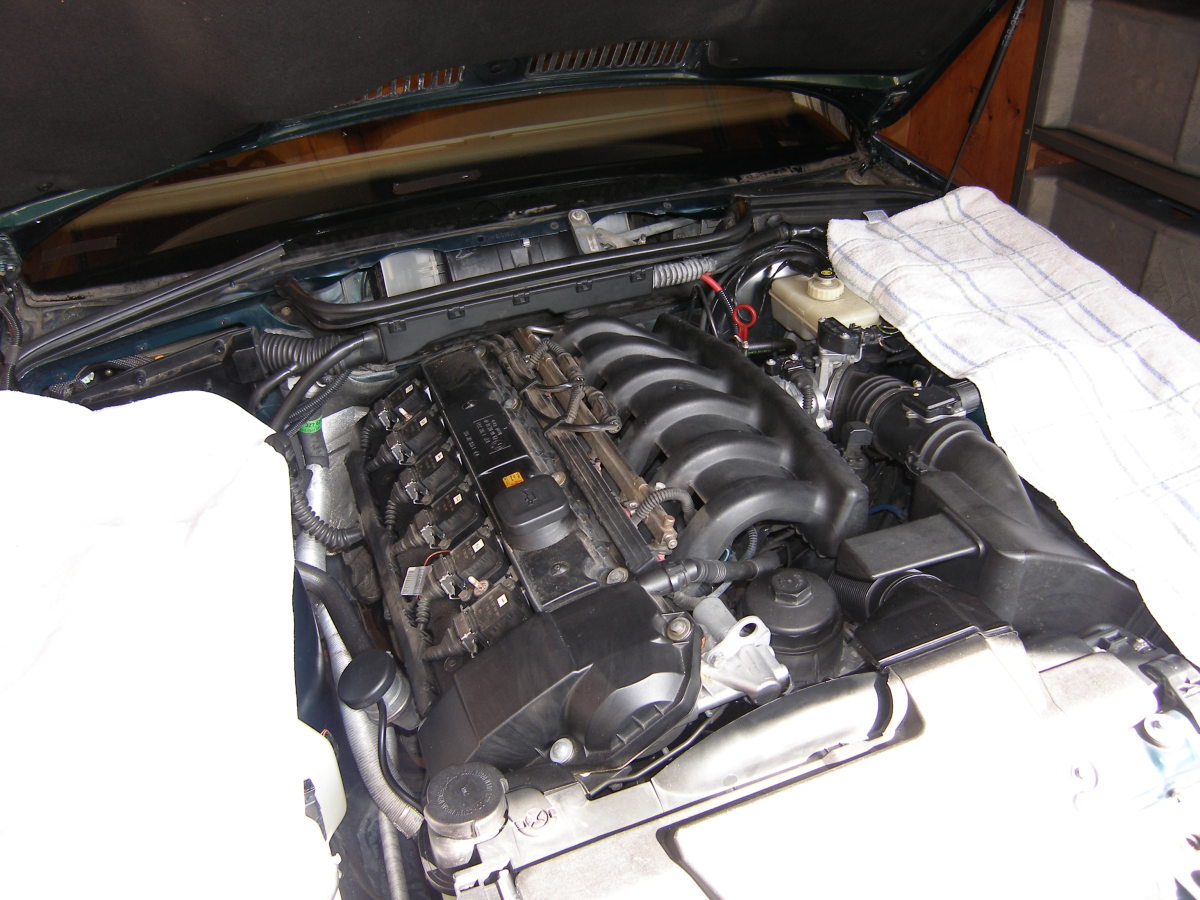 The BMW fender covers are nice pieces, but at $80 each a tad pricey. For now, some towels will do the job. I recommend taking any sharp objects out of your front pockets so they don't jab into the paint or dent the fenders. |
 This closeup of the DME cover insulation shows the location of the retaining fasteners. The top three just pull off, while the bottom two are plastic nuts that require a 10 mm socket to remove. |
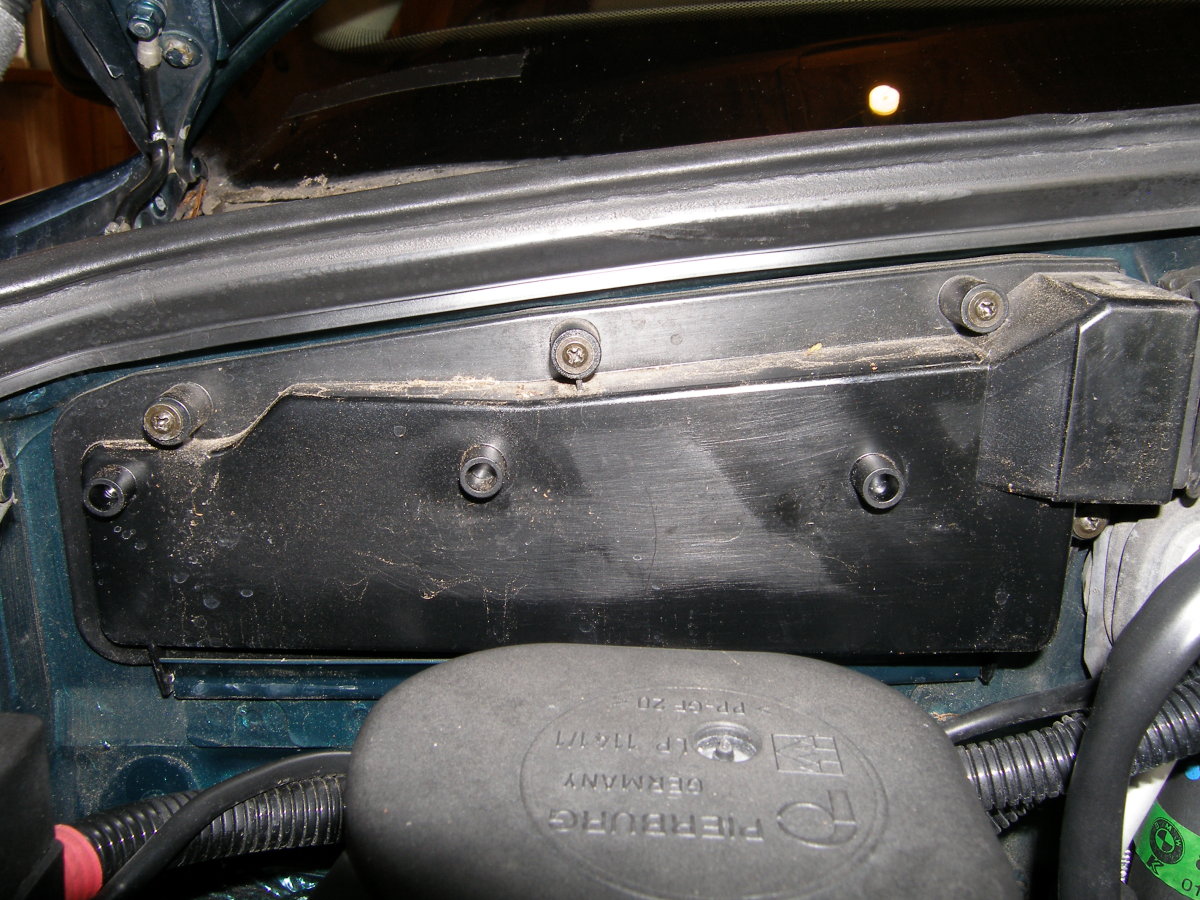 This shows the locations of the four DME cover screws that must be removed. |
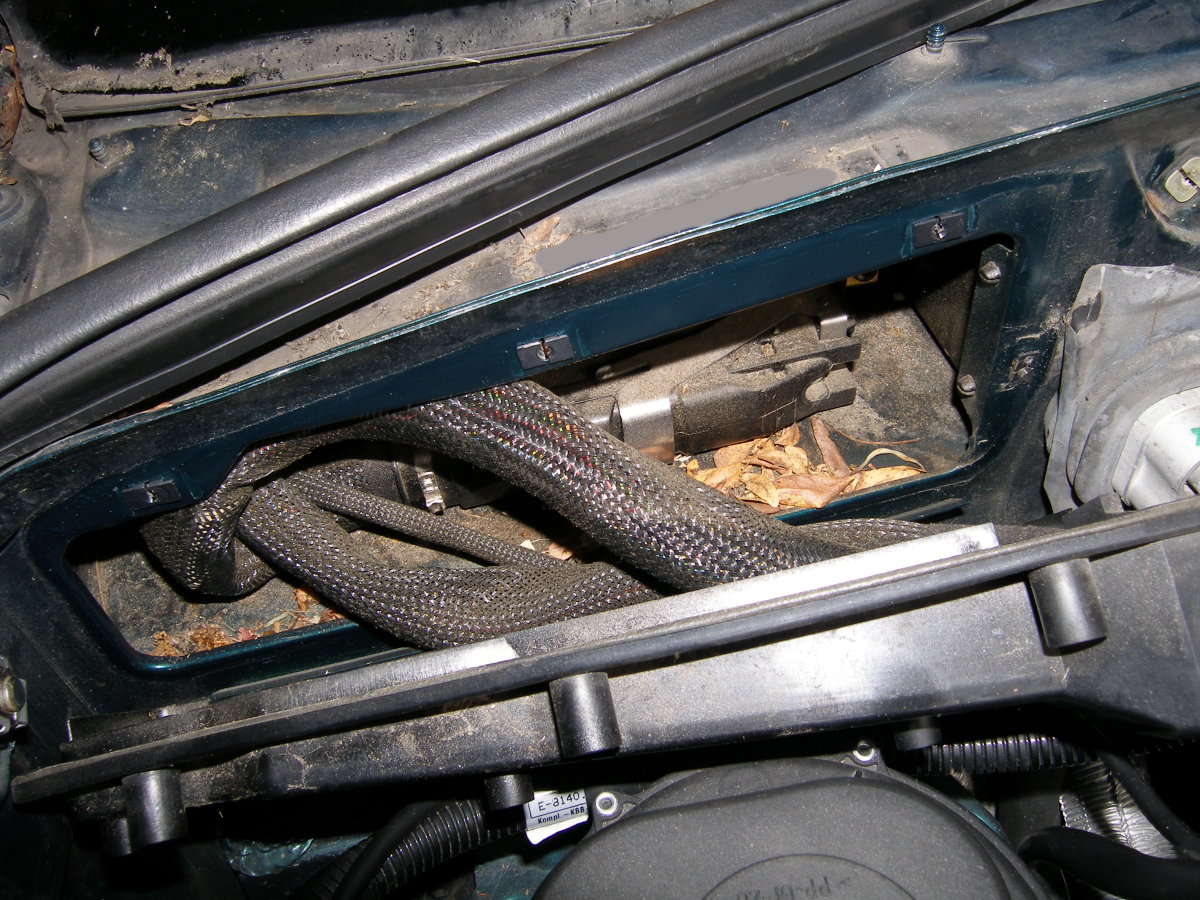 After the DME cover is removed, don't be surprised if you find some debris behind it. It's best to use compressed shop air to blow this area out. No liquids, please! |
 Before the cowl can be removed, remove the two screws on the top of the cowl that holds the harness raceway to it. |
 The green arrow points to the upper right cowl fastener, one of two on this side of the cowl. |
 Another cowl fastener on the right side. |