


All done!
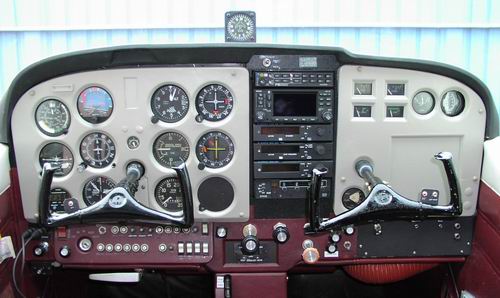
The Finished Product
Logistics
Although this was my third panel makeover project (and the second on this airplane), this was the first time I could not be in close proximity to the airplane during the installation process. The last two projects were awarded to a shop in New Hampshire that just so happened to be a few minutes' ride from a friend's place, so in both instances I was able to stay there and make a short vacation of it, traveling with college buddies and generally goofing off.
Being close to the shop meant I could stop by the shop a couple times a day to check on their progress and make comments as things progressed. Given that the lead installer in this shop had flown RF-4's and the SR-71 back in his military days, he was not only an outstanding pilot, but he was as detail-oriented as I was. Needless to say, we were of like mind and it showed. The installs came out, well, perfectly.
He often asked me for my preferences in certain situations, e.g. how to align jacks, switches, circuit breakers, and the like. Since I was right there in the airplane with him, I could visually describe exactly what I wanted. The process generally took a couple of minutes, at which point I'd leave him to his work and I'd go about my business...errr...playing.
Detailed Work Description
Unfortunately, however, this time things were different. The shop is about 45 minutes flying and over 2 hours' driving time away from my house. For this reason, and the simple fact that I don't have the luxury of free time I had then, what with working 12-14 hours a day 6 days a week, I had to rely on more tedious forms of communication to get my needs and desires across to the installation team as questions came up.
After several email exchanges with shop owner to discuss the high-level details and settle on a general price quote that took into account only the equipment installation (no extras), I decided to spend a few hours to create a detailed work description document (link to PDF file) and send it to him.
Although the quote was quite detailed, it did not (and could not) include my personal preferences, so my work description was designed to clearly outline what and (most importantly) HOW I wanted things done. Its purpose was to be there in the face of the installer when I couldn't be and (to be honest) to serve as an "I told you so" document if the need arose. It may not have been as legally-binding as a contract, but in my opinion, contracts are only necessary to cover one's butt if things go awry. My document aimed to make that a remote possibility.
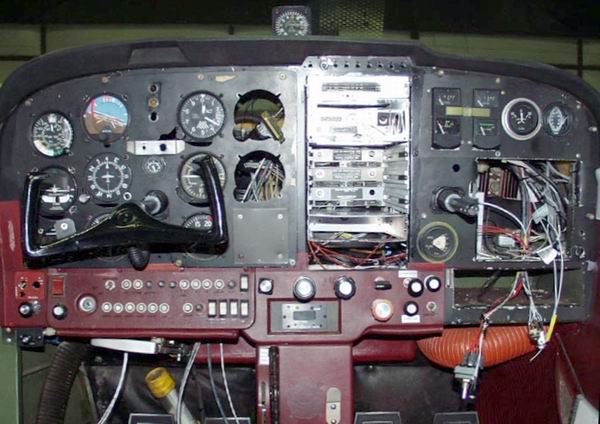
About 2.5 weeks into the installation
Of course, three pages or not, no such document could possibly handle all scenarios, so I wound up communicating with the installer directly via email and cc'ing the shop to keep them in the loop. While in retrospect I think I was kept in the loop and successfully communicated my wants and needs to them, it did take a lot of time to write sufficiently-detailed and carefully-worded replies via email. Then why did I use email? For the same reason I wrote the document...to have things in writing. It's hard to say "but when you said X, I thought you meant Y" if things are on paper, so-to-speak. I still wish I could have been there, but as they say, you play the hand you're dealt.
Allow extra time to reach your destination...
The first two projects were completed in 5 days or less. That's a lot of work to get done in a week's time, but what can I say...I had one installer dedicated to the airplane and he worked hard from 8AM to 5PM every day to see that I could fly it home first thing Saturday morning.
This time the estimated time to completion of 2.5 weeks. I told my friend that based on my experience with these things, and the fact that we'd probably wind up getting a few extras done by the time all was said and done, I figured it would be closer to 4 weeks by the time we picked it up. We picked it up nearly 4 weeks to the day.
 Fortunately, we don't rely on
this airplane for business purposes, but if you do rely on your
airplane for some critical role and you're considering getting
some work done, my advice is to take the shop's estimate for
completion and add 25-50%, depending on the type of airplane and
the complexity of the install (like if a FAA DER needs to get
involved to locate a GPS antenna on a pressure vessel).
Fortunately, we don't rely on
this airplane for business purposes, but if you do rely on your
airplane for some critical role and you're considering getting
some work done, my advice is to take the shop's estimate for
completion and add 25-50%, depending on the type of airplane and
the complexity of the install (like if a FAA DER needs to get
involved to locate a GPS antenna on a pressure vessel).
Final Equipment Choices
If you've read my last article, you know that it took a lot of soul searching to figure out what equipment we wanted to install. We eventually came to an understanding and wound up with a PS Engineering 7000B and Garmin GNS430 as the heart of the installation. We also decided to keep the slimline Narco 810 communication transceiver, 825 navigation receiver with glideslope, and the DME890 because it's still helpful in today's system -- even with an IFR GPs on board. The otherwise fine Mark 12D was traded along with its indicator, and a credit of $1500 was placed on our invoice.
Now, I know what you're saying..."Hey, why didn't you keep it and sell it on Ebay, I heard a good 12D w/ CDI is going for $X". Yea, I suppose we could have done that, but IMHO Ebay is a craps shoot. You never know what you'll get, and it does take time to create a sufficiently detailed ad to command the price you want. Although the shop offered to yellow-tag the equipment and drop ship it to the winning bidder I envisioned spending a lot of personal time building the ad, tracking the auction progress, responding to emails, and coordinating the shipment, with no guarantee that it would sell for more than the shop's offer. In other words, too much time and hassle for the risk, so I told the shop to keep it.
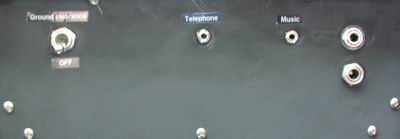
Glove Box Panel
We needed a convenient place to put the various circuit breakers, switches, and jacks made necessary by the installation, so I threw together a quick design for a panel that would replace the glove box. I did the same thing in my friend's C150 when it became clear the "little airplane that could" couldn't spare the panel space for an autopilot, so I figured we'd do it again.
 There's
nothing really special about this panel except that it solved a
lot of placement problems. If I were in the shop working with the
guys as the install progressed, this is one of those things that
I would have conditionally implemented based on how many
breakers, jacks, and such we needed to install. As it turns out,
the original design was home to the circuit breakers required for
the install, but the installer managed to squeeze them into the
existing breaker panel. Therefore, the glove box panel is now
home to just a clearance delivery switch, a "hands free"
telephone interface jack, an entertainment audio interface, and
headset jacks relocated from above, where they were interfering
with the plastic panel overlay.
There's
nothing really special about this panel except that it solved a
lot of placement problems. If I were in the shop working with the
guys as the install progressed, this is one of those things that
I would have conditionally implemented based on how many
breakers, jacks, and such we needed to install. As it turns out,
the original design was home to the circuit breakers required for
the install, but the installer managed to squeeze them into the
existing breaker panel. Therefore, the glove box panel is now
home to just a clearance delivery switch, a "hands free"
telephone interface jack, an entertainment audio interface, and
headset jacks relocated from above, where they were interfering
with the plastic panel overlay.
Ground Clearance Delivery Switch
This was one of the last items I added to the list but the most significant "extra". If you don't know what a clearance delivery switch does, it's pretty simple. As we implemented it, it provides fused power directly from the battery to the 7000B and the GNS430. When the switch is turned to the ON position, it disconnects this equipment from the avionics bus and connects them individually to the battery via properly-sized fuses. This avoids the need to turn on the battery and avionics master switches, as well as the need to turn off all unused radios in that case (which reduces wear and tear on those costly volume pot/power switches). It also eliminates the whirring noise of the electric turn-coordinator gyro that is unavoidable unless you have a pull-type circuit breaker for it.
A clearance delivery switch is obviously helpful while you're sitting on the ramp for an extended period of time waiting for the controller to come back with your clearance and programming the GPs for the upcoming route. There's no sense in clocking engine hours for that time or needlessly driving gear that is draining your battery.
During the installation the shop and I discussed what equipment to power and the switching mechanism we would use to power it. The question came down to the use of a small switch and a relay OR a massive, appropriately-rated switch to control the heavy loads of the GNS430 (5A during transmit) and PS7000 (1A). I told them that I did not want a relay because I viewed relays as another point of failure, so we went with the massive switch. While the switch is not a latching type as I originally specified (they were apparently unable to find one at a respectable price), as it turns out the switch requires so much force to turn on and off (it is a switch, not a switch-breaker) that it's highly unlikely a casual bump of the switch would change its position in flight. If this were to become a problem, we could always install a hinged switch cover over it.
The shop also questioned my rationale for powering the 7000 as well, because doing so meant more wiring and a larger 3PDT switch. I told him I wanted the option of using the integral intercom and headsets to discuss the clearance with my copilot in case we were parked next to a jet with a LOUD APU (it's happened more than once) and use the telephone interface to pick up the clearance from ATC at uncontrolled fields.
"Hands Free" Telephone Interface
This is made possible by the COM3 input and multiple "off-hook switch" inputs to the PS Engineering 7000B. There was some confusion over the myriad options involved in provisioning this and the other interfaces of the PS7000B, but the credit for making sense of it all goes to Mark Scheuer, President of PS Engineering. He took the time to communicate with me via email to outline the options available and actually convinced me to install not only the telephone interface, but stereo audio input as well. In retrospect, this increased the value of the PS7000B in our airplane, so it made complete sense to do it now, and it also increased my respect for the PS Engineering name. Nothing against Garmin, but I'm sure the guy who built the GMA340 wouldn't have called me to discuss its installation options.
The way we wired the telephone interface allows the crew member in either the left seat, right seat, or BOTH to engage in the phone conversation. The COM3 switch in the audio panel serves the left seat position, but we had to add a single-pole switch for the right seat position (on the yoke, next to the PTT switch). Note that this switch is NOT a momentary switch like the PTT. When you turn the switch on, your transmit (mic) and receive audio are directed to COM3. When you turn it off, you can again listen to the active COM or NAV audio.
You must install one off-hook switch for each position in the cabin for each person you want to include (or allow to originate) the phone call. There is a limit to the number of switch inputs. I'm not sure of the total, but I think it's 3. If you only ever want to make phone calls from the left seat and don't ever want to involve anyone else in the cabin in the phone call, you don't need to install any off-hook switches.
On my direction the shop installed a 3.5mm (common 1/8") jack for this interface, but I didn't put 2 and 2 together fast enough. A modern phone's "hands free" jack is 2.5mm. Therefore, I'll either need to find a cable with a 3.5mm jack on one end and a 2.5mm jack on the other, or just buy the cord and an adapter.
Entertainment Source Input
I'll grant you that I have never really had much of a need or opportunity to listen to music in airplanes. There's a time and a place for everything, and I'm generally so busy flying IFR in the busy New York corridor and listening to ATC that it's doubtful I would enjoy listening to music at those times.
However, we don't fly IFR all the time, and for the very simple reason that the PS7000B is a stereo intercom, my Bose X headset has a great reputation for accurate audio reproduction, AND because it really didn't cost that much to install while we the panel was in pieces, I figured I'd go ahead and install a stereo audio input. I plan to use an MP3 player as the music source, since the thought of switching CD's in flight without an autopilot is disconcerting.
The audio level of the entertainment interface is controlled by the music source. The 7000B will normally mute the entertainment source if COM audio or discussions over the intercom break squelch, but this can be defeated by pressing (activating) the ICS button. This enables so-called "karaoke" or sing-along mode. I expect that on long VFR cross countries we'll probably enable this mode so my copilot and passengers can have a discussion with the music playing at a low level in the background.
The pilot and copilot ("crew") normally receive input from the 7000's audio input #1, while the passengers receive audio input #2. Since we didn't see a need for a separate audio input in our case, we asked the shop to tie both inputs together, so all four seat positions will hear the single music source input.
The (small) Price of Stereo Audio
There is, of course, one downside to implementing a stereo intercom. You must use a stereo headset to gain the full benefit of the stereo audio. If you plug in a mono headset to any jack connected to the PS7000B (or any other stereo intercoms I would imagine) you'll hear audio in only one ear.
Fortunately, PS Engineering provides a simple and inexpensive solution to this problem. For approximately $85 including shipping back to you, they will convert your existing non-ANR mono headset into stereo by replacing the cord that contains a stereo/mono switch for compatibility, AND replace the earpiece drivers with ones capable of reproducing a wider audio frequency bandwidth.
When I took delivery of the airplane, I tried my converted David Clark H10-40 headset and I was amazed at the quality of the receive audio. The "tinny" sounding lows were replaced with a warm, clear low-end, and to my pleasant surprise, I actually heard clear high frequencies, such as my "S's" in the words "Sugar", "Saskatchewan", and Sex. Not that pilots talk about Sex while flying...but you get my point. :-)
TIS Traffic and the GTX330
As I mentioned in the previous article (written before the GTX330 had been released), we had considered replacing our aging transponder with the 330, but the budget didn't allow it at this time. Fortunately, the shop was able to pre-wire for the 330 for a minimal charge, so when we do get the remaining $3600, we'll be able to swap the KT76 & tray for a new GTX330 in only a couple hours. This keeps it within the realm of a "while we wait" installation.
Reports are that the unit works well, and we're looking forward to leveraging the information it provides to fly safer in the congested NY metro area airspace.
Odds and Ends
We originally wanted to install a couple of flood lights in the cockpit near the top of each door post to illuminate our laps, since the existing overhead light does a great job bathing the panel in red light, but doesn't cover much else. These units were available from Aircraft Spruce, but unfortunately were not TSO approved (and what a surprise...they were actually reasonably priced at $99 each...had they been TSO approved, I have no doubt they'd cost triple that figure).
We were going to purchase the lights and give them to the shop to install as they originally requested, but I never got around to purchasing them. When I asked the shop to acquire them for me they hestitated for reasons of liability. I didn't quite understand their logic, but apparently some shops fear liability of providing (if not installing) a non-TSO'd part, even though it would be perfectly legal to install it under a field approval. I guess we'll just have our regular mechanic install those and send in the paperwork at some point.
I also wanted the shop to replace the vacuum regulator as a last-ditch effort to fix a persistent low-vacuum indication we'd been experiencing, but since they couldn't be completely sure it was the regulator, and the approved part was nearly $900 (!), we decided to pass on it until we could do further troubleshooting.
Enough of the installation details. How does everything work?
Well, what do you expect me to say? I've only flown once with the gear and I'm impressed, perhaps more so with the 7000 since I'd flown behind the 430 many times before and had already drooled enough over it.
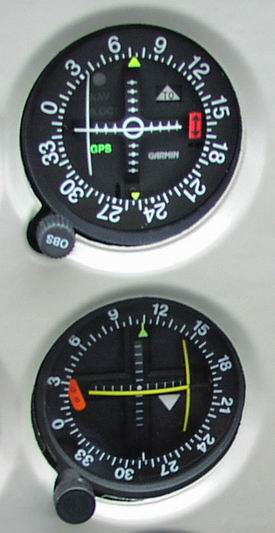
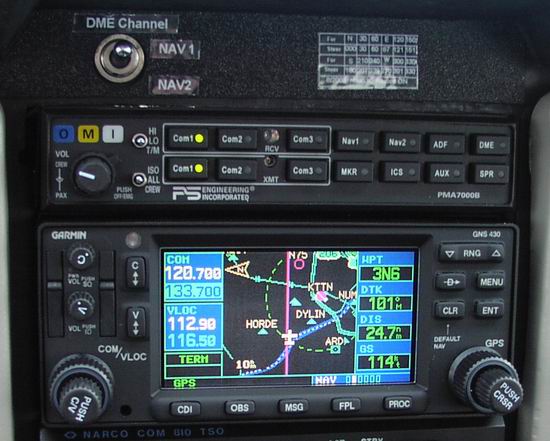
The GNS430 has revolutionized General Aviation avionics. It gives me almost everything I need to know to navigate safely. The few things it lacks (like terrain information) are in the works, if not as a future revision to the software of this unit, then as a new unit with other new capabilities. Either way, I think this was the best decision for this aircraft at this time. As you may notice, the GNS430 also emulates the Narco DME890 remote switching interface, so when the DME is in "remote" mode, a flip of the DME Channel switch will change the frequency it uses to determine the DME information.
I decided to talk to Trenton Tower on the way home and they reported the transmit audio as crisp and clear, and notably (though completely subjectively) better than the Narco 810 (and no controller ever made any negative comments about that). I noticed a very clear sidetone and no switching noise when activating the transmitter.
In spite of some earlier reservations, I can also report that the 7000B's Intellivox works beautifully. Not only do I no longer need to deal with squelch controls, the squelch broke cleanly at all the right times. Sure enough, the squelch never broke during the LOUD takeoff run. Its dramatic improvement in sound quality and notable lack of distortion is worth the price of admission alone but taken as a package, the results are impressive.
Welcome to the world of database updates
If there is one downside to the "new-order" of avionics, it's the cost associated with database updates. The unit came with a Worldwide database a few months old, but I didn't mind because we won't be flying it IFR (that is, filing /G) until the paperwork comes back from the FSDO, certifying the GPs portion of the unit for IFR use.
A quick review of the Jeppesen website is sobering. The PCMCIA card adapter needed to "burn" a new database every month is $130, plus $255/yr for Eastern/Central US coverage. Getting full US coverage comes at a $55 premium, but it makes no sense for us to pay for a full US database since we don't have any intention on flying this aircraft very far west. The typical trips are along the eastern seaboard back and forth to Florida.
Of course, you must also factor in the cost of a PCIbus PCMCIA adapter (if using a desktop PC) or a laptop, and internet access. Also, you must be "live" on the net to perform the updates. You can't just download the database and burn it at the airport "standalone", which means that if you don't want to leave the airplane without a database card installed (important if you have partners and you don't want to run back and forth to the airport), you'll also need to spend $110 on an extra card.
Conclusions
Overall, I'm happy with the installation. I could nitpick a few minor cosmetic installation details, but I attribute those to the simple fact that I was not there to guide the work in the desired direction. There is only so much I can critique from 10000 feet, if you know what I mean. I'm also admittedly one of the pickest engineer-types on the planet, so I always have something to bitch about. :-)