


Scheduled Maintenance:
A Tale of a 50 hour Inspection
Part 1
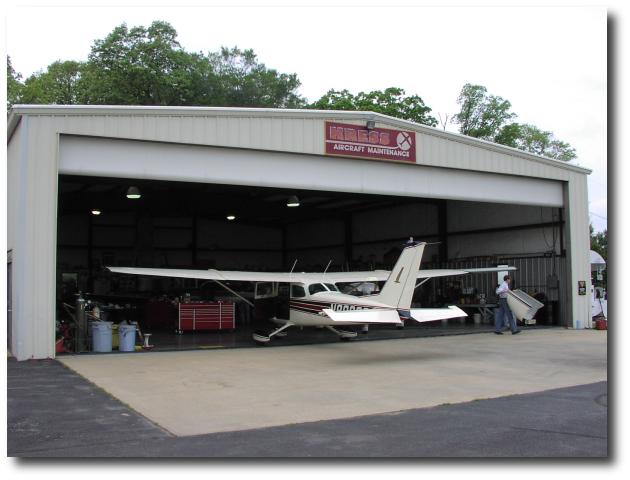
As I looked back through the logbooks for N9803C this week in preparation for a 50 hour inspection, I couldn't quite believe over ten years had passed since I helped my friend locate the airplane on a remote airport in northern Kentucky, just south of the Indiana border, and fly it home.
In 1993, I was a mere two years out of college, battling an ailing economy on my career path to the airlines (sound familiar, anyone?) and in spite of working full time for the family business, found myself with a lot of free time on my hands. Fortunately, I put that time to good use taking care of my friend's airplanes, including helping out with all necessary maintenance. I got to know both the airplane and our mechanic, Marty Kress, pretty well. I accumulated many fond memories of time spent at the airport, absorbing the sights, sounds, and smells of aviation.
When I decided to take the the airplane to Marty for it's 50 hour inspection, I didn't realize how much fun I'd have catching up with both Marty AND the airplane. This article is a brief overview of the work we had done and some of the things I learned.
 CHT Probe Replacement
Our Westach CHT probe had failed several months ago, but since it wasn't required as a primary instrument and we knew the speeds to fly to keep our cylinders cool, we had the option of delaying this squawk until the 50 hour.
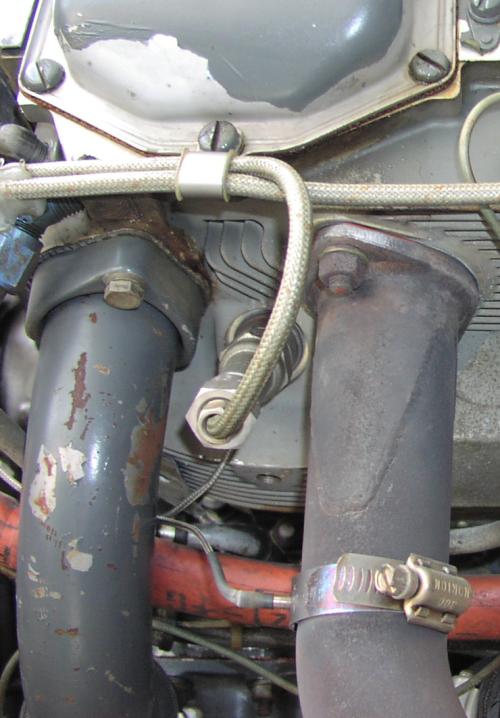
We decided to take this opportunity and eliminate the problematic gasket type CHT probe in favor of a traditional bayonet. The bayonet CHT probe looks a lot like an EGT probe and screws in to a pre-drilled & tapped hole in the bottom of the cylinder head between the intake and exhaust pipes (visible slightly below and to the right of the spark plug in the picture). This is a much cleaner installation that is actually preferred by most mechanics, since they don't need to risk possible damage to the probe every time they pull the plugs.
 One distinct advantage of the
bayonet type, aside from longevity, is accuracy. I recall reading
somewhere that the gasket probes typically read 50 degrees higher
than the bayonet type and after my first flight with the new
probe, I'd have to agree with that. Previously, in a climb at
80KIAS (cruise climb for this aircraft), the original probe
measured 425 degrees on average, while the new probe measured
about 360 under similar conditions.
One distinct advantage of the
bayonet type, aside from longevity, is accuracy. I recall reading
somewhere that the gasket probes typically read 50 degrees higher
than the bayonet type and after my first flight with the new
probe, I'd have to agree with that. Previously, in a climb at
80KIAS (cruise climb for this aircraft), the original probe
measured 425 degrees on average, while the new probe measured
about 360 under similar conditions.
The most interesting aspect of the new probe is how much more slowly the CHT reading rose after we started the engine. The original probe hit 300 degrees in almost no time while it took perhaps 5 minutes of running at idle before we saw the CHT reach 200 degrees. I believe this is more a function of its location relative to the combustion chamber than the type of probe, but in any case, I think it's telling of the differences between the two styles of probes. If you have a choice, I'd definitely recommend the bayonet over the washer type.
The hardest part of this job was pulling the old braided stainless CHT cable out throught he firewall and routing the new one between the gauge and the right rear cylinder. The gauge itself requires no power, so it's one of the most reliable instruments on the airplane. The probes do take a beating, however, so when the gauge starts showing bogus readings, the probe is usually the culrpit.
Clean and Gap 'Em
 The
cornerstone of the 50 hour inspection is a thorough check of the
engine, including the spark plugs. Fortunately, cleaning and
gapping plugs is one of the many maintenance practices an
aircraft owner may legally perform under Part 43, but the
downside is that you do need a few specialized (and potentially
expensive) tools to do the job properly.
The
cornerstone of the 50 hour inspection is a thorough check of the
engine, including the spark plugs. Fortunately, cleaning and
gapping plugs is one of the many maintenance practices an
aircraft owner may legally perform under Part 43, but the
downside is that you do need a few specialized (and potentially
expensive) tools to do the job properly.
If the plugs are clogged with lead deposits, you might need a vibrator cleaner, but in our case the few lead balls we found wedged around our massive electrode plugs were easily removed with a piece of safety wire. The threads were then cleaned up on the grinder with a soft wire wheel.
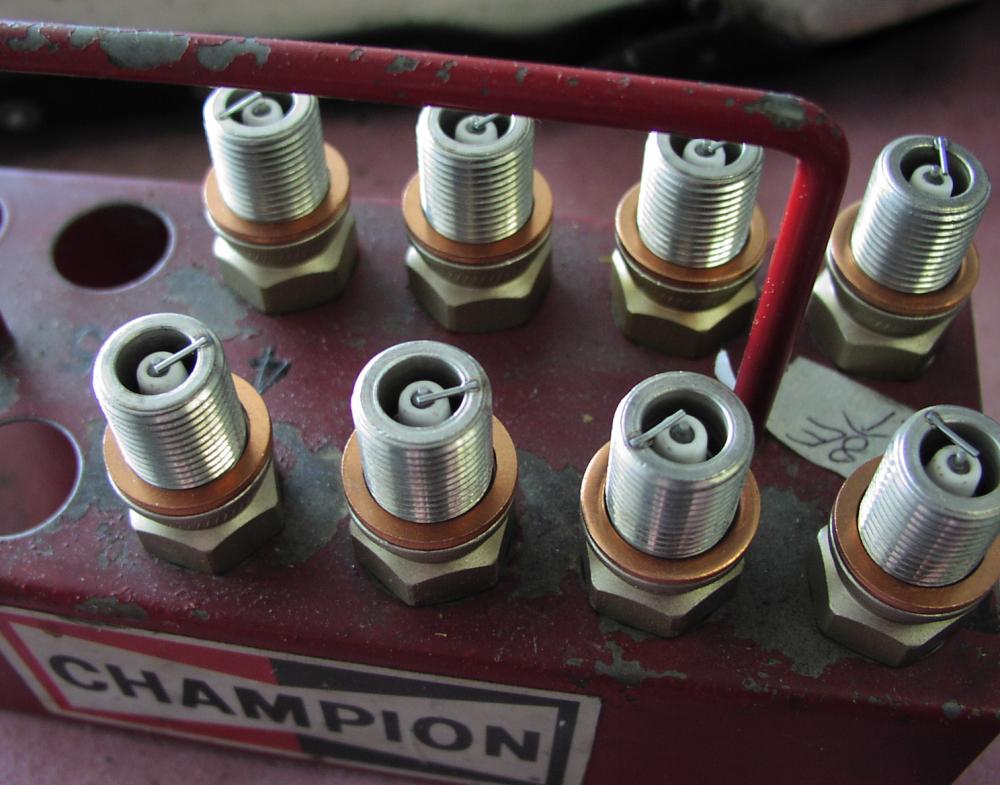
Incidentally, some say that fine wire plugs, like those I found in a plug tray elsewhere in the shop (pictured), tend not to lead foul as badly as massive electrode plugs, but that benefit comes at a price...about $50 each.
After the threads were clean of any old anti-seize compound or other gunk, we then moved them to the media blasting booth in which the electrodes and insulator were cleaned of any remaining deposits. I don't know of any other way to clean the plugs and get the same great results, so if you don't have a media blaster, you'd be well advised to throw your local shop a few bucks to use theirs.
We then used compressed air to blow any remaining media out of the plugs and perfromed a basic inspection of the electrodes. We happened to notice that a couple of the plugs looked almost new...in other words the center electrode was almost perfectly round, while others were significantly worn (oval shaped), but still gapped properly (indicating a progressive wear pattern over several plug cleanings). A check of the logbooks established that all eight plugs were the same age...about 300 hours since new. I'm not quite sure to make of the differences in wear rates, but given that the engine appears to be running very well, I suppose we'll just replace the worst offenders at the annual just to be on the safe side.
 Marty then sparingly applied anti-seize compound to the threads,
slid on some new copper compression washers, reinstalled them
(rotated to the adjacent cylinder, opposite location), and
torqued them to 36 inch-pounds. Job done in about 20 minutes.
Marty then sparingly applied anti-seize compound to the threads,
slid on some new copper compression washers, reinstalled them
(rotated to the adjacent cylinder, opposite location), and
torqued them to 36 inch-pounds. Job done in about 20 minutes.
I then asked Marty whether anyone anneals and reuses the washers anymore. He basically said that while it's still an option if you're doing the work yourself, the washers cost $0.25 each and the shop labor to anneal them would probably be several times that cost. In other words, why bother? It's cheaper to use new ones.
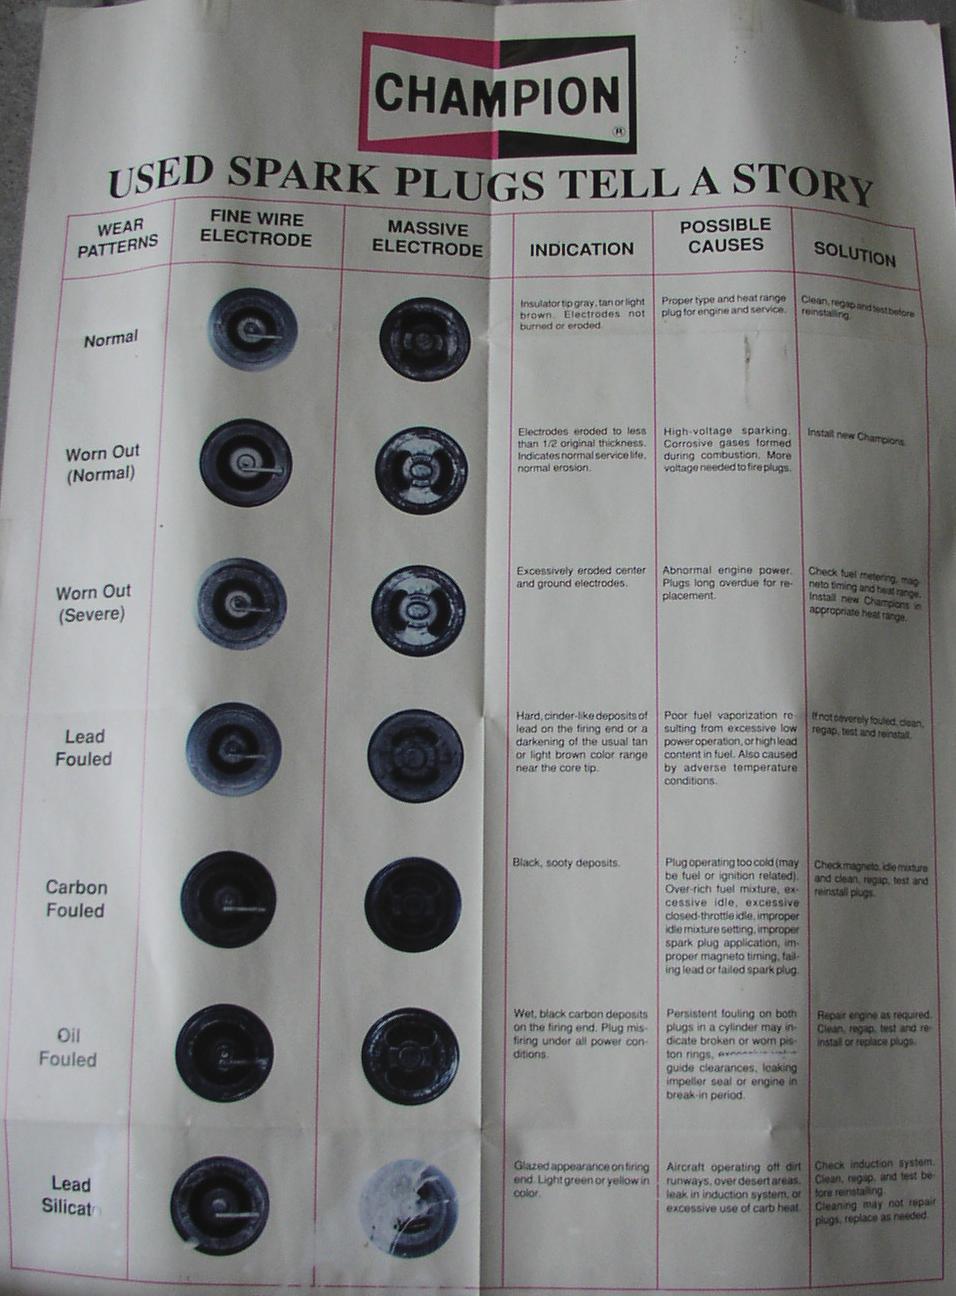
I happened to see an informative plug diagnostic poster on the wall, so I did my best to capture it. Click on it for a much larger image.
Lunch!
Lunchtime rolled around so we decided to run into town for lunch (the otherwise pretty good on-field restaurant was closed for a week around the memorial day holiday).
Pittstown is a small country town that is practically frozen in time. Indeed, nothing on the road leading from the airport into town had changed since I drove it about eight years prior. Pretty amazing for New Jersey (and if you live in the state, you know what I'm talking about!).
When we arrived at the local sandwich/pizza shop, we happened to find a Glasair III owner and local celebrity (he flew it around the world shortly after it was finished back in 1993) chowing down with a couple of his friends. It was nice to see he was still an involved member of the airport community, dispensing thoughts in his usual calm and collected manner.
 The
conversation naturally meandered through things aviation and not,
and while on the topic of what separates a good mechanic from
bad, and what customers expect from them, Marty said that the
stuff that most customers seem to judge when the aircraft leaves
his hangar relate to the details. Are the tires pumped up? Is the
engine bay clean? Is the interior vacuumed? In other words, does
the mechanic care about the details, and going the extra mile for
his customers?
The
conversation naturally meandered through things aviation and not,
and while on the topic of what separates a good mechanic from
bad, and what customers expect from them, Marty said that the
stuff that most customers seem to judge when the aircraft leaves
his hangar relate to the details. Are the tires pumped up? Is the
engine bay clean? Is the interior vacuumed? In other words, does
the mechanic care about the details, and going the extra mile for
his customers?
At that point I mentioned that Marty's attention to detail and proactive attitude toward preventative maintenance as two of the reasons I prefer to have him perform maintenance on the aircraft that carries me thousands of feet into the air and hundreds of miles away from home on regular basis. It is true what they say...a good mechanic is the aircraft owner's best friend.
Before we knew it, lunch was over, and we were headed back to the shop.
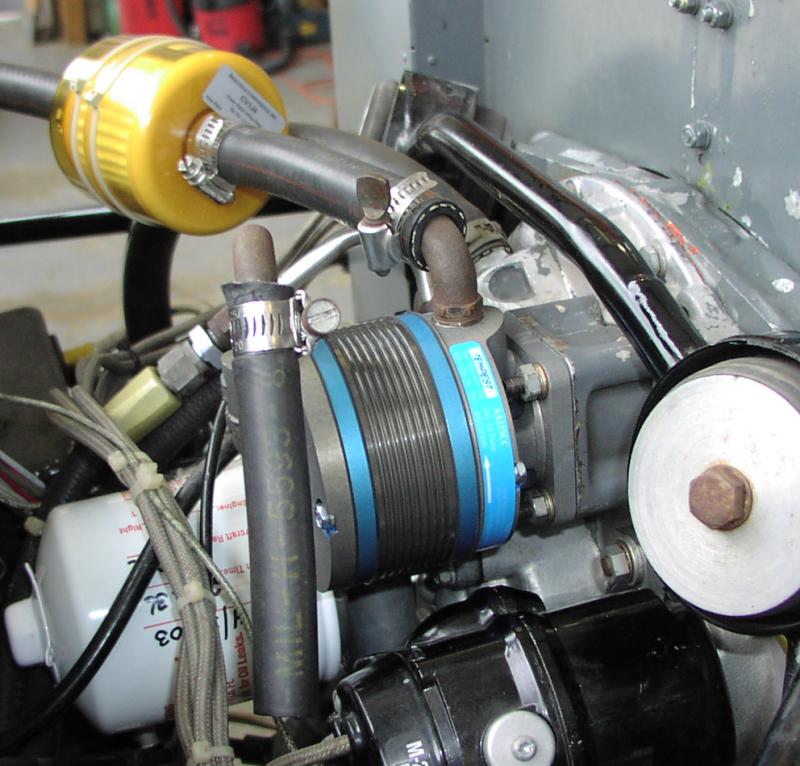
New Vacuum Pump
Now that the engine had cooled down sufficiently, the next order of business was a replacement of our vacuum pump. This was one more item on our list of possible hiding places for a gremlin that had taken up residence in our vacuum system.
Replacing the pump was pretty simple, hindered only by its proximity to the engine mount on the top and the tachometer drive to the left. Of course, as my father used to say, you can do anything if you have the right tool for thejob, and this case was no exception. Marty pulled out a specially-manufactured vacuum pump wrench with a contorted handle resembling that of a cylinder base wrench, and made quick work of the pump swap.
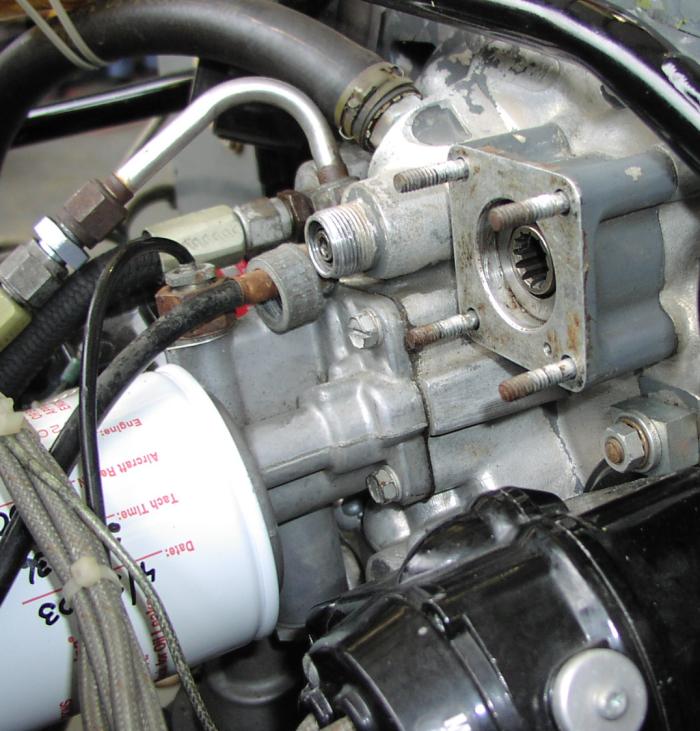
 In the picture you
can see the vacuum pump drive base with the metal drive shaft.
The vacuum pump has a spined shaft made out of a composite that
fits into that spined drive shaft. If the vacuum pump seizes for
any reason, the composite drive will cleanly break away from the
part that fits into the metal drive shaft, allowing it and the
engine to spin away merrily. That's generally the start of a bad
day for the pilot, but a good thing for the continued health of
the engine.
In the picture you
can see the vacuum pump drive base with the metal drive shaft.
The vacuum pump has a spined shaft made out of a composite that
fits into that spined drive shaft. If the vacuum pump seizes for
any reason, the composite drive will cleanly break away from the
part that fits into the metal drive shaft, allowing it and the
engine to spin away merrily. That's generally the start of a bad
day for the pilot, but a good thing for the continued health of
the engine.
Because we weren't 100% sure the pump was the cause of the problem, I really wanted to keep the old vacuum pump as a field replacement, but I didn't want to pay the core charge. Oh well.
Dressing the prop
We're pretty good about keeping the aircraft's nose out of the sticks and stones, but when we're not flying the aircraft, all bets are off. Unfortunately, the last mechanic to fly the aircraft put a couple of good defects in the leading edge of the prop during a test hop. There was really no excuse for this, but what was done was done. Since defects beyond certain tolerances can lead to stress fractures, I asked Marty to dress the prop.
The process is fairly straightforward, if not a bit crude. He started with a straight-edge file positioned at about a 30 degree angle to the leading edge radius and moved it in a steady, sweeping pattern, covering the area a couple inches either side of the nick. When he determined that the file had brought down the high ridges of the nick, he moved the file over the outer two thirds of the blade in a long sweeping motion from root to tip to do some general cleanup. He then repeated the long sweeping motion over the other blade to remove approximately the same amount of material to preserve the balance, and finished up by using emery cloth to smooth out any roughness that may have been created by the file, paying particular attention to smoothing the contour now formed around the larger of the two defects.
I then asked Marty how the prop shop would restore the edge during an overhaul, and he said they would simply file the entire leading edge down and reshape it until the edge was true again. That begged the question "what if they need to remove more material from the leading edge than is permitted?" Simple. They would tape a big red tag on it and it would become a centerpiece. Needless to say, if I ever needed more motivation to be careful about where I taxi or do my runups, that was it. New props ain't cheap.
Oil Leaks
Over the last 50 hours I had noticed a thin film of oil on the left side of the lower cowling. The oil was clearly mixed in with some dirt and did not appear "fresh", but it was pretty obvious we had a very slight oil leak somewhere. I've seen my share of oil leaks, so I assumed it was coming from one of the oil return lines, a pushrod tube, or maybe a rocker cover gasket. But, with only 450 hours on the cylinders, I discounted the possibility that the gaskets could have separated in that short a period of time. Of course, since I'm not a mechanic, I was wrong. :-)
 When we took the lower cowling
off, Marty quickly spotted oil oozing from both left-side rocker
cover gaskets. He also spotted a few drops coming from the oil
return lines.
When we took the lower cowling
off, Marty quickly spotted oil oozing from both left-side rocker
cover gaskets. He also spotted a few drops coming from the oil
return lines.
Our particular seals were of the cork variety, and since I thought most engines by now used silicone, I nervously asked Marty whether he had any of these "ancient technology gaskets" in stock. "SURE!", came his enthusiastic response (gotta like a mechanic that knows his inventory!).
The gaskets were stuck to the rocker covers, so Marty removed the majority of the gasket material by hand and then removed the remaining residue with a soft wire wheel on the grinder. The mating surface on the cylinder head was cleaned with the head of a large regular screwdriver and then wiped down with a dry rag. The new seals were then mated with the covers, the screws used as guides, and the covers & new gaskets reinstalled. Marty then used another tool that looked like a swivel ratchet wrench with a slot cut in the socket to snug up the wing-nut-like fasteners on the various oil lines.
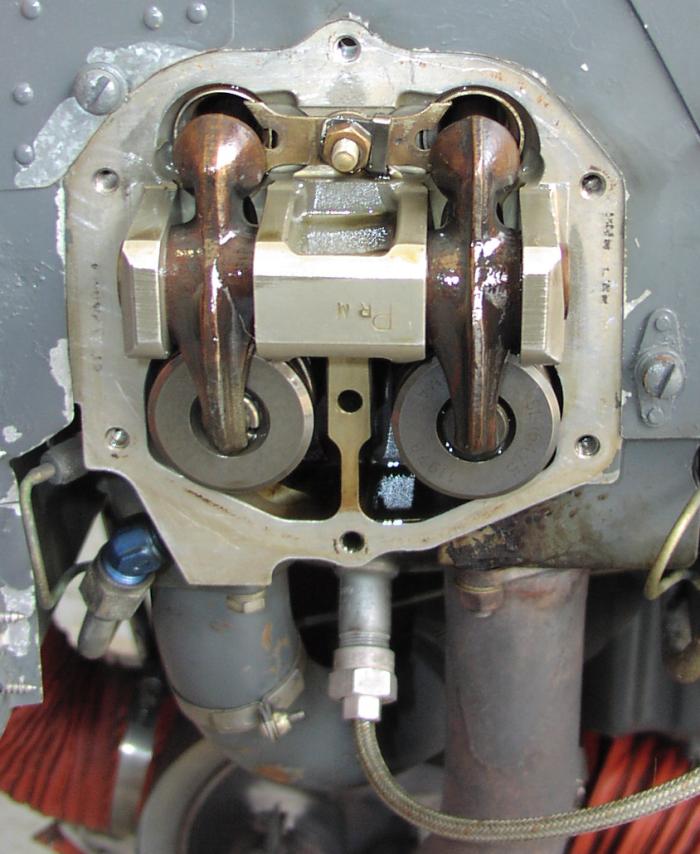
The picture shows the business end of a Superior AirParts Millenium cylinder for a Lycoming O-360. Check out those beefy rocker bosses. To the left of the intake header you can see the return line that brings oil back to the sump after flowing through the center of the pushrods (top), coating the rockers, rocker bearings, and valve stems. If you look closely below the intake valve spring, you can see the hole in the cylinder head that connects with the blue oil return fitting.
Slightly above and to the left of the oil return fitting is the primer nozzle. When you actuate the primer in this aircraft, fuel is directly injected into the cylinder. This significantly reduces the risk for fire if you overprime as compared with an O-200 on the Cessna 150, for example, which relies on a single primer nozzle in the carburetor. If you overprime the O-360, it probably won't start. If you overprime the O-200, or don't use force on the primer sufficient to properly atomize the fuel, it will run down into the airbox (remember, both engines use updraft carbs mounted on the bottom of the engine), which will set you up for a nice induction fire if the engine backfires. Moral? Know your engine and how best to prime it.
 The residue you see on the base
of the cylinder above the exhaust stack is from the oil that
leaked through the failed rocker cover gasket and burned off due
to the intense heat in the vicinity. We also found a few telltale
"spots" on the horizontal portion of the exhaust stack (directly
below and out of the field of view) that served to illustrate why
it's so critical to fix oil leaks before they become a rushing
torrent. Oil and hot exhaust stacks do not mix, except when
they're put in contact with one another intentionally for the
benefit of an airshow audience. :-)
The residue you see on the base
of the cylinder above the exhaust stack is from the oil that
leaked through the failed rocker cover gasket and burned off due
to the intense heat in the vicinity. We also found a few telltale
"spots" on the horizontal portion of the exhaust stack (directly
below and out of the field of view) that served to illustrate why
it's so critical to fix oil leaks before they become a rushing
torrent. Oil and hot exhaust stacks do not mix, except when
they're put in contact with one another intentionally for the
benefit of an airshow audience. :-)
In prep for the runup and leak check, Marty then cleaned the engine and interior of the cowling with mineral spirits dispensed from a spray wand connected to the shop air compressor.
About those tires...
With the runup and leak check complete, we put the cowling back on in short order. I was just about to push the aircraft back into a tiedown spot to wait while Marty's secretary (also known as Marty's Mom!) prepared the bill, and Marty asked me whether I had pumped the tires up recently. I said "sure, 25 in the mains and 30 in the nose, right?". He quickly pointed out that due to the engine conversion the tire pressures were higher than for a traditional 172, and managed to pull out a small piece of paper from his toolchest with the numbers he had obviously written down at some point in the past... "38 in the mains, 45 in the nose", came the startling answer. As diligent as I'd been keeping the tires up to pressure and as well as I thought I knew the airplane, I was using the WRONG pressures!
Needless to say, Marty quickly brought the tires up to those pressures, and I noted that the slight bulge in the tires I'd accepted as "normal" miraculously disappeared. I also noticed how much easier it was to move the aircraft with the towbar, which just goes to show you that no matter how many decades have passed since you brought it home, no matter how well you think you know your aircraft, there's always something to learn.