


Garmin 396 GPS Review
Page 1 of 2

At home, the Garmin 396 provides weather and XM Radio via direct
or RF link.
The screenshot depicts what would become the infamous Hurricane
Katrina
The Big Time
During the summer of 2005 I began to fly as a jump pilot. I left the sheltered world of perfectly maintained and equipped airplanes to fly a 1956 Cessna 182. With the exception of the single digital flip-flop radio loosely installed in the panel, the airplane appeared to be stranded in the year of its birth...with about 10000 hours on the airframe, that is.
Part of the gig involved taking the aircraft to another dropzone about a half-hour away as a crow flies. It didn't seem like a big deal until several weekends in a row I was forced to dodge thunderstorms in 3 mile visibility to get home. I soon concluded that I ought to get some near-real-time weather in the cockpit with me or become a statistic.
Get In Line
I researched several solutions from PDAs to tablet computers. None seemed as elegant (or as inexpensive) as a GPS moving map display with integrated weather. Fortunately, Oshkosh 2005 soon arrived and Garmin announced the 396 GPS with XM weather integration. They reportedly sold 3500 of them on site in three days and forced everyone else to get in line for a limited production run due in part to a defective GPS antenna.
I called every avionics shop and online retailer and was quoted delivery dates in "October/November at the earliest". Then I called my local avionics shop. They told me that they had, coincidentally, placed an order for five of the units when Garmin first offered them to dealers a couple months ago. They expected them shortly and offered to reserve one for me.
The fact that I jumped to the head of the waiting list was a perk, but I was still on a waiting list. About a week passed before the shop notified me that Garmin had just shipped his batch out -- a full two months ahead of what others were now quoting. To make a long story short, I took delivery just in time to fly several weekends of good jump runs before the season wound down. I've since flown with it in the 172 on private missions, and outside of the cockpit I've used it extensively in automotive mode. It has also served as my primary home XM radio receiver.
Based on this experience I offer the following review.
Five Stars
Life is short. Rather than keep you in suspense or tell you what you probably already know by now, I'll just come out and say it. You want one of these. The Garmin 396 is probably the best product I've seen to hit aviation since GPS itself (which I first accessed with none other than Garmin's first product -- the GPS100AVD). The unit integrates XM datalink weather, a fantastic sunlight readable display, a speedy processor for rapid screen updates, and respectable battery life. With the 396, GPS has reached critical mass in the cockpit, and at a surprisingly low price point.
If I speak of the 396 in superlatives, please understand that this is my first portable GPS. I avoided the incremental (but still very important) enhancements of the Garmin 195, 196, 295, and 296 -- and in doing so saved about $6K on those units. That's in part why I think even at $2500, the 396 is still a great deal for me and other late adopters. Let me tell you, if you've been on the fence trying to figure out when to buy a GPS, the time is now and the product of choice is the 396.
And don't let the subscription cost for the XM services scare you. While somewhat pricey, fly with the unit once in challenging weather and you'll gladly write the check every month. Or, think of it this way...if you fly a 172, it's less than the cost of a single hour's worth of gas. How much would you pay for the sanity that comes along with datalink weather & TFR depiction?
With that out of the way, let's look at the Garmin 396 in detail.
What's In the Box, Doc?
The box contains the following:
- The crown jewels -- a Garmin 396 with transflective, daylight-readable color display, integral Lithium Ion battery and 64MB memory.
- Stubby GPS antenna with integral male BNC connector.
- External GPS antenna with about 15 feet of 1/8" thick coaxial cable terminating in a male BNC.
- XM receiver/antenna with about 6 feet of cable terminating in a right angle USB2 mini connector.
- Six foot USB cable terminating in a mini USB connector on one end and a full size USB1/2 connector on the other (used to connect the device to a computer for updates)
- Aluminum & high impact plastic yoke mount designed to mate with the yoke tubes of virtually every modern aircraft I've flown. From 3/4" Cessna tubes to larger Beechcraft / Commander aircraft, this is the only yoke mount you'll need.
- Fixed dashboard mount with double-sided tape
- Cigarette lighter DC power adapter
- AC Power adapter
- Small rugged fabric case
In short, it's everything you need to use the GPS in the aviation environment. What's missing? Essentially everything available in the auto kit sold separately:
- Street Maps on CD (MetroGuide Software)
- Beanbag mount
- Flash memory card (128MB)
At the time I bought the 396, Garmin was running a special offer in which they would provide an auto kit for free (normally $300) as long as I cut out the UPC symbol from the box and sent it to them with the ORIGINAL receipt. About a week after I dropped the envelope in the mail, I received the auto kit.
GPS and XM Receiver Firmware Updates
 As with most complex technological devices these days, the
Garmin 396 has upgradeable firmware. The unit came with current
firmware so I didn't need to update it at first, but Garmin
issued three new releases in a bit under 3 months and I managed
to complete each upgrade without any problems.
As with most complex technological devices these days, the
Garmin 396 has upgradeable firmware. The unit came with current
firmware so I didn't need to update it at first, but Garmin
issued three new releases in a bit under 3 months and I managed
to complete each upgrade without any problems.
The process involves installing the USB drivers on a Windows PC, and connecting the GPS to the computer via the USB cable. Since the GPS has only a single USB port you need to disconnect the XM receiver to upload the new firmware. If the firmware package includes a firmware upgrade for the XM receiver, the GPS will download the new firmware to the XM receiver the next time it's connected to the unit. The XM receiver firmware has been updated twice since I took delivery of the unit.
XM Receiver Activation and Operation
The XM receiver arrived deactivated, so I called the XM activation number provided in the box. The only question the customer service rep had was whether the XM weather and radio receivers were to be registered under a single radio id. Finding only a single radio ID on a sticker affixed to the receiver I answered "yes" and gave him that number. He then told me to turn on the receiver and put it in clear view of the sky so it could receive the activation code. In under 10 minutes the unit was receiving XM weather and radio.
It turns out that XM signal strength is excellent, even indoors, Three bars (maximum signal) is the norm, but it is easily affected by antenna location. Six inches either way can mean a great signal or occasional fade-outs. And speaking of fade outs, while in automotive operation the signal will fade out occasionally if the antenna is mounted inside the vehicle. If you leverage the antenna's magnetic base and install it on the exterior of the vehicle, signal quality is outstanding. In aircraft operation with the antenna mounted on the glareshield signal strength is also great. I have never lost the XM signal while flying.
The one installation limitation in aircraft relates to the position of the antenna relative to the magnetic compass. The magnets in the antenna are quite strong and will influence the compass up to 15 inches away. Assuming that the compass is located on the glareshield like in our 172 you'll need to keep the antenna to the far right or left. In those locations I don't notice any impact on the compass.
Power Considerations
The internal battery came discharged, but charging it was a simple matter of installing it and then connecting the GPS it to an external power source via either power adapter. Some experimentation over the next several months revealed that the unit would run for about 4 hours at what I'll define as "usable" backlighting (about mid-level) with the XM receiver connected or an impressive 9 hours without. As you can surmise, the XM receiver is a power hog. In fact, it dissipates so much power that the antenna case itself is an integral heatsink and becomes noticeably warm to the touch during normal operation. On the flip side, Garmin's XM receiver is smaller than the WxWorx unit.
| Garmin 396 Runtime (Without XM) | |
|---|---|
| Backlighting Level | Runtime |
| Off | 11:45 |
| Midrange | 9:30 |
| High | 5:30 |
Fortunately, most of the aircraft I fly have operating 12V cigarette lighter sockets so I don't have to worry about battery life, but one aircraft (the Cessna Caravan) lacks any such power outlet. Since I fly for a full weekend and want to keep the XM receiver connected at all times, I constructed an external high capacity power source consisting of two 12V 7.5Ah sealed lead acid batteries connected in parallel for an amazing 15Ah of juice. This is enough power to run the unit for approximately 28 hours with the XM receiver or nearly 42 hours without. How did I come up with these numbers? Simple. I measured the real-time current draw when connected to the batteries. The results are as follows:
| Garmin 396 Current Draw by Function | |
|---|---|
| GPS Only, Backlighting Minimum, Battery charged | 360mA |
| Backlighting (10 levels) | 20mA-110mA |
| XM Receiver | 180mA |
| Charging Current (tapers to 0 when battery is charged) | 300-0mA |
For planning purposes, you can assume that the unit will pull about 540mA with the XM receiver connected or nearly 840mA at maximum charge rate. When you're charging the internal battery you would normally not care about the additional load the charging circuitry places on the external power source, but I required this information because all batteries have a maximum discharge current and I needed to size my external batteries appropriately.
Display
The 396's display is the clearest sunlight readable display I've ever seen and is subjectively twice as clear as that of its predecessor. Most transflective display backlights, particularly those of PDAs, wash out in direct sunlight. They look, for lack of a better word, transflective -- which is to say, hardly readable with very poor contrast. Not so with the 396. It's at least as bright as the GNS430/530 series and actually has far better contrast than the 430. Fortunately, the 396's display doesn't need that much backlighting even in direct sunlight to look good. And at night, the results are simply breathtaking.
The backlighting increments in 10 levels. The first two levels are what I'd describe as "night backlight settings". The difference in brightness between level 2 and 3 is more dramatic than at any other level, and level 3 is sufficient for daytime use, though I generally prefer level 4 or 5. One thing is sure -- I've never needed the backlight on full brightness even during bright summer days in the 172 or 182, though I imagine someone flying an RV, Pitts, or similar with a bubble canopy might discover otherwise.
Interface Tour
The best way to explain the 396 is to show how it works using actual screenshots. Note that all images in this article are unretouched. Some are actual screenshots from my GPS obtained with the xImage utility, while others are taken with a camera. The camera shots may give you the false impression that the colors are washed out. In reality, the colors are as vibrant as they are on the xImage screenshots.
Here are a few general pictures from the in-flight pages (selectable via the PAGE or QUIT buttons.
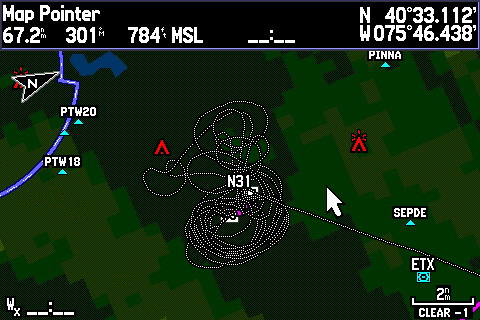
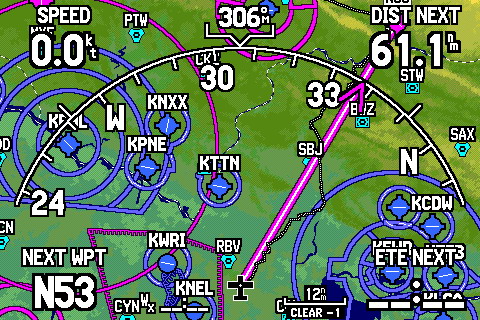 This is the navigation
display in arc mode. It's possible to configure what variables
are displayed in each corner and whether the values are
overlaid on the map or presented in a boxed form down one side
of the screen. It's also possible to provision one side of the
display to show the HSI. Unfortunately, the map as shown here
does not show a CDI so the HSI presentation is the only way to
show courseline deviation.
This is the navigation
display in arc mode. It's possible to configure what variables
are displayed in each corner and whether the values are
overlaid on the map or presented in a boxed form down one side
of the screen. It's also possible to provision one side of the
display to show the HSI. Unfortunately, the map as shown here
does not show a CDI so the HSI presentation is the only way to
show courseline deviation.
It even overlays a vertical deviation indicator on the top right and left of the display automatically when you approach the VNAV profile you have set up.
If you're wondering what the squiggly dotted line is that leaves my current position and briefly crosses the outer boundary of New York Class B, it's a track I made while in automotive mode. Learn more about tracks below.
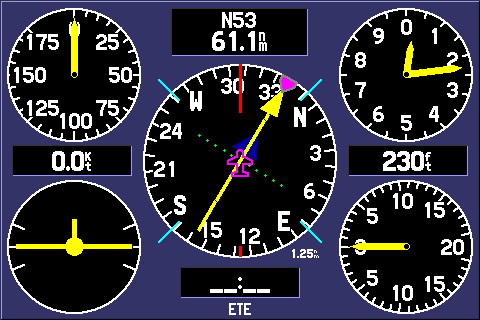 The "six pack" is probably the most controversial feature of
the Garmin 396.
The "six pack" is probably the most controversial feature of
the Garmin 396.
I personally find it of little value since I didn't buy a 396 to look at a representation of my primary flight instruments.
This page does, however, illustrate the relative speed at which the system updates its position. It's still not fast or accurate enough for real-world use and this could never be mistaken for a true AHRS-derived instrument presentation, but it's interesting in a gee-whiz sort of way.
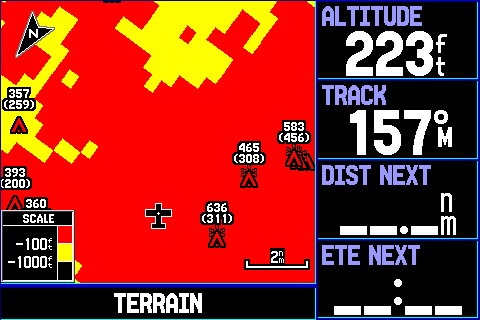 Terrain
within 100 feet of the aircraft is depicted as red, while that
within 1000 feet is yellow. Terrain below 1000 feet is not
depicted. This screenshot was taken on the ground at 223 feet
(roughly...this is GPS altitude we're talking here...not AGL
-OR-MSL), so most of the surrounding terrain is red.
Terrain
within 100 feet of the aircraft is depicted as red, while that
within 1000 feet is yellow. Terrain below 1000 feet is not
depicted. This screenshot was taken on the ground at 223 feet
(roughly...this is GPS altitude we're talking here...not AGL
-OR-MSL), so most of the surrounding terrain is red.
You don't need to monitor this page to receive terrain and obstacle alerts. When I fly jumpers I do fairly aggressive approaches with high rates of descent, and I've seen the unit pop up a warning dialog box to alert me to proximity of terrain as I'm turning final.
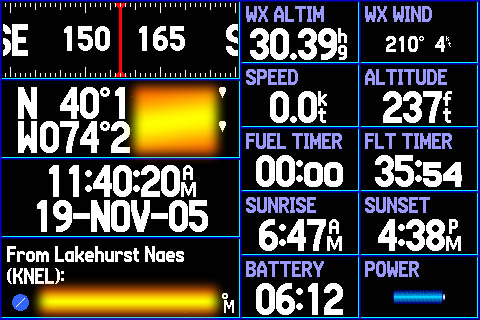 The status page
has a lot of information in one place.
The status page
has a lot of information in one place.
This is one of two places you can see the system's estimate of battery life given current power consumption (yes, this changes in real-time as you change the backlight setting or connect the XM receiver). This picture depicts typical battery life with the backlight at 50% (more than adequate) and the XM receiver disconnected. Based on my experience, the power estimate is accurate.
And just so I don't get anybody flour bombing my house if they don't like this review, accurate position information has been scrubbed from this image.
 The Garmin 396 can tell you where
to go, but it can also tell you where you've been. The unit
continually stores your position and displays a path of dots
similar to breadcrumbs on the screen.
The Garmin 396 can tell you where
to go, but it can also tell you where you've been. The unit
continually stores your position and displays a path of dots
similar to breadcrumbs on the screen.
In this example, I've panned over to Kutztown, PA to show the tracks resulting from the last three skydiving loads of a particularly busy weekend. Trivia: Each load to 10000 feet covers about 55NM over the ground, even though I never get beyond 2-3 miles from the airport(!) How did I know that? The 396 told me, of course!
Incidentally, the blue arc in the upper left corner of the map is the Class D airspace boundary for Reading, PA and the red triangles are obstacles. Following the convention of sectional charts, lighted obstacles are shown with a decoration on top. ETX is of course East Texas VOR and the "Wx" text in the lower left corner is the time since the last weather update. It's blank because the XM receiver was not connected when I took the screenshot.
The relatively straight line leaving the airport is my flight back to home base. And, if your curious, look back at the arc mode display above and you'll see the other side of that line approaching the N53 airport. The squiggly dotted line leaving the airport and arriving at my current position is the track recorded as I drove home with the unit in automotive mode.
Next, let's walk through some of the unit's menu pages.
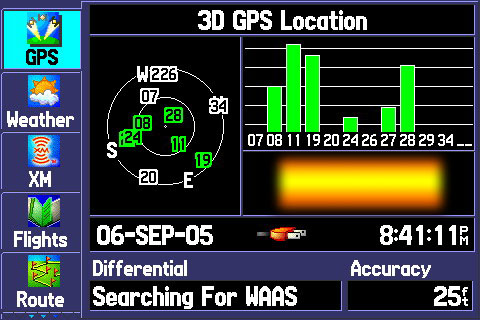 This page shows some
essential information regarding the status of the GPS. You'll
note that the satellite bars are green. That means they're
being used in the position solution. The GPS-accurate time and
date are here as well, and between those is an indication that
the unit is receiving power from an external source (either DC
or AC).
This page shows some
essential information regarding the status of the GPS. You'll
note that the satellite bars are green. That means they're
being used in the position solution. The GPS-accurate time and
date are here as well, and between those is an indication that
the unit is receiving power from an external source (either DC
or AC).
This particular example shows typical INDOOR GPS coverage using the stubby antenna. Using the larger external suction-cup mount antenna, whether indoors or in the car or airplane always results in substantially better performance.
The unit ships with WAAS disabled, so you have to turn it on in the configuration section. With WAAS enabled and tracking, a "D" (for Differential) appears at the base of each satellite signal bar and accuracy increases to show a position error of around 10 feet (!)
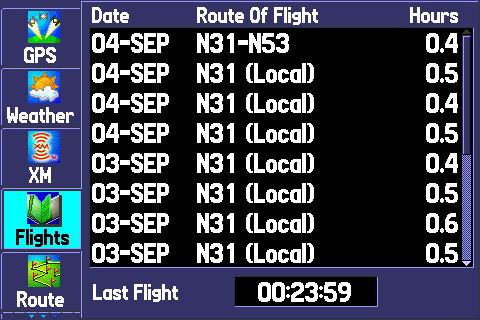 One
of the more helpful aspects of the Garmin 396 is the fact that
it keeps track of your flying. Garmin provides free software
that can download and import this data. Digital logbooks are no
substitute for paper logs, but this takes some of the guesswork
out of tallying the totals.
One
of the more helpful aspects of the Garmin 396 is the fact that
it keeps track of your flying. Garmin provides free software
that can download and import this data. Digital logbooks are no
substitute for paper logs, but this takes some of the guesswork
out of tallying the totals.
Here we see a busy weekend of jump flying. If you don't actually arrive at another airport, the 396 knows this and appropriately calls it "local" flying.
If you're wondering, the 0.4 hobbs flights are what we call hop-n-pops (relatively low altitude drops), while the 0.6 are trips to 10000 feet. Although we based billing on tach time, not hobbs, this served as a nice backup.
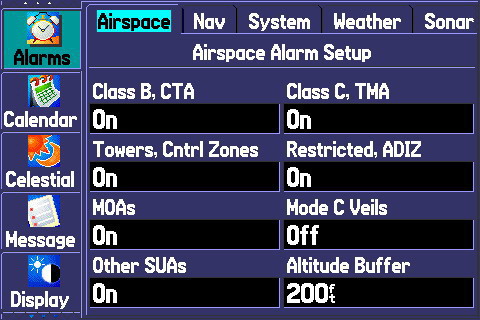 Here we can see
how to enable/disable visible warnings for various types of
airspace. These are the default settings and I've left them
that way because I've been flying VFR a lot lately.
Here we can see
how to enable/disable visible warnings for various types of
airspace. These are the default settings and I've left them
that way because I've been flying VFR a lot lately.
You simply can't run into any critical airspace or TFRs with the Garmin 396 painting real-time maps for you.
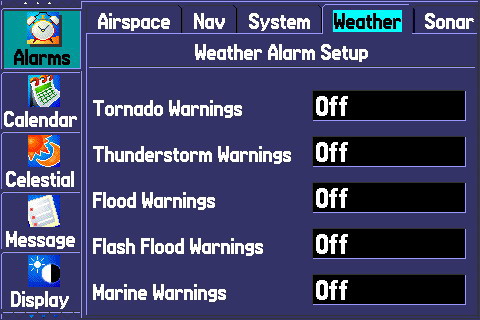 The weather tab of
the alarms page defaults to these settings. I turned most of
them on to test them out.
The weather tab of
the alarms page defaults to these settings. I turned most of
them on to test them out.
Then, one evening a few weeks ago I was in the car leaving my friend's place in advance of a line of severe thunderstorms. Shortly after connecting the XM antenna the entire area of very heavy rain popped up on the screen. A minute or two after that I received a notice on the screen which said "Severe Thunderstorm Warning". I then zoomed out to see the areas covered by the thunderstorm warning were highlighted in a yellow/amber color.
 One of the
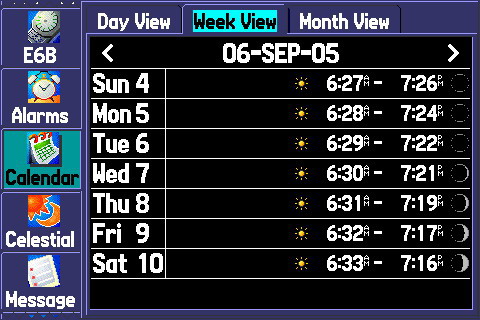
lesser known features of the Garmin 396 - the calendar page.
This thing is fully aware of time and space. Here we can see
the sunrise and sunset times for an entire week at a
glance.
One of the
lesser known features of the Garmin 396 - the calendar page.
This thing is fully aware of time and space. Here we can see
the sunrise and sunset times for an entire week at a
glance.
If you need to quickly look at a particular day more than a week either side of the current date, simply navigate to the month view and then find the date you want.
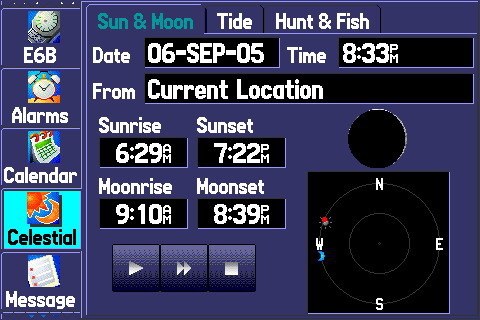 The
Celestial page is a WYSIWYG studio for detemining the position
of the sun and moon in the heavens. You can skip forward in
time to see where things will be at a particular time. The
single arrow ("play" button) skips by one hour. The double
arrow skips by one day.
The
Celestial page is a WYSIWYG studio for detemining the position
of the sun and moon in the heavens. You can skip forward in
time to see where things will be at a particular time. The
single arrow ("play" button) skips by one hour. The double
arrow skips by one day.
This picture shows that on September 6th at 8:33, the sun had just set and a near new moon was just rising. And yes, you can still "see" the sun and moon if they are below the horizon -- they're just colored gray in that case.
The inner circle represents 45 degree elevation above the horizon, while the point at the center of the circles is directly overhead.
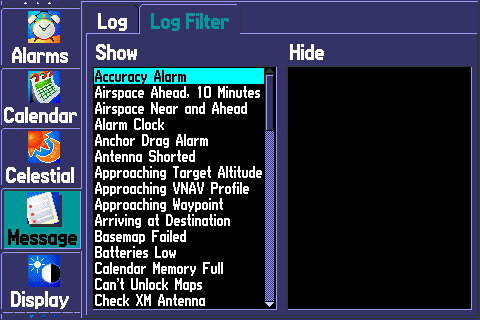 The Garmin
cooks your breakfast for you and logs when the eggs are ready.
In fact, it logs so many events by default that you may find it
helpful to tell it to ignore certain events.
The Garmin
cooks your breakfast for you and logs when the eggs are ready.
In fact, it logs so many events by default that you may find it
helpful to tell it to ignore certain events.
Fortunately, on the Log Filter tab of the Message Page there's an easy way to do this. Just highlight the event you don't want logged and press ENTER. Done.
Note that sometimes these settings are reset during firmware upgrades, so my suggestion is to NOT obsess over these details otherwise you'll have to reset them anyway and be at increased risk for a heart attack.
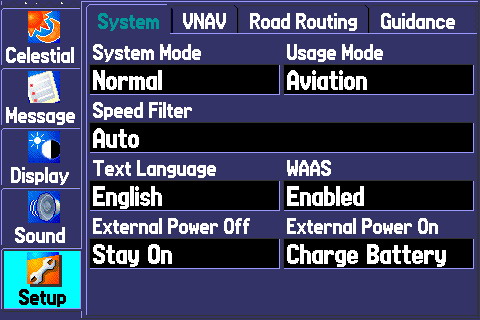 Way down at the bottom
of the menu pages is the setup page. Here's where you set all
the nitty gritty details of the unit's operation.
Way down at the bottom
of the menu pages is the setup page. Here's where you set all
the nitty gritty details of the unit's operation.
The biggie to note here is the WAAS setting. The usage mode can be changed here or by holding the PAGE/MODE button for a second or so (which is by far the most convenient way to do it, even if you're on this page).
Another setting I changed upon delivery is "External Power Off". It was set to turn the device off when the power was disconnected but that would have be highly undesirable in the airplane, especially given the flaky nature of the power output in most aircraft.
An analysis of the weather delivery and depiction follows on the next page.