


Monday, September 1, 2008
Oil Analysis All Clear
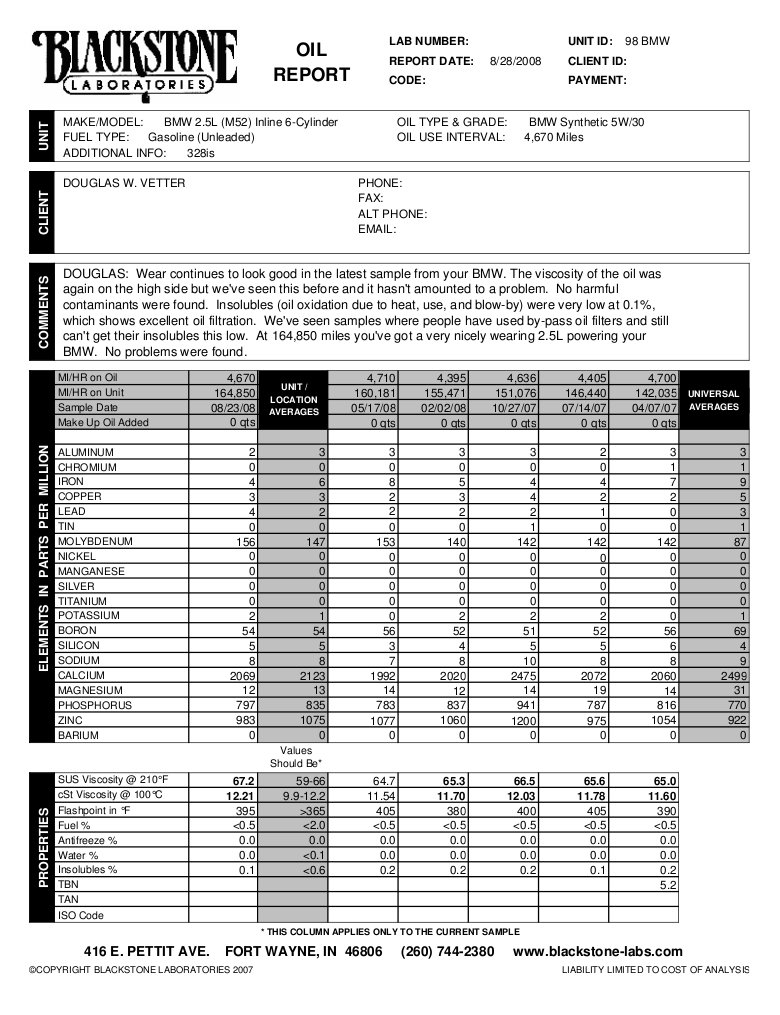 As expected, the oil analysis came back clear,
and I'm beginning to think
I could easily run this engine for another 100K miles provided I keep up with
routine maintenance of the oil and coolant. The chief concern I have at this
point is a failed head gasket, but they usually fail because people don't change
the coolant, so I should be in good shape there. We'll see over the next few
years I suppose.
As expected, the oil analysis came back clear,
and I'm beginning to think
I could easily run this engine for another 100K miles provided I keep up with
routine maintenance of the oil and coolant. The chief concern I have at this
point is a failed head gasket, but they usually fail because people don't change
the coolant, so I should be in good shape there. We'll see over the next few
years I suppose.
Trip to HazMat
I couldn't quite believe that I had managed to collect almost 20 gallons of used motor oil, ATF, and coolant over the past year but that was the tally I gave to the HazMat facility when I made an appointment this morning. I asked the attendants why they were open on a holiday and they said that they were required to be open at any time the nearby landfill was open in case they had a spill over there and needed to clean it up.
I was originally under the impression that I could not throw BMW paper oil filters and oil soaked paper towels and rags into the household trash but the attendants told me that was okay and refused to take them. They did agree, however, to take a metal oil filter I removed from a John Deere tractor because they apparently recycle the metal. I told them I thought this was a bit strange since the paper oil filters can still hold a lot of oil that can leach into the groundwater but it was pretty clear they didn't make the rules.
Trivia for the day -- this one county facility collected over a million pounds of hazardous waste that was recycled or otherwise properly disposed of...and that's a million pounds that didn't wind up in the landfill contaminating our ground water.
Rear Swaybar Bushings and Endlinks
While normal people were out on their decks flipping burgers and dogs on the grill this fine Labor Day, crazy BMW owners like me were using this holiday as an opportunity to catch up on some work that got swept under the rug. Of course, I'm referring to my rear swaybar (ahem, "stabilizer bar") bushings and endlinks.
I bought the parts for this job last year when I did the front swaybar, but stories online of DIYers having problems with the press-fit endlinks scared me off at the time. The odd "loose" feeling in the rear end at high speed I've experienced recently prompted me to tackle this before I take the car in to see my technician for a test drive to get his opinion. I'm pretty sure the problem is bad trailing arm bushings, but I won't know until my technician uses his 30 years of experience, puts his ear to the road, so-to-speak, and gives me his diagnosis.
I gathered what information I could find from online resources as well as the TIS and started work around noon today. I expected to be done in around two hours but I ran into a snag. In short, I somehow managed to strip the threads on one of the new brackets used to connect the endlink to the upper control arm. I was not pleased.
I knew that the car was safe to drive in that condition because there was no way in hell that nut was going to pull out the remainder of the threads, but I'm never one to do things half-assed. So I cursed a few times and then attacked the nut with a reinforced cutting disk attached to my Dremel. In about 10 minutes I managed to cut the stripped nut off and remove the swaybar again. The original bracket was still in great shape so I cleaned it up and installed it on the new endlink, reinstalled the bar, torqued the fasteners as best I could and breathed another sigh...this time one of relief.
 The strange thing about stripping the nut is at no time did the fastener on
the left side bracket "tighten up" as the bracket and control arm mated. I
mean, this "tightening" is obvious when it occurs on the bushing brackets,
for example, since you literally can't turn the fastener with the same torque
anymore. But that didn't happen here, and the kicker is the VERY SAME THING
started to happen with the old bracket I reinstalled on the left side to replace
the damaged new bracket, but this time I didn't go so far as to pull out the
threads. I simply stopped turning the fastener when I saw the anti-twist nub
on the bracket appear in the adjacent hole in the control arm. Was the bracket
fully mated with the control arm? I think so, but there was no way in hell
I was going to destroy another bracket to test the theory. Frankly, I think
the brackets are defective and should be made of a much harder steel so this
doesn't happen, but I don't expect BMW to acknowledge that in my lifetime.
The strange thing about stripping the nut is at no time did the fastener on
the left side bracket "tighten up" as the bracket and control arm mated. I
mean, this "tightening" is obvious when it occurs on the bushing brackets,
for example, since you literally can't turn the fastener with the same torque
anymore. But that didn't happen here, and the kicker is the VERY SAME THING
started to happen with the old bracket I reinstalled on the left side to replace
the damaged new bracket, but this time I didn't go so far as to pull out the
threads. I simply stopped turning the fastener when I saw the anti-twist nub
on the bracket appear in the adjacent hole in the control arm. Was the bracket
fully mated with the control arm? I think so, but there was no way in hell
I was going to destroy another bracket to test the theory. Frankly, I think
the brackets are defective and should be made of a much harder steel so this
doesn't happen, but I don't expect BMW to acknowledge that in my lifetime.
That little headache aside, the job went more or less as planned and the car seems to be a bit more "smooth" in the rear as a result. The effect so far appears quite subtle, much in the same way the front end quieted down when I replaced the front end links and bushings. The rubber bushings in the end links were definitely cracked, but still surprisingly flexible. The support bushings on the car were in pretty good shape too and were still quite pliable, though they were slightly worn and compressed a bit near the edges just like those I removed from the front swaybar. I'm not sure if the new parts will really make a difference, but if after some additional driving I can articulate the change(s), I'll document them here.
The best tip for this work came from my technician, who pointed out that if I couldn't get the car high enough off the ground to get the swaybar near vertical as required to snake it out from under the car, I'd need to remove the two rear rubber isolation muffler mounts from the body and pull the muffler down a few inches. He promised this would provide the clearance between the bar and pipes needed to minimize the angle at which one is required to rotate the bar to remove it. And sure enough, it worked exactly as he indicated. Have I said lately my tech is a cool guy?
Book labor for this task reportedly 1.5 hours, or about $180 with tax at my dealer, which means most master BMW techs could get it done in half that time. When I looked up at the clock as I began to put the tools away I realized nearly three hours had passed. Forty-five minutes of that time, however, was required to correct the stripped fastener and I spent at least 15 minutes cleaning up afterward, thus I wasn't far off from the book labor figure. I expect the "customer" will be pleased with my bill. :-) I'll call this job $65 in parts and Labor Saved of $180.
I'll be swamped with other things this week as I return to the salt mine, but I hope to update my existing Swaybar Service DIY with this new information as soon as I'm able. Look for that.
Mileage: 165200, Parts $65, Labor saved $180