


Saturday, June 5, 2010
Axle Remanufacturing Options
For the past week I had been going back and forth about the need to regrease the CV joints in the rear axles during the rear suspension overhaul. I would have preferred to do the job myself and save a ton of money, but given the scope and logistical headaches of this job, my schedule, and the cost of my time to rework them, I ultimately decided to go with a pair of "remanufactured" BMW output shafts.
Of course, "remanufactured" is a somewhat disingenuous term as applied to those parts. Normally, the term "remanufactured" refers to a part that has had all wear components replaced with new parts. The unfortunate reality is that BMW does not replace the CV joints on their "remanufactured" output shafts. The better word to describe what BMW does is "overhaul" the joints, which amounts to disassembly (where possible), cleaning, inspection for damage, regrinding, and then regreasing and installing new boots and clamps. Basically, this is the same kind of thing a pro technician or DIYer can do (sans grinding), only a hell of a lot more expensive.
I looked into having a professional remanufacturer overhaul my axles but the one I spoke to (raxles.com) said they couldn't touch BMW axles anymore because they were no longer able to source new CV joints from Germany. Both raxles.com and Mike Miller of the BMWCCA confirmed that due to a "bear claw" design of the outer joint, few if any remanufacturers can disassemble the joint in the same way an average DIYer can disassemble the inner joint. It was not always this way but BMW changed the design for some stupid reason, so now all we have are more or less throw-away parts. The best thing to do, therefore, is make sure your axles don't fail.
As Mike Miller commented, however, he has yet to see a failure of a CV joint on the back of a BMW that wasn't due to failure of the boots (which causes the grease to leak out and moisture and dirt to get in and destroy the joint in short order). So it's safe to say that if you are so inclined and have the time to invest in the process. you can clean them in a bucket of solvent, regrease them and install new boots for considerably less than I paid for each of the BMW "remanufactured" units. Of course, do that job wrong and you'll be buying BMW remanufactured shafts in any case. I could not take that risk, and with a nearly 25% discount on the parts from my dealer (a total of $750 without the core charge), buying OE up front seemed like the best thing to do.
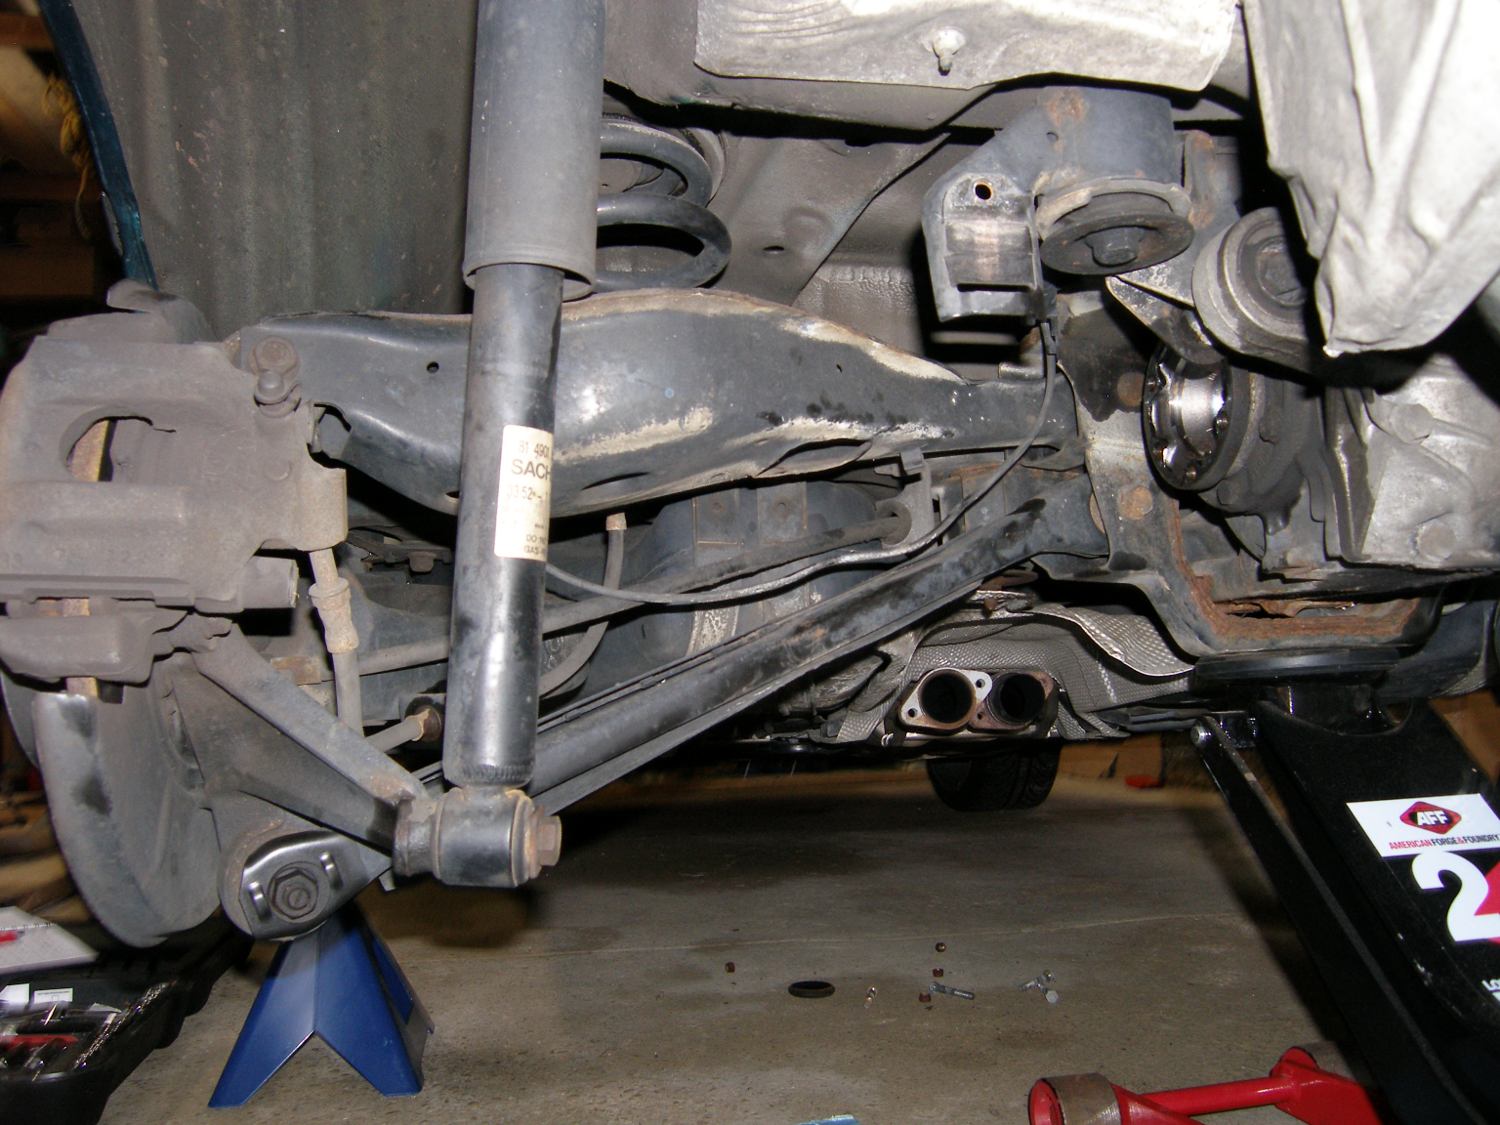
Rear Suspension Overhaul - Disassembly Day One
 I had hoped to begin the suspension overhaul
last weekend but I wound up
committed to other things for the holiday. It was probably just as well, since
I was still busy sourcing parts and dealing with the logistical headaches associated
with a project of this magnitude. And as it turns out, my technician went on
vacation this week so while I didn't expect to need his counsel to dismantle
everything and get the parts out for overhaul, I knew full well it would be
preferable to have him a mere phone call away before I started tearing into
this.
I had hoped to begin the suspension overhaul
last weekend but I wound up
committed to other things for the holiday. It was probably just as well, since
I was still busy sourcing parts and dealing with the logistical headaches associated
with a project of this magnitude. And as it turns out, my technician went on
vacation this week so while I didn't expect to need his counsel to dismantle
everything and get the parts out for overhaul, I knew full well it would be
preferable to have him a mere phone call away before I started tearing into
this.
The vast majority of the parts came in from Tischer and my local dealer yesterday and I spent a couple hours inventorying everything last night. This was a very big and tedious process largely because I ordered virtually all new hardware to replace rusted or otherwise damaged parts. As it turned out, they shorted me a few parts, including a wheel bearing. That shouldn't delay me as long as the parts arrive before mid-week.
I set the goal for today to disassemble the entire rear. Needless to say, I didn't get that far. This is what I did manage to accomplish:
- Remove the interior panels from the trunk.
- Remove the wheel nuts.
- Remove the sway bar.
- Partially disassemble the brakes and disconnect the wear sensors
- Remove the nuts holding the driveshaft to the differential.
- Remove the external torx bolts holding the axles to the differential.
- Push the driver's side output shaft out of the hub.
The first snag of the day came when I attempted to use my 36MM socket to remove the axle nuts. Too bad I got my signals crossed and bought the wrong socket. The E36 uses 30MM nuts on the rear. So, I jumped in the E46 and ran over to Eppy's to buy a 30MM impact socket. Fortunately that only ran me $11, but I naturally saw some other sockets I needed to the total bill jumped to $125. This deviation blew about an hour of my day.
I quit for the day after about 5 hours of work when I realized I was not able to press the passenger side output shaft out of the hub using an air hammer or the old fashioned hand-operated kind. This will require a two arm puller, something I plan to buy tomorrow. I figured I could probably leave the output shaft in the trailing arm and let my local indy tech press it out when they press out all the bushings for me Monday, but I have to go the tool store anyway to pick up a set of impact sockets to remove the subframe. There is no way those rusted bolts and nuts will come out using breaker bars. I had a hell of a time just removing the output shaft bolts (yea, even the ones my tech removed a couple years back when he did the left rear wheel bearing, and yea, after I coated them earlier in the day with some PB Blaster penetrating oil), so I'm convinced I'll need air tools and appropriate sockets to make that happen.
The good news is that there is nothing to stop me from removing the differential first thing tomorrow, which is absolutely necessary for me to fly it up to diffsonline on Monday morning. I'm doubtful at this point whether I will be able to reassemble everything by next weekend simply because I don't believe my parts will be back from powdercoat until late in the week and I still have to schedule my indy tech at that point to press all the new parts in. Worst case is the car will be down for two weeks and I'll spend next weekend taking a well-deserved break. We'll have to wait and see.
Mileage: 193332, Parts: $1572, Tools: $125, Supplies: $30, Parts Saved: $400