


Saturday, September 3, 2011
State Inspection
I knew I might get the car into a state during the upcoming interior overhaul that might preclude taking it to inspection before the end of the month so I decided to take care of that yesterday in advance of the work I had planned for the weekend.
Fortunately, the car passed with flying colors and I even received an indirect complement on the car from one of the inspectors. While trapped in the little ventilated cage they put the owners in "for their own safety" I overheard the inspector in the next lane asking the guy working on my car for the model year. He followed up by saying "98, huh? Wow...that looks really good!" Of course, I don't really give a crap what people think of the car I drive -- I drive it for my own personal gratification -- but it's nice to see that the car still presents well after all the blood, sweat, tears and, of course, money I've spent maintaining it.
Interior Overhaul - Day 1
After washing the car and spending some time helping my brother prepare one of his vehicles to be wrapped for advertising purposes I began work on the interior overhaul project.
Naturally, I started with the easy stuff first including removal of the visors, the sunroof switch panel, oh-shit handles and the light assemblies that are press-fit into the headliner. I had hoped to salvage the passenger side visor clip but as I rotated the visor down to gain access to the screws at the mounting point the clip disintegrated in a familiar fashion. In all my years I've never seen plastic become this brittle before, but I suppose there's a first for everything. The fact that these cheap and failure-prone parts are no longer made by BMW in my interior color irritates me to no end (and yes, I'm planning to call BMWNA and bitch for all the good it will do), but I consider myself lucky that I was able to order new clips at all.
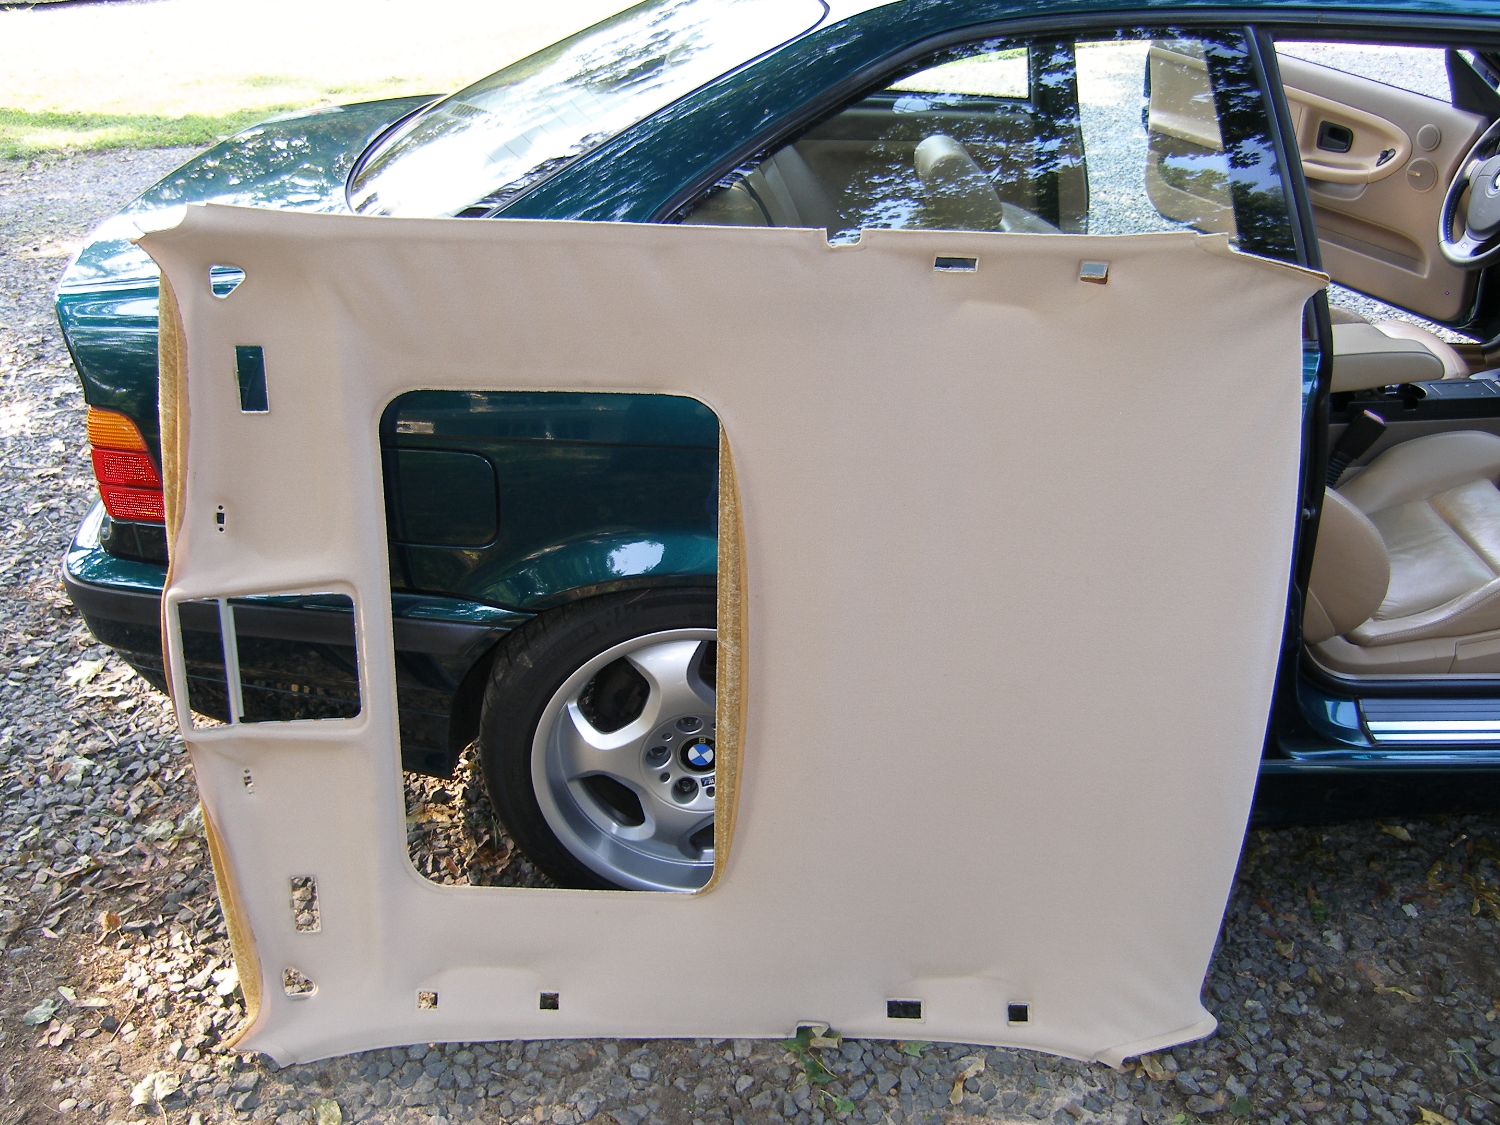 I then carefully removed the A, B and C pillars,
knowing full well they are
no longer available from BMW and any ham-fisted approach on my part would likely
lead me down a road involving more time and money.
I then carefully removed the A, B and C pillars,
knowing full well they are
no longer available from BMW and any ham-fisted approach on my part would likely
lead me down a road involving more time and money.
To remove the A pillar trims I grabbed the piece with two hands positioned near the top and middle of the part, squeezed the sides in a bit to get a good grip on it and tugged straight away (i.e. perpendicular to) the piller itself. There are two long plastic "fingers" built into the trim that upon installation are inserted into metal retention clips in the pillar itself. These are located near the top and middle of the pillar trim, while the bottom of the trim is retained to the vehicle only by its fit into the relief built into the dashboard, so once I freed the two clips, I just pulled the trim up and out. Unfortunately, a portion of one "finger" on each A pillar trim stayed behind with the metal retention clip in the body so I have some concern that I will need to buy new parts or they will not fit properly when I reinstall them.
To remove the C pillar trims I first removed the light assembly (which is simply press fit) and then inserted several fingers of one hand into the hole facing upward toward the top of the trim to support the piece as I attempted to use my other hand to grab the top edge of the trim before pulling straight out. This revealed two fasteners near the top edge of the trim. I then pulled the top of the trim away from the pillar enough to get a look at another couple of fasteners at the base of the trim. What I didn't realize until I completely removed the trim is that the "fingers" are molded such that the trim should be pulled toward the center of the vehicle, not perpendicular to the pillar as is the case with the A pillars. I have no idea why BMW did this, but I'm sure the same particle physicist that replaced tried and true screws with these God-forsaken one-time-use fastening methods was responsible.
The B pillar trims were still helping to hold up the headliner so I removed those at this point. I first removed the small half-moon shaped plastic trim that covers the seatbelt retaining nut and then removed the nut using a 16mm hex socket. I then removed the small T-shaped handle that allows vertical adjustment of the seatbelt by pulling it straight out and off the post on which it mounts. I then used a technique similar to that used on the A pillars to "squeeze and pull" the top of the trim off the car. What I didn't realize until I removed the first trim, however, is that the bottom is retained by an "L" shaped plastic clip that mates with a slot in the pillar and so I pulled the top of the trim away from the pillar too far before pulling the trim upward, and that wound up severely bending the L clip. Fortunately in this case, the bottom of the trim is largely retained by the side panel so I don't expect this to be a big problem.
Sadly, while I was looking more closely at the B pillar, I noticed that the center section of the driver's side rear panel (what would be the rear door panel if this was a sedan) had partially delaminated. Since I'll have the rear seats out to do the parcel shelf shortly, there's no time like the present to fix that with some five minute epoxy. Scope creep anyone?
With all the obvious parts retaining the headliner removed I gently wedged my index finger under the door seals and walked my finger along the length of the seal as I pulled the headliner down and out from under the seal. With both sides done and the headliner clearly loose on all four sides I sat back for a moment wondering why the headliner hadn't fallen down yet. Then I looked straight up at the sunroof opening and realized that the "synthetic strip" that lines the interior sunroof opening isn't just cosmetic -- it helps mate the headliner with a flange on the sunroof cassette. I couldn't get a good grip on the strip from the inside of the car so I fully opened the sunroof, stepped outside and grabbed it from the top. One good tug pulled the strip away from one side of the opening and the other sides followed easily enough. My brother was unassumingly sitting in the passenger seat so as the headliner dropped away at this point his head conveniently cushioned it's fall. What else is a brother for? :)
Before starting work today I did some additional research to determine exactly how to extract the headliner from the car. One comment I found online read "it's hard to describe how to remove the headliner. You'll figure it out when you get there". And that's not far from the truth. I moved the seats all the way aft and reclined the seat backs until they hit the back seat. The passenger window was already down for ventilation purposes so at that point all I needed to do was rotate the front of the headliner toward the passenger door. Common sense led me to realize that I needed to keep the right side of the headliner (facing aft at this point) up near the top rear corner of the door frame while I kept the left side lower than that, but higher than the dashboard. At this point I stopped and thanked the German designers and engineers since the headliner easily cleared the frameless door. I can't imagine how this job is done in the sedan. Good luck to you guys.
All in all, this is not the nightmare most people make this out to be. I wouldn't care to do this every day and I'm still nervous about installing the new part, but I did make a point to play around with the old part, pushing it in and out and generally experimenting with it to ensure I would be able to install the new part without bending it. Of course, you know what they say about the best laid plans...
After some brief cleanup, I left for the day. I lost track of time during the process, but my brother mentioned I had been working for about an hour and a half. Felt like two hours to me, so I'll go with the latter estimate. That's no doubt higher than book but, as usual, now that I've done the job once I could probably do it again a lot faster.
Tomorrow I plan to go back to the garage and do the following:
- Remove, repair and reinstall the driver's side side rear panel.
- Clean and function check the sunroof
- Install the new external sunroof seal and do a water leakage test.
- Install the new rear window seals
- Install the new parcel shelf.
- Test and then permanently install the iPod adapter.
That's actually more work than it at first appears so I'm not sure I'll get it all done, but it's a plan.
GTI Evaluation Leads To Visor Clip Epiphany
Yesterday I found myself stuck in traffic in front of our local VW dealer so I decided on impulse to scoot in and take a look at the latest generation GTI. I've always had a thing for the GTI and in fact once owned a 2001 VR6 (with a stick, of course). In spite of some initial quality issues typical of VW at the time and a crappy dealer (thankfully since defunct), I really enjoyed the car and regretfully sold it in 2002 after the parasites on Wall Street got finished ass-fucking the tech industry on which I depended for my survival.
I found only 4 door 2011 leftovers as well as one used 2010 2 door on site, but that was enough to survey what VW had done in the last two design cycles and I was reasonably pleased at what I found. Unfortunately, VW no longer provides a normally aspirated or VR6 engine option (even in the upcoming R model), but that's life with the eco-nazis in control. The plaid cloth seats are considered the base trim but I actually like them more than the otherwise well-done leather. The fact that the cloth is lighter and ultimately cheaper to replace in the long run is a definite plus. Hey BMW, you listening? A cloth option (a la E30 M3) in M colors would rock. P.S. Alcantara sucks.
Anyway, back to the point for this segment. After sitting in the car a few minutes and investigating the tactile response of all the knobs and buttons I looked up at the visor and rotated it to reveal a visor clip very similar to that on the E36. I couldn't help but smirk. I pulled the visor out of the clip and saw the same type of electrical contact used in the BMW part to illuminate the mirror. I couldn't tell whether the part would fit the E36 but no sooner than I considered that as an option I realized parts from the E46 might work as well. The reason I didn't consider it earlier is because I figured the visors themselves might need to be replaced as well to make it work. Since today's work revealed that mine are in worse shape than I thought I am not opposed to replacing them if necessary.
Mileage: 212035