


Friday, June 16, 2017
Plan To Discard Old Airbag
While in my technician's bay with my E46 for a driver's side airbag recall campaign I recalled that I still had the airbag from my E36's original four spoke wheel from when I converted to the three spoke back in 2007. Knowing that it would be unsafe to simply throw it in the trash asked my technician for his opinion on how to dispose of the airbag properly.
He said the easiest way is to set it off and then discard it in the trash. There's apparently a special BMW tool for this task which involves a ~50 foot cable and a trigger. He was not sure whether the dealer still had the tool but I expressed an interest in obtaining it to detonate my old airbag. If he cannot provide that tool I'll probably just buy the harness connector and pigtails from BMW and then connect that to about 50 feet of lamp cord and a 12V battery...while my camera records the action, of course. Stay tuned.
First BMW Parts Order
Early in the week I placed the first of what will likely be a few big parts orders from my dealer and the order arrived in full today. I pleaded with the parts guys to be extra kind to my wallet so they gave me an additional 5% across the board discount for a total of 25% and slightly higher discounts on some of the big ticket items like the driveshaft (which I have yet to order). During this process I researched and recorded prices for the OE parts and then searched for aftermarket parts to get the cost down where possible. Unfortunately, my research has revealed that the quality of aftermarket parts has dropped significantly in recent years and once-respected manufacturers are being found negligent with respect to quality control (QC).
For example, Glyco is the OEM for BMW and Porsche main and connecting rod bearing shells. BMW sells each bearing shell (top and bottom) separately, and charges a small fortune for them ($12 per rod shell, $19 per main shell, two shells required per rod / main). In the aftermarket Glyco sells full bearing kits at a considerable discount (the entire rod/main set goes for $100) but they have developed quite the poor reputation for quality lately as builders have taken note of inconsistent bearing thicknesses. One builder paid Porsche's ransom for the OE bearings and found they all had three marks across a portion of the bearing face, which he surmised was the result of additional QC processes. Those bearings naturally worked perfectly.
As a result of this and other stories of prematurely failed head gaskets, trashed threads on aftermarket head bolts and the like I have decided to stick with OE parts where replacement would impose significant inconvenience or cost. This means that most of the seals and internal parts, including bearings, will come from BMW. While this will clearly increase the cost of the project somewhat the discounts offered by my dealer will reduce my wallet's pain and suffering to the extent possible.
On the other hand, when it comes to easy-to-replace items like the valve cover gasket it makes sense to order that gasket and the small grommets from the aftermarket where they are half the price (or less) than the BMW equivalent. If those fail I'm out at most an hour's labor so I'll take those odds. I'm also planning to buy a set of aftermarket head bolts ($15) in addition to the OE set ($50) that arrived today. As these are torqued to their yield point they are one-time-use parts, and all things being equal I'd rather waste $15 installing the torque plate than $50. The OE set will naturally be used for the final installation.
Driveshaft Note
While discussing an upcoming parts order with my technician recently I said I was planning to wait to purchase the driveshaft until I got closer to the installation date. He cautioned me that while the lead times are pretty standard on these parts they are heavy and occasionally arrive damaged. When he sees damage he just sends them back rather than risk installing them and inconveniencing everyone involved with the need to swap the unit later. This has convinced me to order the driveshaft at least a month in advance of the installation date. I checked with the parts guys and they said they would be willing to store the driveshaft for me until I need it, so I could order it earlier if desired.
For those wondering why I have elected to purchase the OE part vs. send my unit out for overhaul / exchange at Driveline of Portland or one of the other popular remanufacturers, it's simple, really. My dealer has discounted the driveshaft a bit over 30%, which puts the price for a BMW reman at around $750. That isn't that much more than what Driveline of Portland charges, and when I factor in the potential delays and cost associated with shipping damage or an improper rebuild that ultimately forces me to pull the driveshaft again (likely with me under the car instead of my technician), it's just not worth the risk. Buying the OE part and having my technician install it grants me a two year warranty and given how sensitive these cars are to driveshaft quality / balance I think that's worth the extra coin.
Sensor Replacements
I recently consulted with my technician about my plans to replace almost everything connected to the engine and asked whether he would recommend replacement of any sensors, particularly if they are original.
The crank position sensor was the first thing that came to mind because if that one fails it puts you on the side of the road. It's also not particularly convenient to access with the engine in the vehicle so now is the time to replace it. I then asked about the knock sensors. His response was that they're nothing more than a piezoelectric element and basically bullet proof so they could be reinstalled...provided that the insulation on the wires and the connector are still in reasonable shape. Unfortunately I won't know that until we pull the engine.
I recently replaced the cam sensor so that will be reused. I am contemplating replacing the vanos solenoid because the last time I removed it I found the insulation heat damaged, but it's not a cheap part so I may just reinstall it for now as it's easy to replace in the future if it does fail.
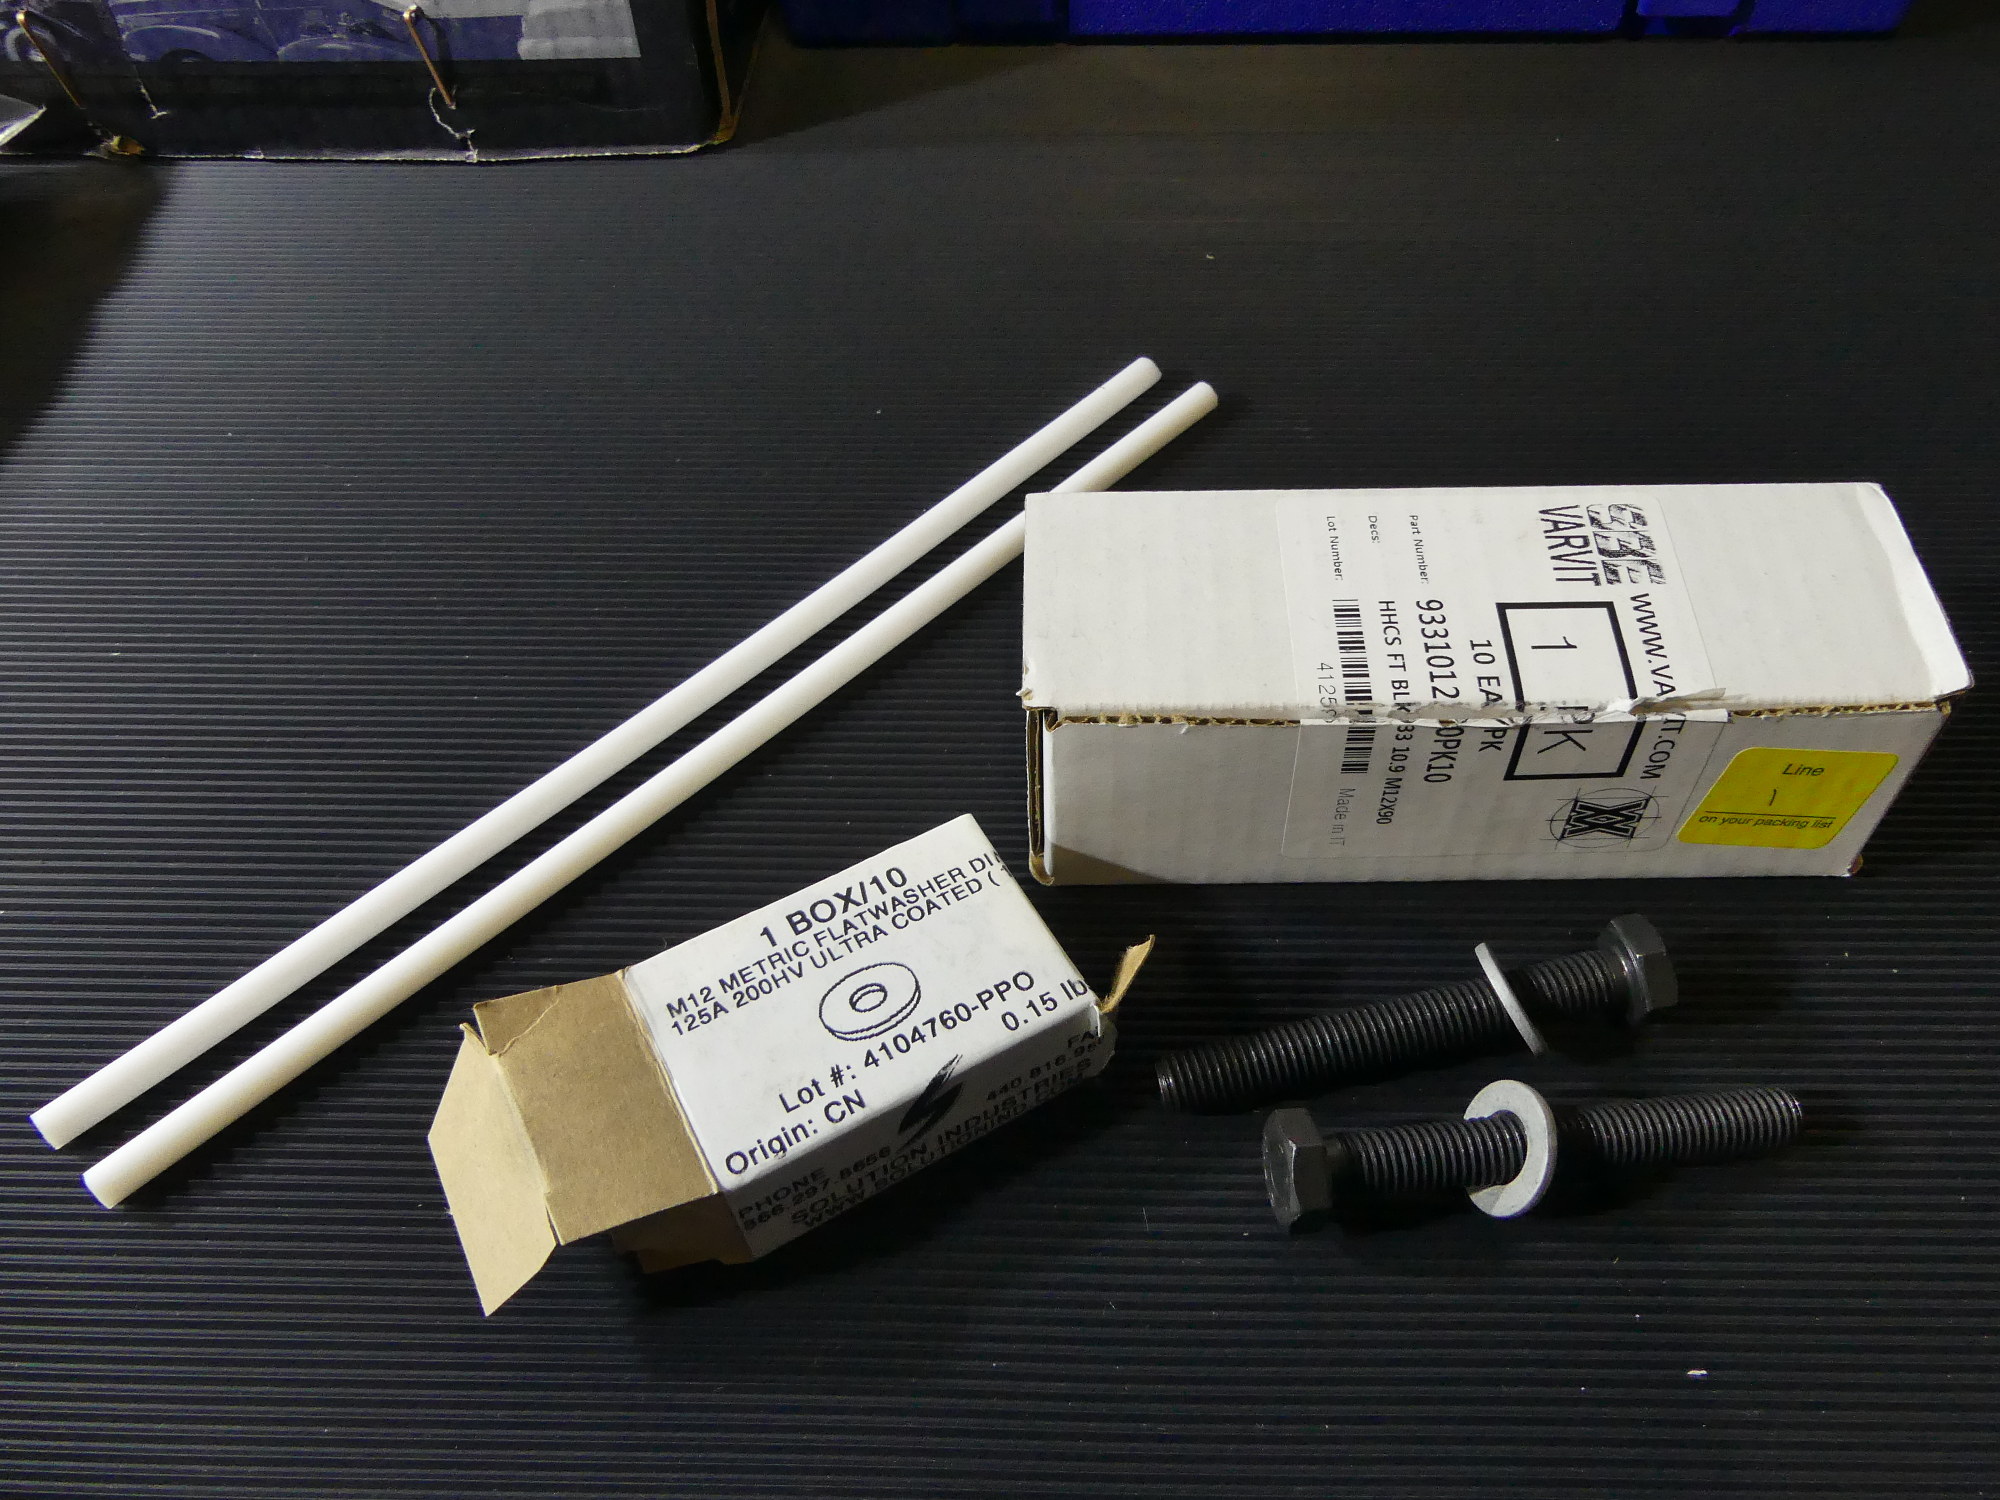
Engine Stand Mounting Hardware
After striking out at the local home center hardware section looking for the M12x1.75 90mm bolts I'll need to mount the engine to the HF engine stand I decided to order them from McMaster-Carr. While I only needed four bolts the minimum order was 10 bolts so I added those and some washers.
Timing / Head Installation Dowels
Rotating the camshafts with the timing chains removed (required during the camshaft installation procedure) brings the risk of contact between the valves and face of the pistons because the M52 is an interference engine. So before the cams are rotated I have to verify all of the pistons are sufficiently (at least 10mm) below TDC. Most people seem to use a screwdriver for this task. As my new pistons are ceramic coated and I don't want to risk any damage to the coating I felt it best to buy a couple plastic (non-marring) dowels from McMaster-Carr for this purpose.
The plan will be to turn the crank so cylinder #1 is at TDC and insert the locking pin into the flywheel. Then I'll insert a dowel into the cylinder #1 spark plug hole and mark the rod in several positions -- first at the top face of the spark plug boss and again in a few 10mm increments above that. This will provide a simple ruler I can use to determine how far away from TDC the piston is located. Then later, while I'm installing the cams, I'll insert the rod into the appropriate cylinders (1-3 or 4-6) and turn the crank until the rod drops by the requisite amount. At that point I'll be able to safely rotate the cams.
I selected dowels manufactured from PTFE primarily because it was the least expensive plastic option. I selected a 5/16" diameter rod because that is, coincidentally, the diameter required if they are used as guide pins during the head installation. I doubt I'll need them for this purpose as I'll be installing the head while the engine is on the stand rather than crammed into the car at an angle, but they are nonetheless available for that purpose.
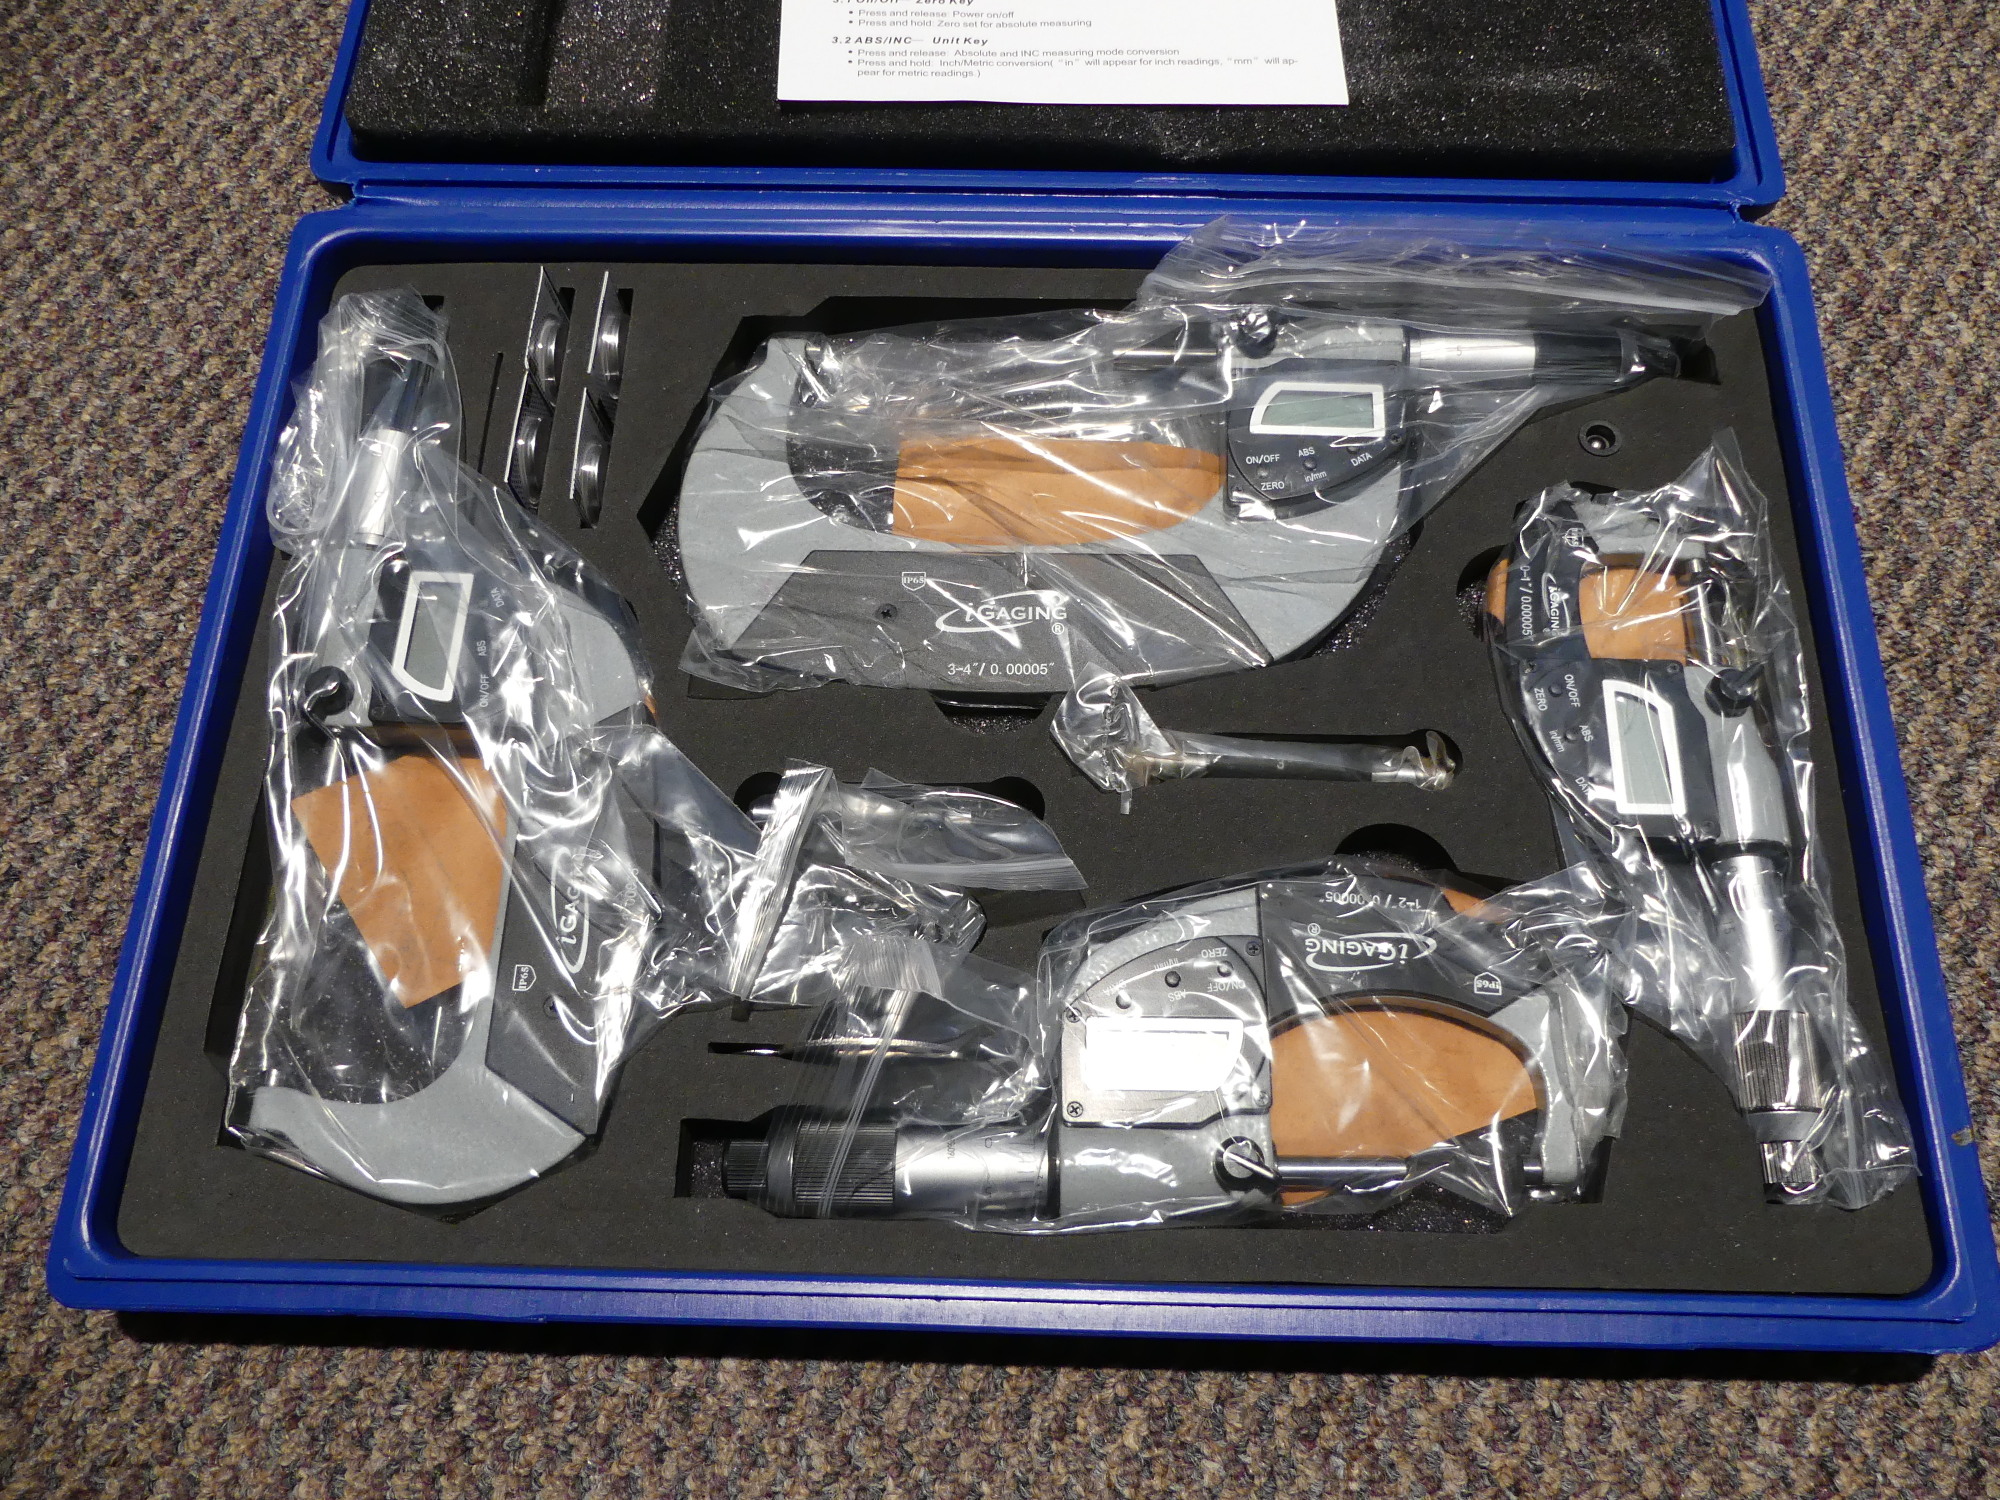
Micrometers Arrive
The set of iGaging IP65 digital outside micrometers arrived last week. They came with 2032 batteries installed and a second set of batteries in the case. I took each of the four calipers (0-1, 1-2, 2-3, 3-4") through a simple calibration process using the standards provided and quickly discovered that the thimble, rather than the speeder, provides the ratcheting function. I actually prefer this, as it's easier to grab the larger grip of the thimble.
I used some alcohol to clean the standards because any dirt can easily cause errors in the scope of at least several ten thousandths and then used them to check the absolute accuracy of the units. I'm happy to report that all were pretty close (within a couple hundred thousandths) though one indicated a touch lower than expected, which means that either the standard was not correctly machined or the unit itself is slightly inaccurate. In any case, the accuracy on all far exceeds what I'll need for this work so these units will get the job done.
Vinyl Table Mat
I ordered the vinyl mat for my work table on May 30th and it arrived on June 9th. I considered that pretty slow service in this day and age but I didn't complain as I ordered in advance. The vendor offered the mat in one foot increments in both width and length so I picked up a 36x80" section that I plan to cut to fit the table. The remainder will likely line some of the drawers in my tool chest.
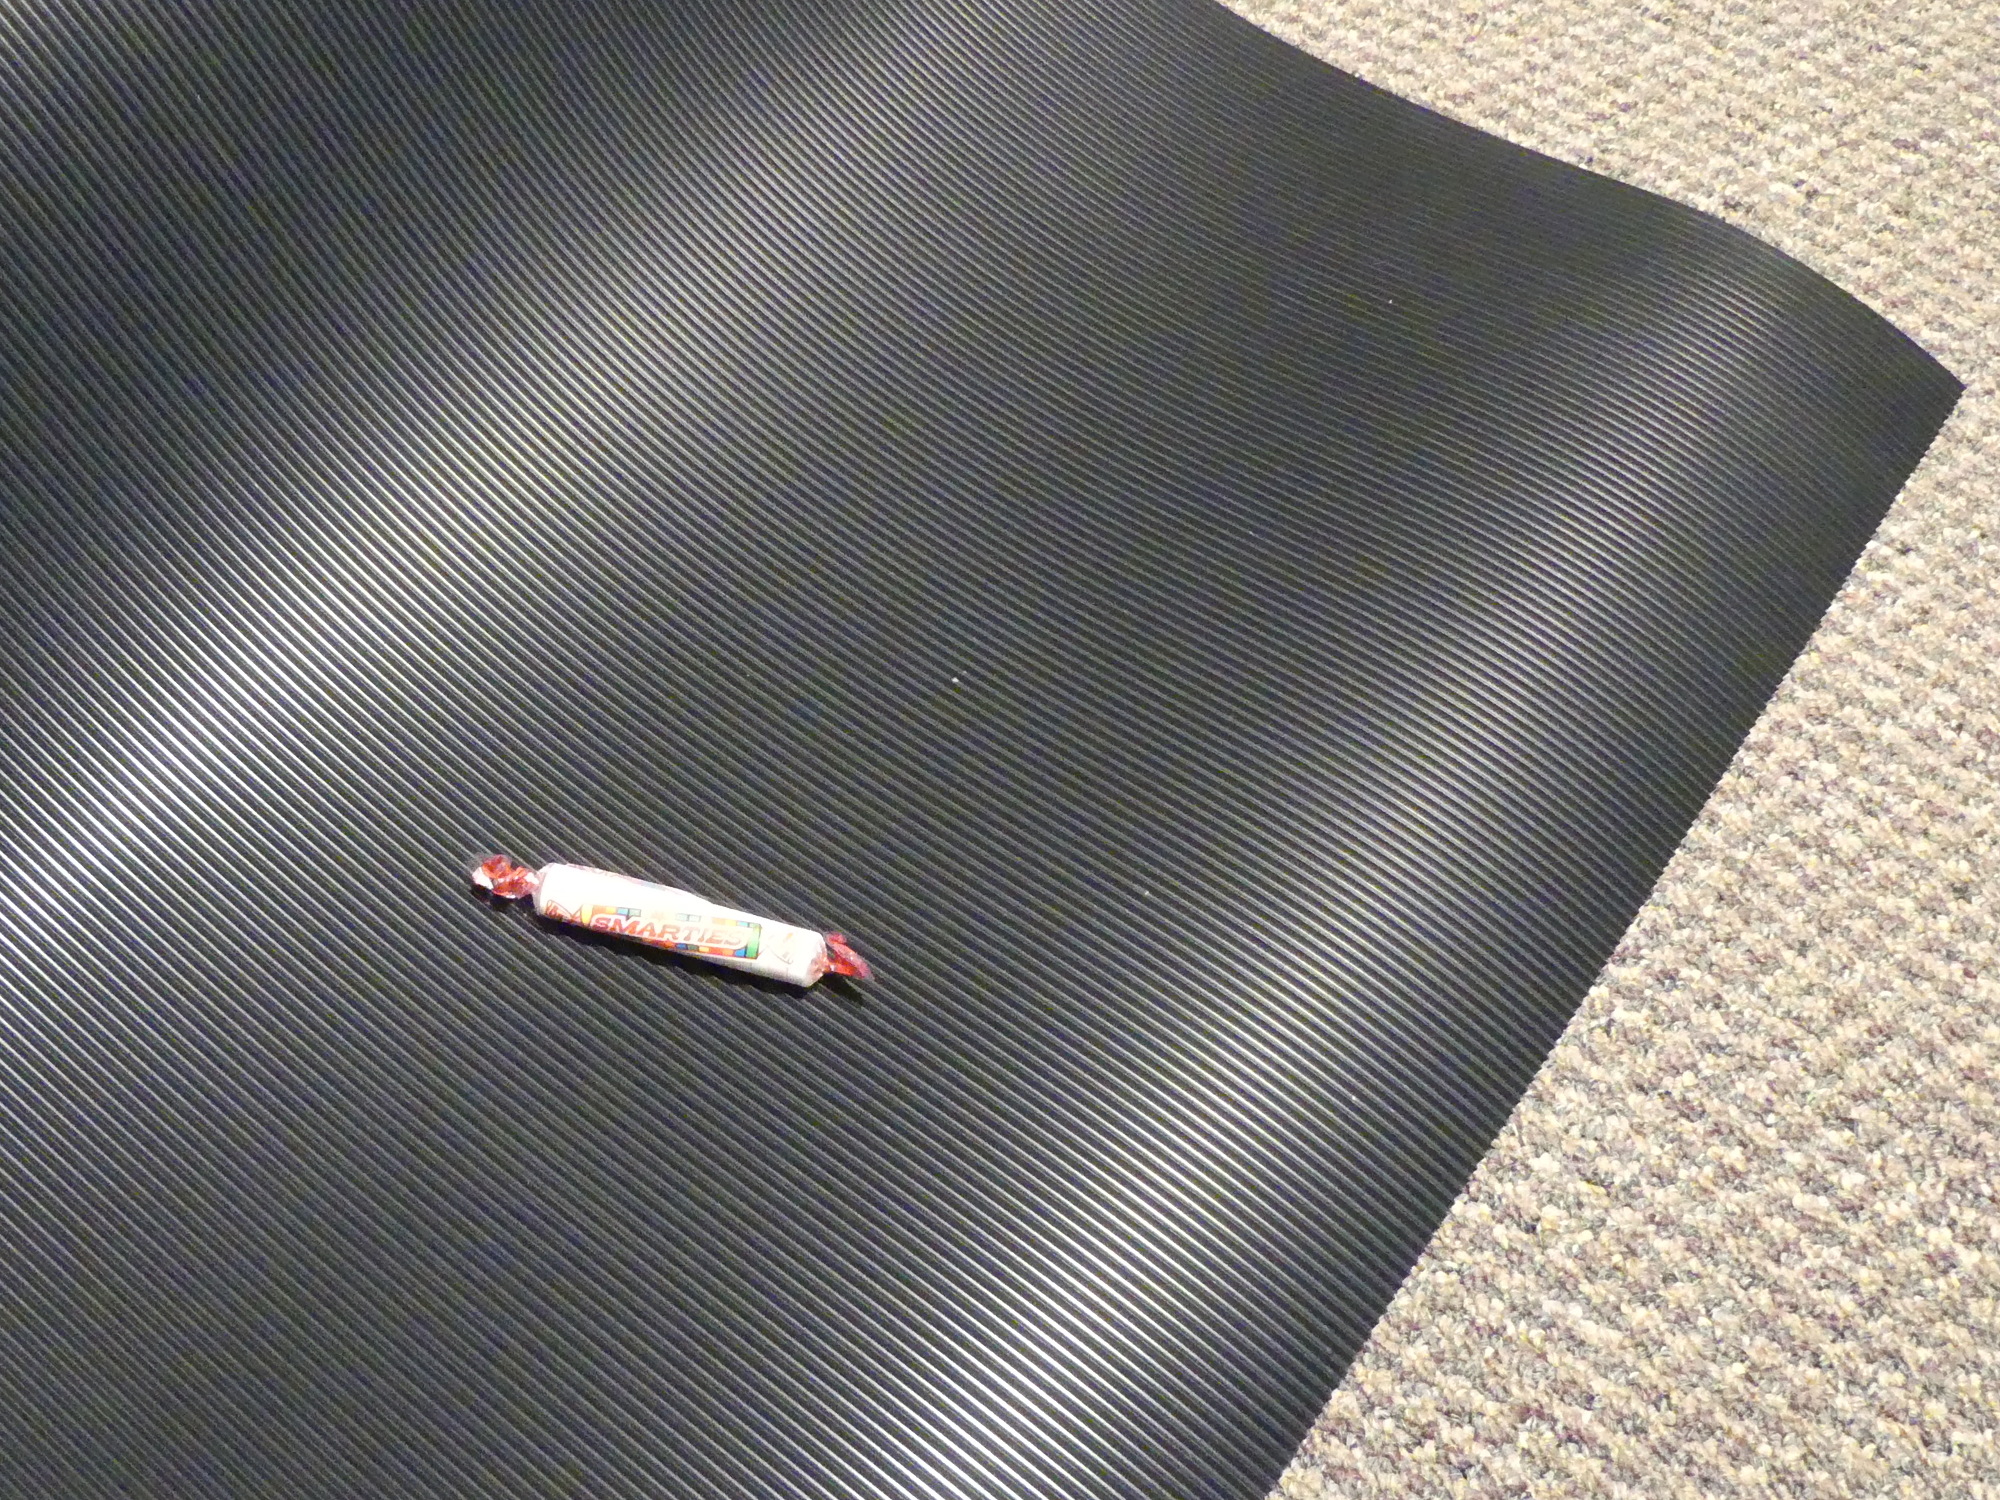
The material I selected sports a triangular profile on its top face. I felt this would be ideal for trapping small parts such as springs or screws that might otherwise roll off a perfectly flat surface. I also imagine it will help to contain small oil spills. The bottom of the mat is flat but not perfectly smooth, and that's a good thing as it will make it less likely to move around -- though to be honest I doubt that will be much of a factor since the table fences will constrain it in three directions.
The good news is that while the mat does give off a slight odor it is almost imperceptible so I can wholeheartedly recommend this kind of mat if you don't want to get high off the fumes generated by whatever toxic shit China puts into their rubber mats to save money.
American Forge and Foundry Vise
I dug out my AFF vise I bought at Eppys many years ago but never used. Still in its original box with anti-corrosion paper intact I found the unit in new condition with no rust whatsoever. I plan to mount it to a piece of 2x10 lumber and then clamp it to the table as needed. Combined with the soft jaws that came in last week I now have a means to hold the outside micrometers, rods, vanos piston, and the various shafts removed from the transmission.
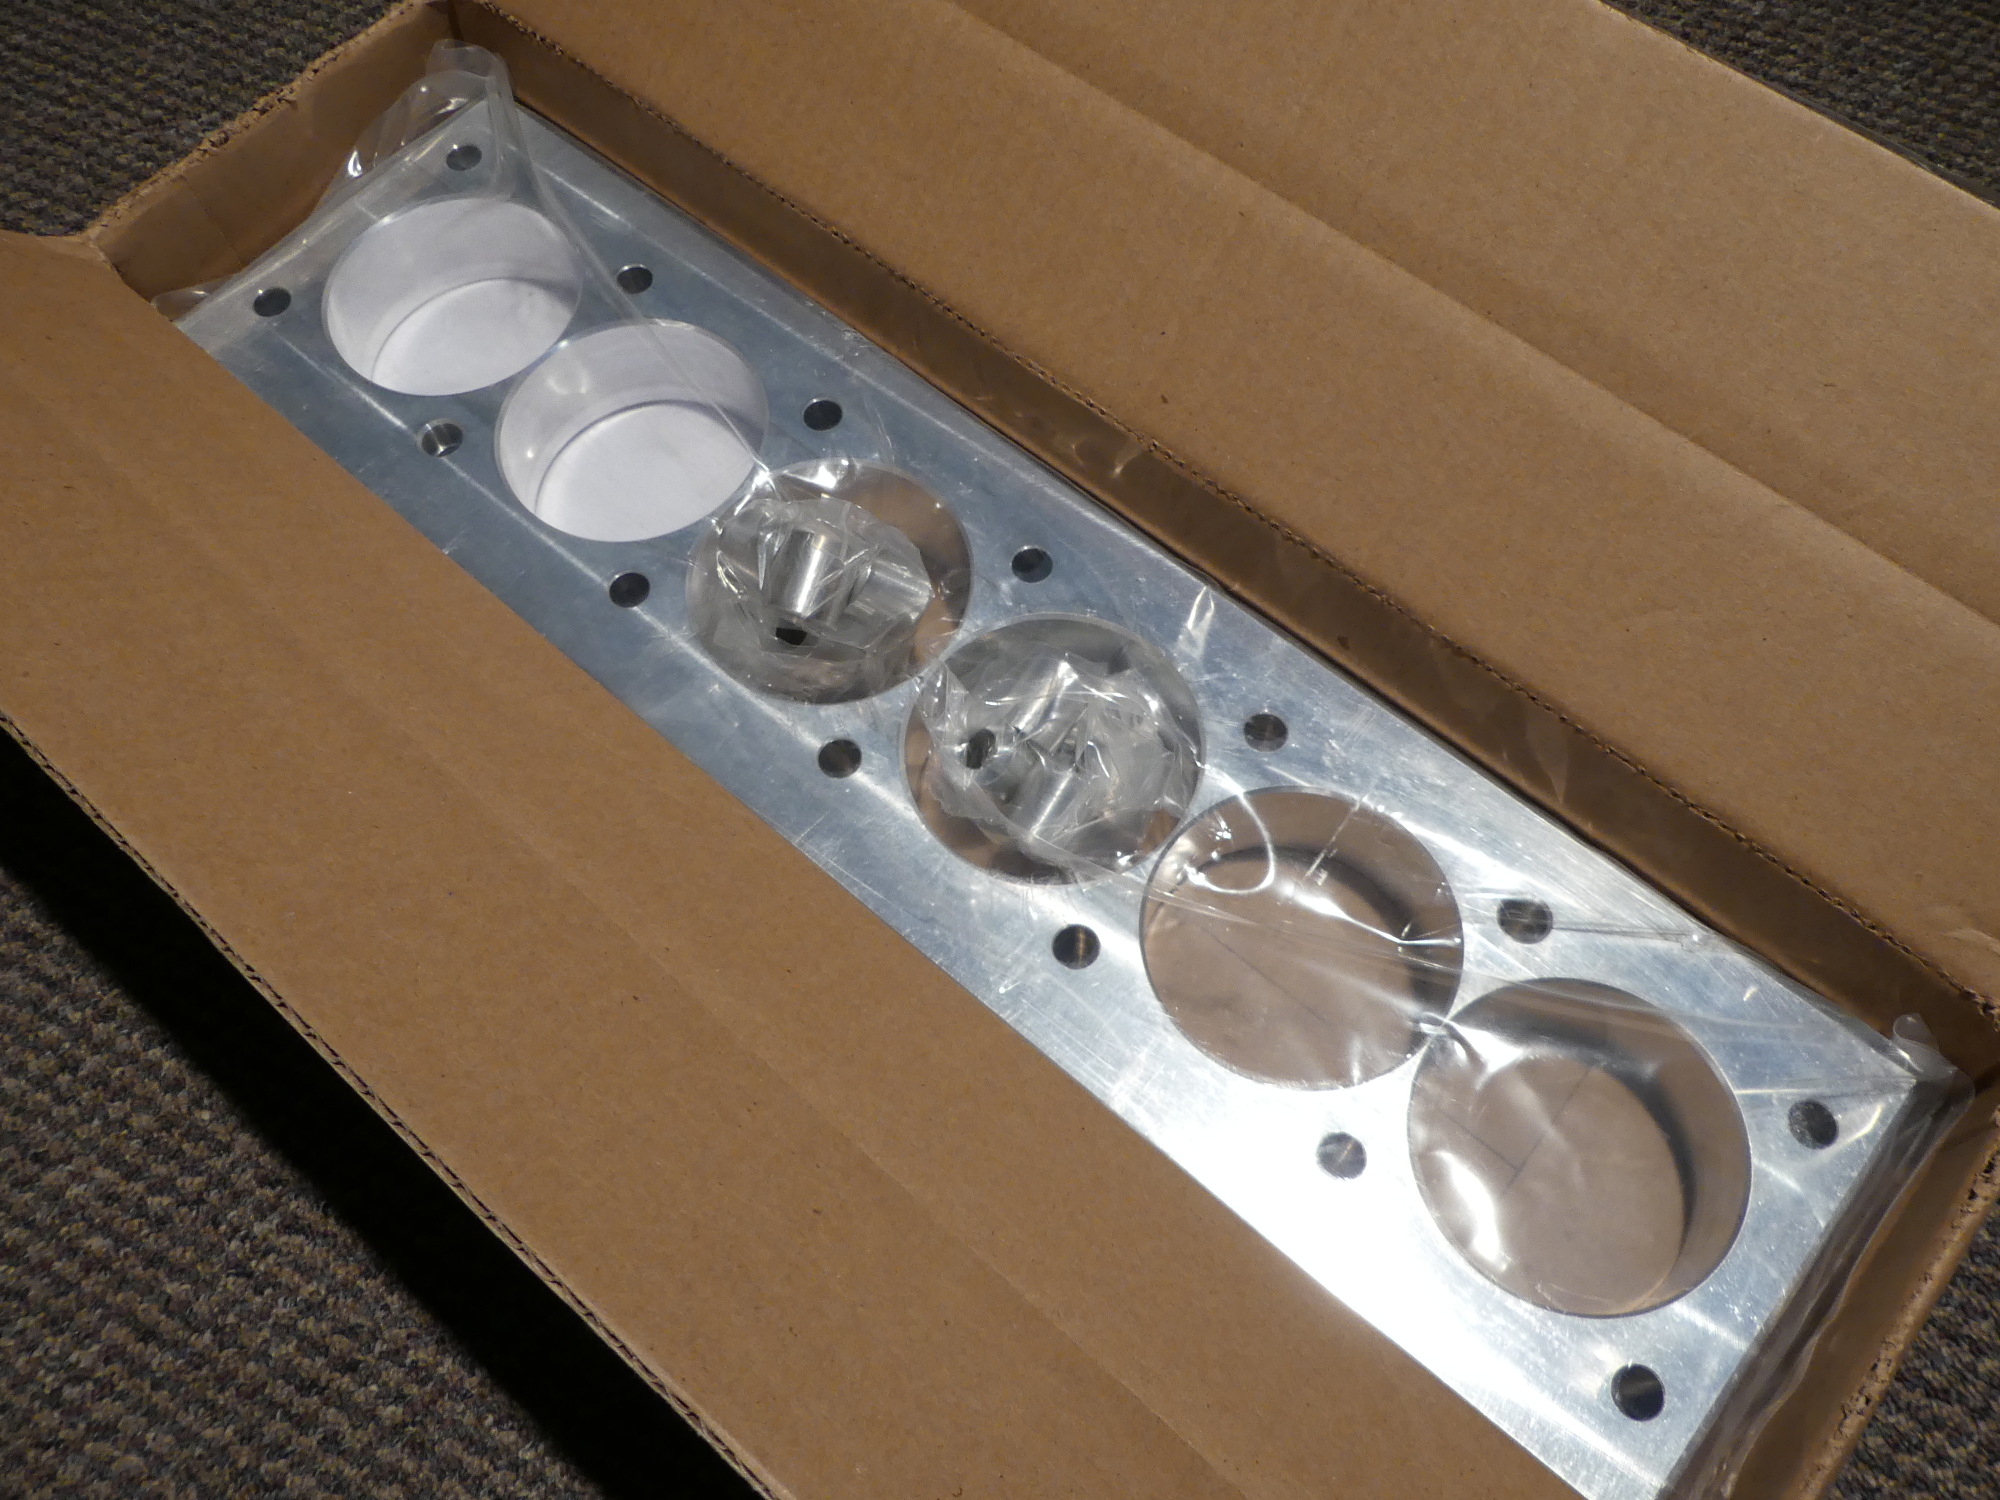
Torque Plate
I ordered the torque plate from VAC Motorsports and it arrived in three days. During checkout I was provided with two options: purchase or rental. Both were $350 plus shipping ($18 my case) but of course the rental option allows return for a $200 credit, bringing the cost of rental down to $150.
As I see it there are only two reasons to purchase the plate outright:
-
you're part of a club or racing team that needs to periodically rebuild engines.
-
you want to loan the tool out a few times and use the proceeds to offset your investment.
At the time I placed the order neither option applied to me so I selected the rental option.
Before I placed the order I called them to ask what, if anything, was different between the plates I would receive with each option. I assumed that if I chose the purchase option they'd send me a brand new unit while if I selected the rental option they could (and likely would) send me a previously used unit. The rep confirmed my assessment but said they had just produced a new run so even if I rented I'd probably get a new one. And in fact that is what happened.
VAC does not seem to care if the units are returned quickly (or at all) because they are paid in full. The rep said one customer had the unit for almost a year before returning it and most people seem to have them for several months. I am planning to return the unit after I'm reasonably confident that the engine machining process was successful...which in my estimation will be after oil analysis indicates that wear metals have stabilized. I estimate this will be in 1000 miles and a few oil changes, the first of which will occur at the 100 mile mark, the second at 500 miles and the third at 1000. The next oil change will likely be a low-utilization oil service and at that point I'll switch to German Castrol or BMW's own 5W-30 (which used to be German Castrol but is now some unknown Shell product).
Block Cleaning Equipment
Last week I called my machinist to discuss the upcoming work. Among other things, I needed to figure out how exactly he was going to clean the block and how it would be returned to me, because an earlier call to Eastwood confirmed that the 2K Aerospray primer I'm planning to use to seal the sides of the block in prep for a finish coat requires a rust-free surface.
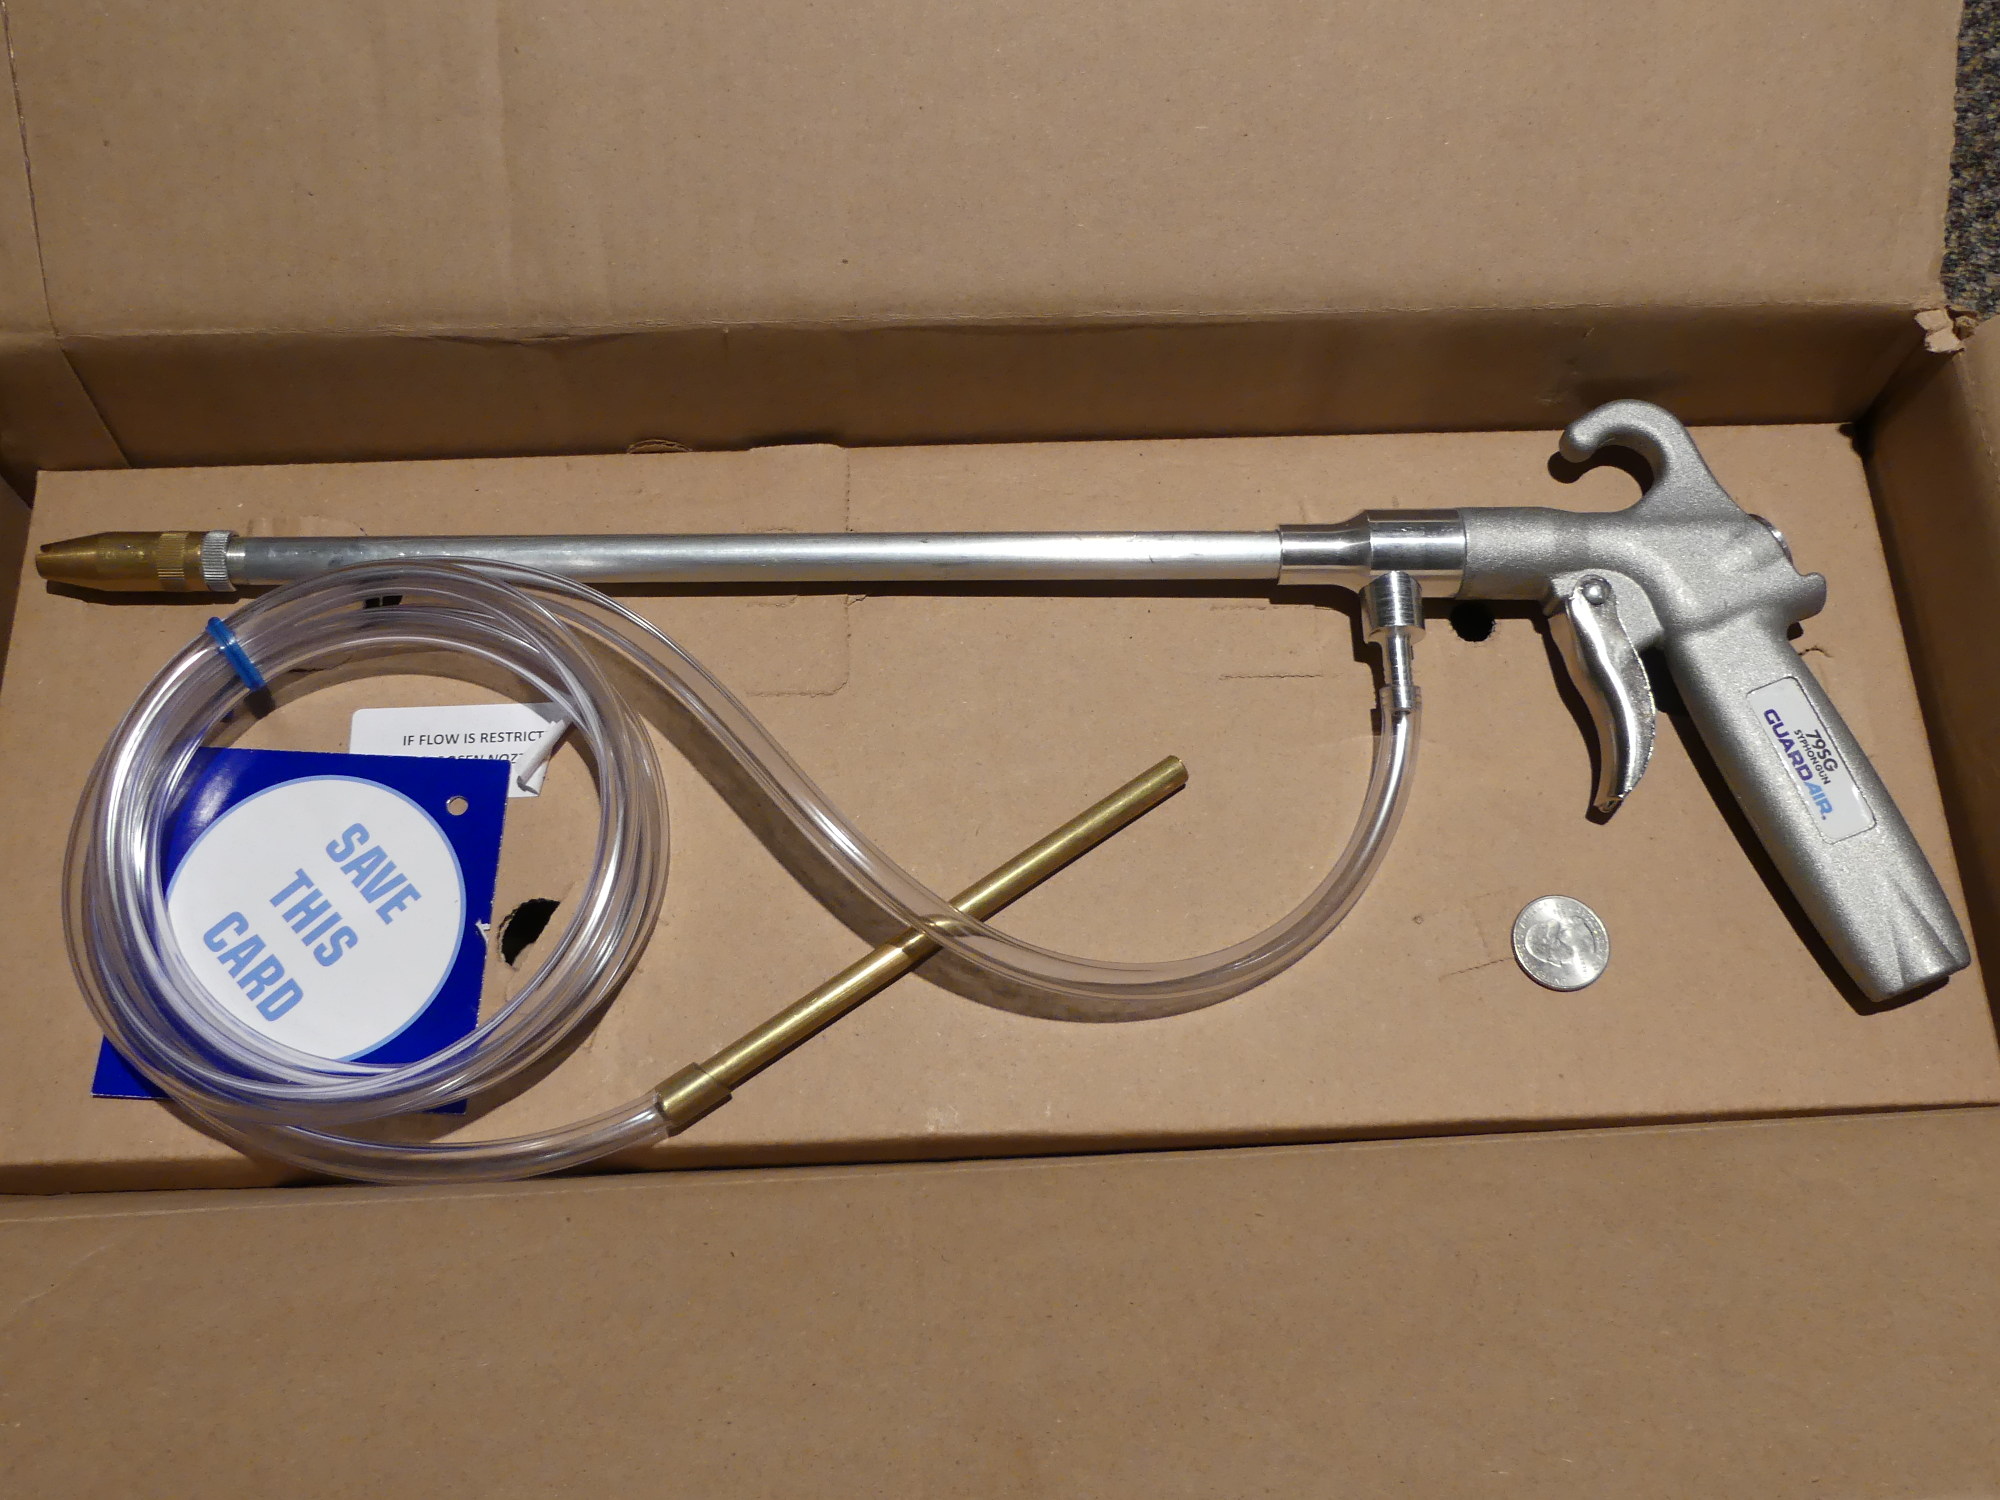
It turns out that my machinist will send the block out for the initial cleaning and shot blasting. Shot blasting is preferred to traditional glass beads because when the glass beads hit the metal they break into pieces and all those tiny pieces tend to find their way into critical nooks and crannies such as oil galleries. This is consistent with what Autohead Performance told me, though their solution is soda blasting as they have found that acceptable for cleaning up aluminum pieces such as the head.
While I don't know if the block will flash rust between the time it exits the machine shop and returns to my garage, some tools that came in recently should help me remove any flash rust as well as any machining oils that remain on the exterior surfaces that would prevent the primer from adhering. Following in Jafromobile's footsteps I decided to acquire some wire wheels including a smaller twisted wire brush that will fit my die grinder and a GuardAir syphon spray gun that I'll use to effectively pressure wash the sides of the block using mineral spirits. I'll then apply the primer coat followed by a couple thin finish coats before I continue with the assembly process.
ShureShop Table Assembly and Initial Impressions
I got a call from the shipping company a couple days ago, or about three weeks after the order date, to inform me that the table had arrived at the terminal. I called them back to arrange the pickup time today and headed over to the terminal with my brother's pickup truck. After providing ID and vehicle information they turned over the skid containing my ShureShop table.
While the delivery went like clockwork it didn't take long to realize that the product and accessories were not packaged correctly:
-
The legs were completely exposed to the elements and the plastic straps used to "secure" the entire package on the skid were in direct contact with the painted surfaces. As a result the legs came through dusty and were scuffed where the plastic straps had rubbed the otherwise nice finish. The legs should have been placed in a box and heavy cardboard or plastic edge protectors installed over the corners of the boxes before they were strapped to the skid.
-
As I unwrapped the table top I found a gouge and some other deep scratches on the underside. The gouge was deep enough to create a slight protrusion that is visible from the top side. The front edge of the table top was also scuffed quite a bit in one area. I'm not sure how any of this damage occurred but without any data to prove otherwise and considering the generally piss-poor packaging I'm pointing the finger at the factory.
-
The bags containing the fasteners were found in a box with at least one bag split open. However, I could not find any of the missing fasteners in the box. So the bag split open at the factory and no one caught the problem.
If this product is representative of how Shure packages its products I'd steer clear of their entire product line until they get their act together. The packaging clearly needs work.
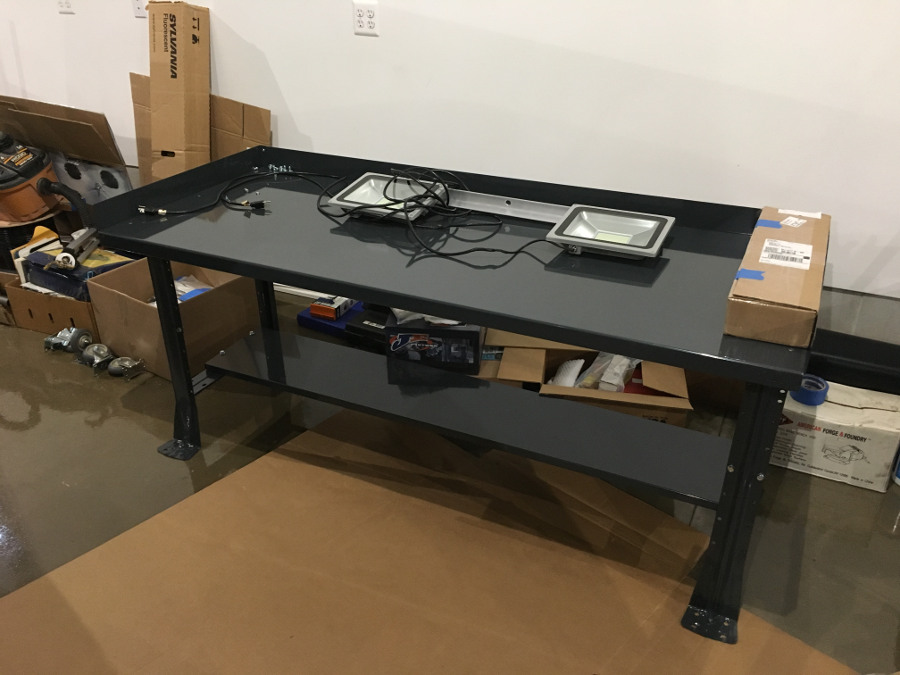
As I assembled the table with assistance from my brother I shook my head at various aspects of the design:
-
The side fences should be secured / captured to the table top by screws and nuts (perhaps the ones tying the top to the legs) but instead they only share a single screw / nut with the rear fence and are weakly held in place by the clamping force that results from being sandwiched between the legs and the top. The fences seem to be tight for now but I'm not confident they will stay that way.
-
Each leg is fastened to the top with a mere three fasteners, yet the legs are drilled to support a full six fasteners. While I bought the accessory kit and that helped to box in the legs and improve the overall stability of the table I still think the top should be fastened to the legs with the full six fasteners.
-
The bottom shelf (part of the accessory kit) fits poorly with the legs. Despite having all the bolts loose and the parts themselves having elongated mounting holes I had to wrestle the shelf into place and push out the legs to get the holes to line up, and even then the bolts could only be inserted at an angle because I could only pull the legs out so far.
-
The lower shelf also uses some long bolts to secure it to the horizontal brace of the legs. The shelf was designed without any standoffs so it is possible to over-tighten the bolts and permanently deform the shelf. Fortunately I saw the design flaw the second I looked at the part and avoided any damage. A few metal standoffs tack-welded to the shelf (or a different shelf design entirely) would solve that problem.
-
The instructions mention a handle kit that is obviously designed to allow easier movement of the portable table. This kit was not included, yet I don't recall seeing it on the website and the sales rep never discussed it. The instructions were dated 2012. Are they out of date? Did the company forget to include the handle kit? I don't know because there wasn't any list of components included in the package. This is manufacturing 101 and Shure failed the course.
-
The instructions are poorly organized and illustrated. The steps are not clearly numbered, the "3D" illustrations are intended to be helpful but are not (mostly because of the perspective used), and the font is too small unless you have a magnifying glass handy. The entire documentation package needs work. I'd expect this kind of thing from a one-man shop -- not from what appears to be a company with sales in the millions.
While I'm not happy at the moment, ultimately I expect the table to do the job....that is to say, once I get the company to replace the missing fasteners and I can permanently affix the rear fence and casters. More to come soon.
Mileage: 266100