


Saturday, June 3, 2017
Pistons Arrived
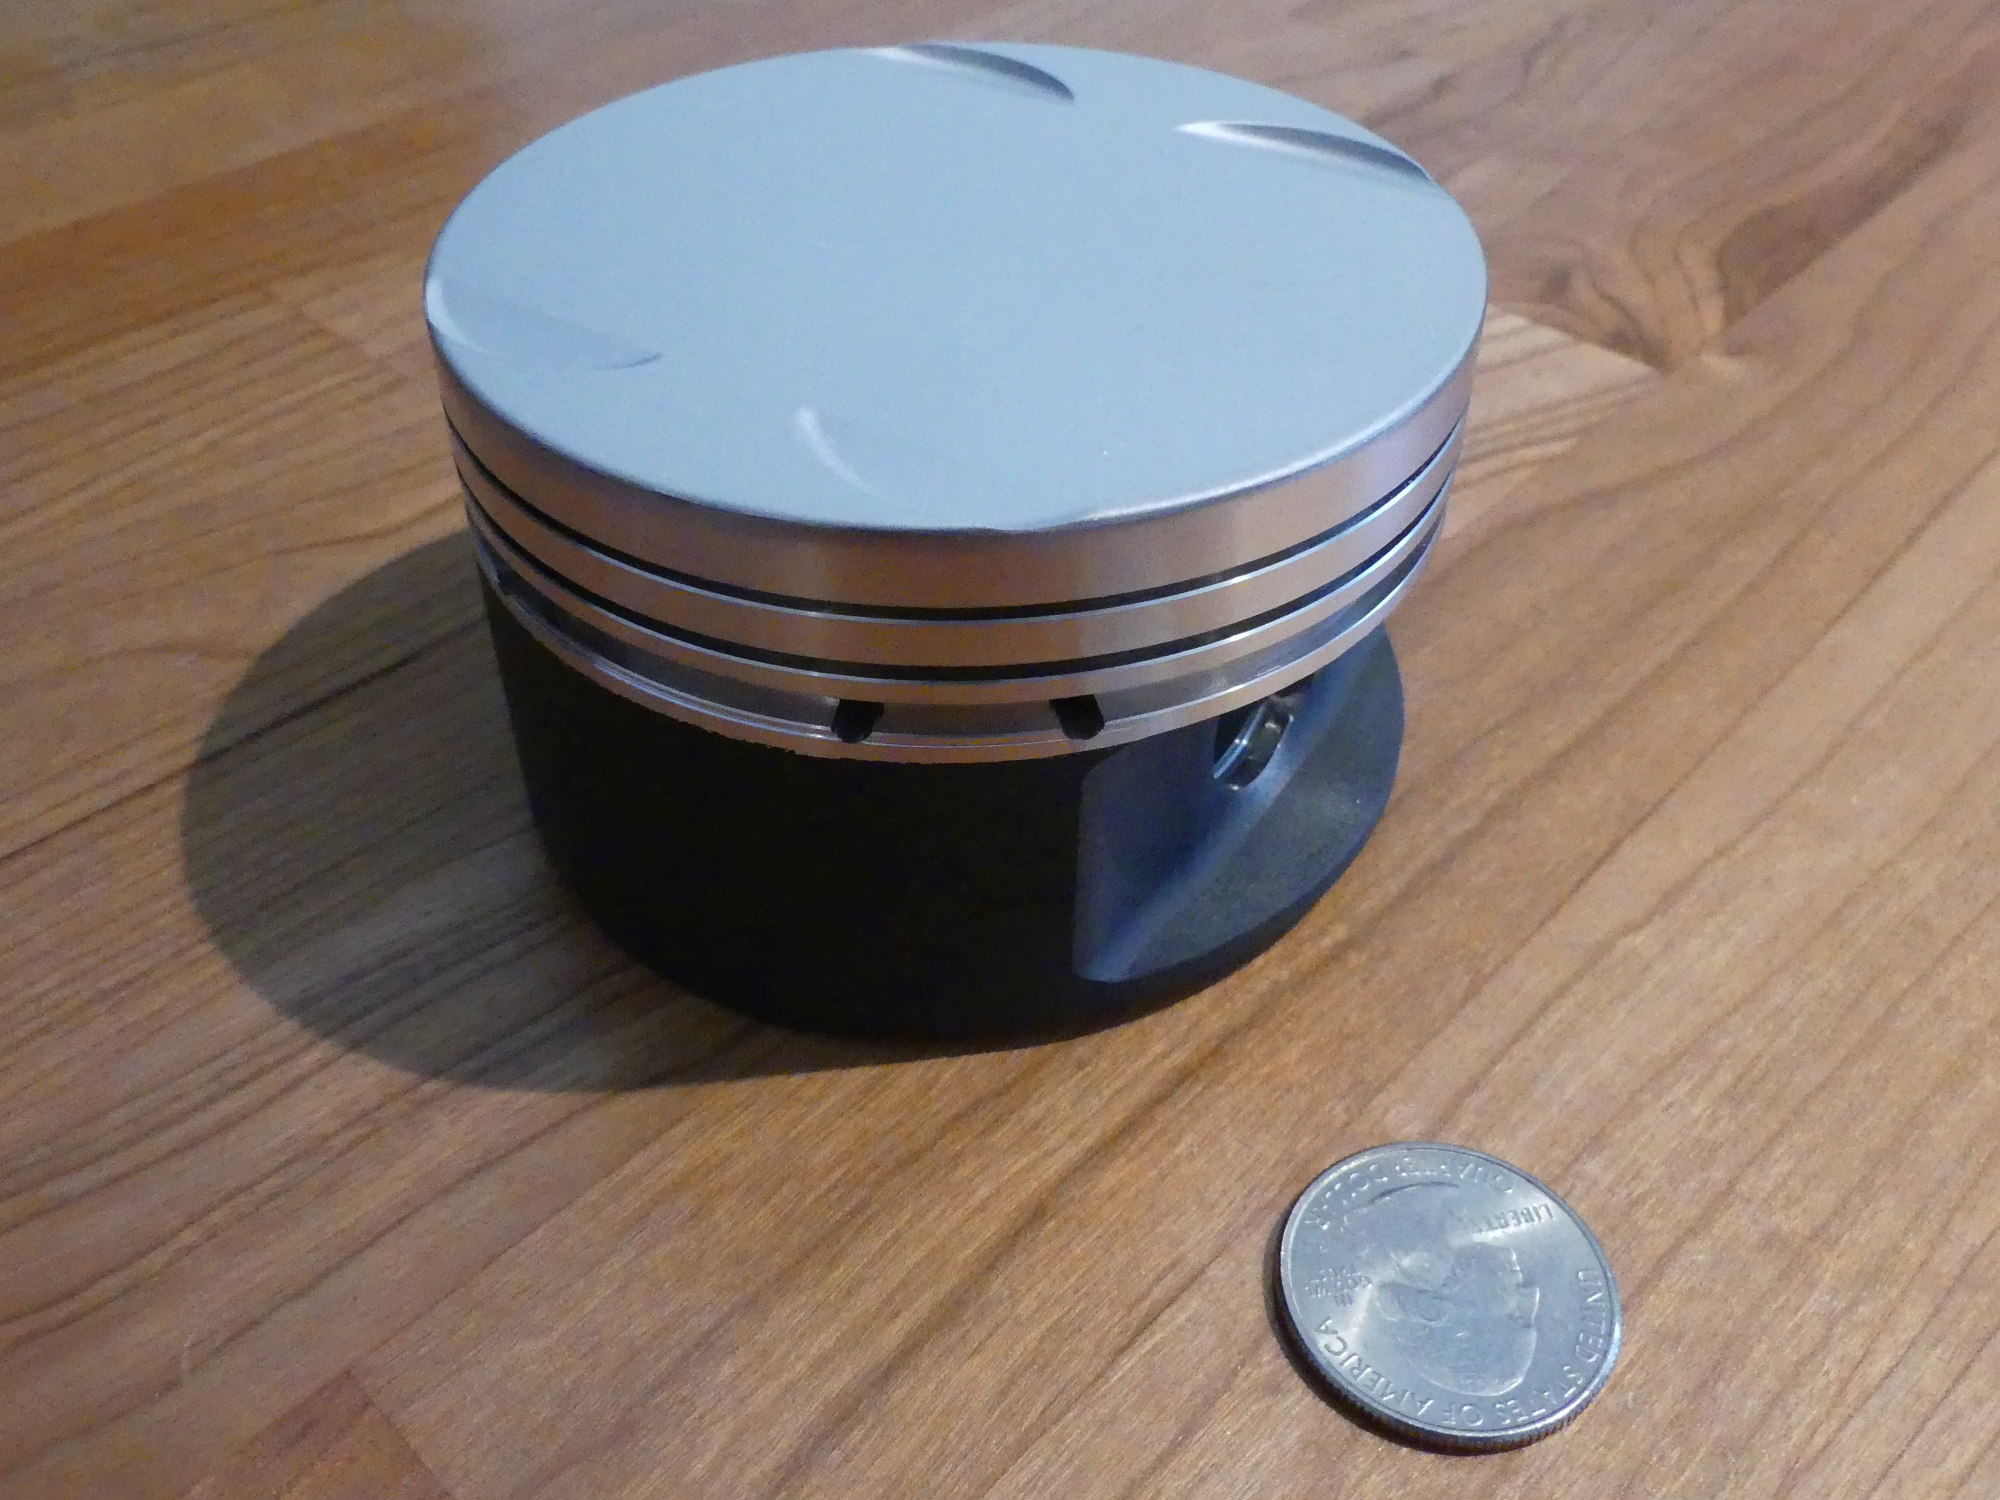
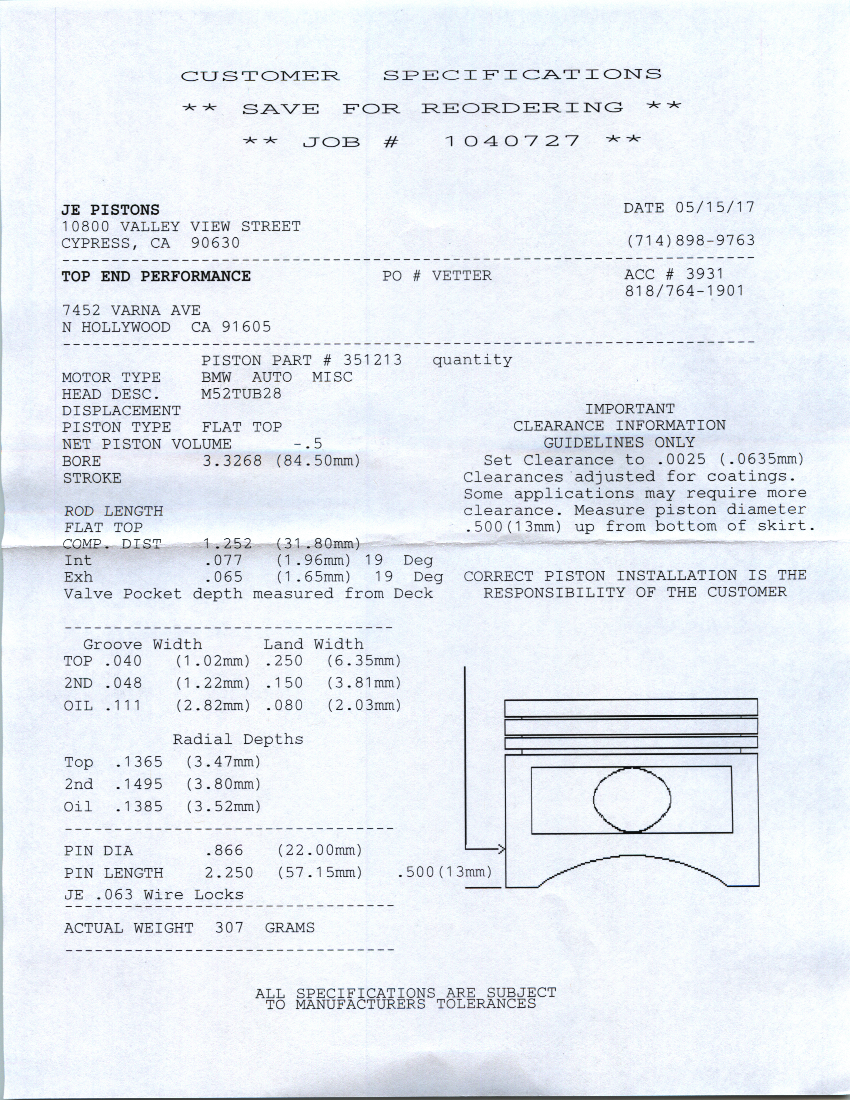
The pistons arrived yesterday or approximately three weeks from the order date. Considering they came from the opposite coast puts the manufacturing time at a bit over two weeks. That's about a week faster than promised. To say the pistons look great would be an understatement.
In the box I found the ring set, pin set and build sheet. I took several measurements of one of the pins with my Mitutoyo 0-1" micrometer and a got a consistent 21.996mm (0.8659842").
Speaking of the pins, I haven't bought the BMW bushings yet but I am curious about their ID. BMW obviously hones their bushings to a value that provides acceptable clearance with a new OE/Mahle pin so no machining is required in the field. That could be a good thing or a bad thing, depending on the standard dimension of the OE / Mahle pins as compared to that of the JE.
My assumption at this point is that the JE pins are a copy of the OE/Mahle and have the same finished dimension but I don't think BMW sells undersize bushings so I may need to source bushings elsewhere if the clearance that results from mating the JE pins with the BMW bushings is too wide. But of course I'm getting a bit ahead of myself. I don't even know if the rods will be reusable so I'll need to verify that first.
Miscellaneous Parts and Supplies
At the start of this project I began to compile an Amazon wish list of miscellaneous small items that would have been painful as well as considerably more expensive to buy elsewhere, mostly due to the separate shipping charges for each vendor. This is where Amazon Prime came to the rescue. I ordered a bunch of stuff that shipped for free and arrived in two days:
-
OTC Locking Pins
I expect one of the pins in this assortment to work on the secondary timing chain tensioner. I would have bought the Baum Tools version I spoke about last time but these weren't available via Prime and the vendor selling them wanted more in shipping than the item cost. I found another vendor selling the OTC version and these were included in Prime shipping. Another $10 in my pocket. -
Stens 751-909 Piston Ring Expander
These are better than the typical $5 ring pliers because they properly support the ring as it is expanded so the rings don't fall off the pliers. They also have an adjustable stop to prevent the tool from opening the ring too much and snapping or bending it. -
Lisle 14000 Parts Cleaning Brush
Although I expect to have most of my parts cleaned by professionals, I wanted a good quality brush that wouldn't shed bristles for some of the detail work I'll likely do myself, including the valve bodies of the transmission. -
OEM Tools 26 Blade Feeler Gauge Set
This set will be used primarily to gauge the ring end gaps. Although 50sKid used gauges to check the deck of the block and the mains, I'll be leaving that up to the professionals with their ridiculously expensive and traceable straight edges and other special tools. -
Brownline Metal Works Torque Angle Gauge
Receiving the unit I was immediately impressed with the quality and tactile response of the buttons, and the overmold of the case. Even the magnets that hold the unit to the shank of the torque wrench are covered with a material that helps prevent the device from rotating. I imagine that material will serve double-duty and help prevent scratching the wrench as well.
The only downside to this unit is its method of feedback as the angle is approached, met, and exceeded. While the SnapOn torque wrench starts beeping progressively faster as the desired angle is approached and then turns to a solid tone when the angle is reached, the Brownline only shows amber LEDs as the angle is approached, a solid tone along with green LEDs when the angle is reached, and a beeping with red LEDs when the angle is exceeded. I prefer the SnapOn approach and if I had to make any suggestion to Brownline it would be to rewrite the firmware to provide the same audible feedback. -
CTA Tools 9259 E12 Long Torx Socket
This is a roughly 6 inch long thin E12 socket. Several manufacturers, including the one that produces the BMW special tool, incorporate a feature that allows the socket to grip the head of the bolt, allowing easier extraction of the loosened bolt in a fully-populated head.
The feature is typically implemented with an external ring and a ball bearing. The external ring serves as a retention mechanism and helps to produce the tension for the ball so it "clicks" onto the bolt head. The problem with this implementation is that the ring often disconnects from the shank of the tool during operation and both the shank and ball bearing fall into the head.
I looked for a tool without this "feature" and found one -- the CTA Tools 9259. One less headache to worry about. -
Nylon 6" Magnetic Soft Jaws
I bought these strictly because I need them to install the Beisan Systems Vanos rattle repair kit. Each jaw has two small magnets that hold them to the jaws. -
Permatex 81950 Assembly Lube
I plan to use this stuff during the final assembly of the engine. I could use regular oil here, as that is what the factory uses, but I expect some delay between the time I finish the engine and when it is started for the first time, so I felt it best to use something a bit thicker than regular oil. -
Permatex 59214 High Temperature Thread Sealant
This is required to seal the two threaded plugs that close up the holes originally milled in the block to create the gallery for the oil squirters. -
Clevite 77 Plastigauge Green
Normally I wouldn't bother using plastiguage as I'm planning to accurately measure all of the required clearances, but as this is my first build I and I can't afford to make any errors I'll use this as a sanity check of my measurements. I should be able to predict what the plastigauge will indicate, and if I get that wrong I will know to stop and check things out before proceeding.
Task Lighting Followup
Shortly after the 100W LED flood lights arrived I managed to disassemble them. The first thing I found was a collection of glass shards at one of the corners. Clearly the person assembling the unit was using an electric screw gun and tightened the corner down a bit too much. Fortunately it did not result in any severe cracking of the glass. Needless to say, when I reassembled them I carefully tightened the frame by hand and avoided doing any further damage.
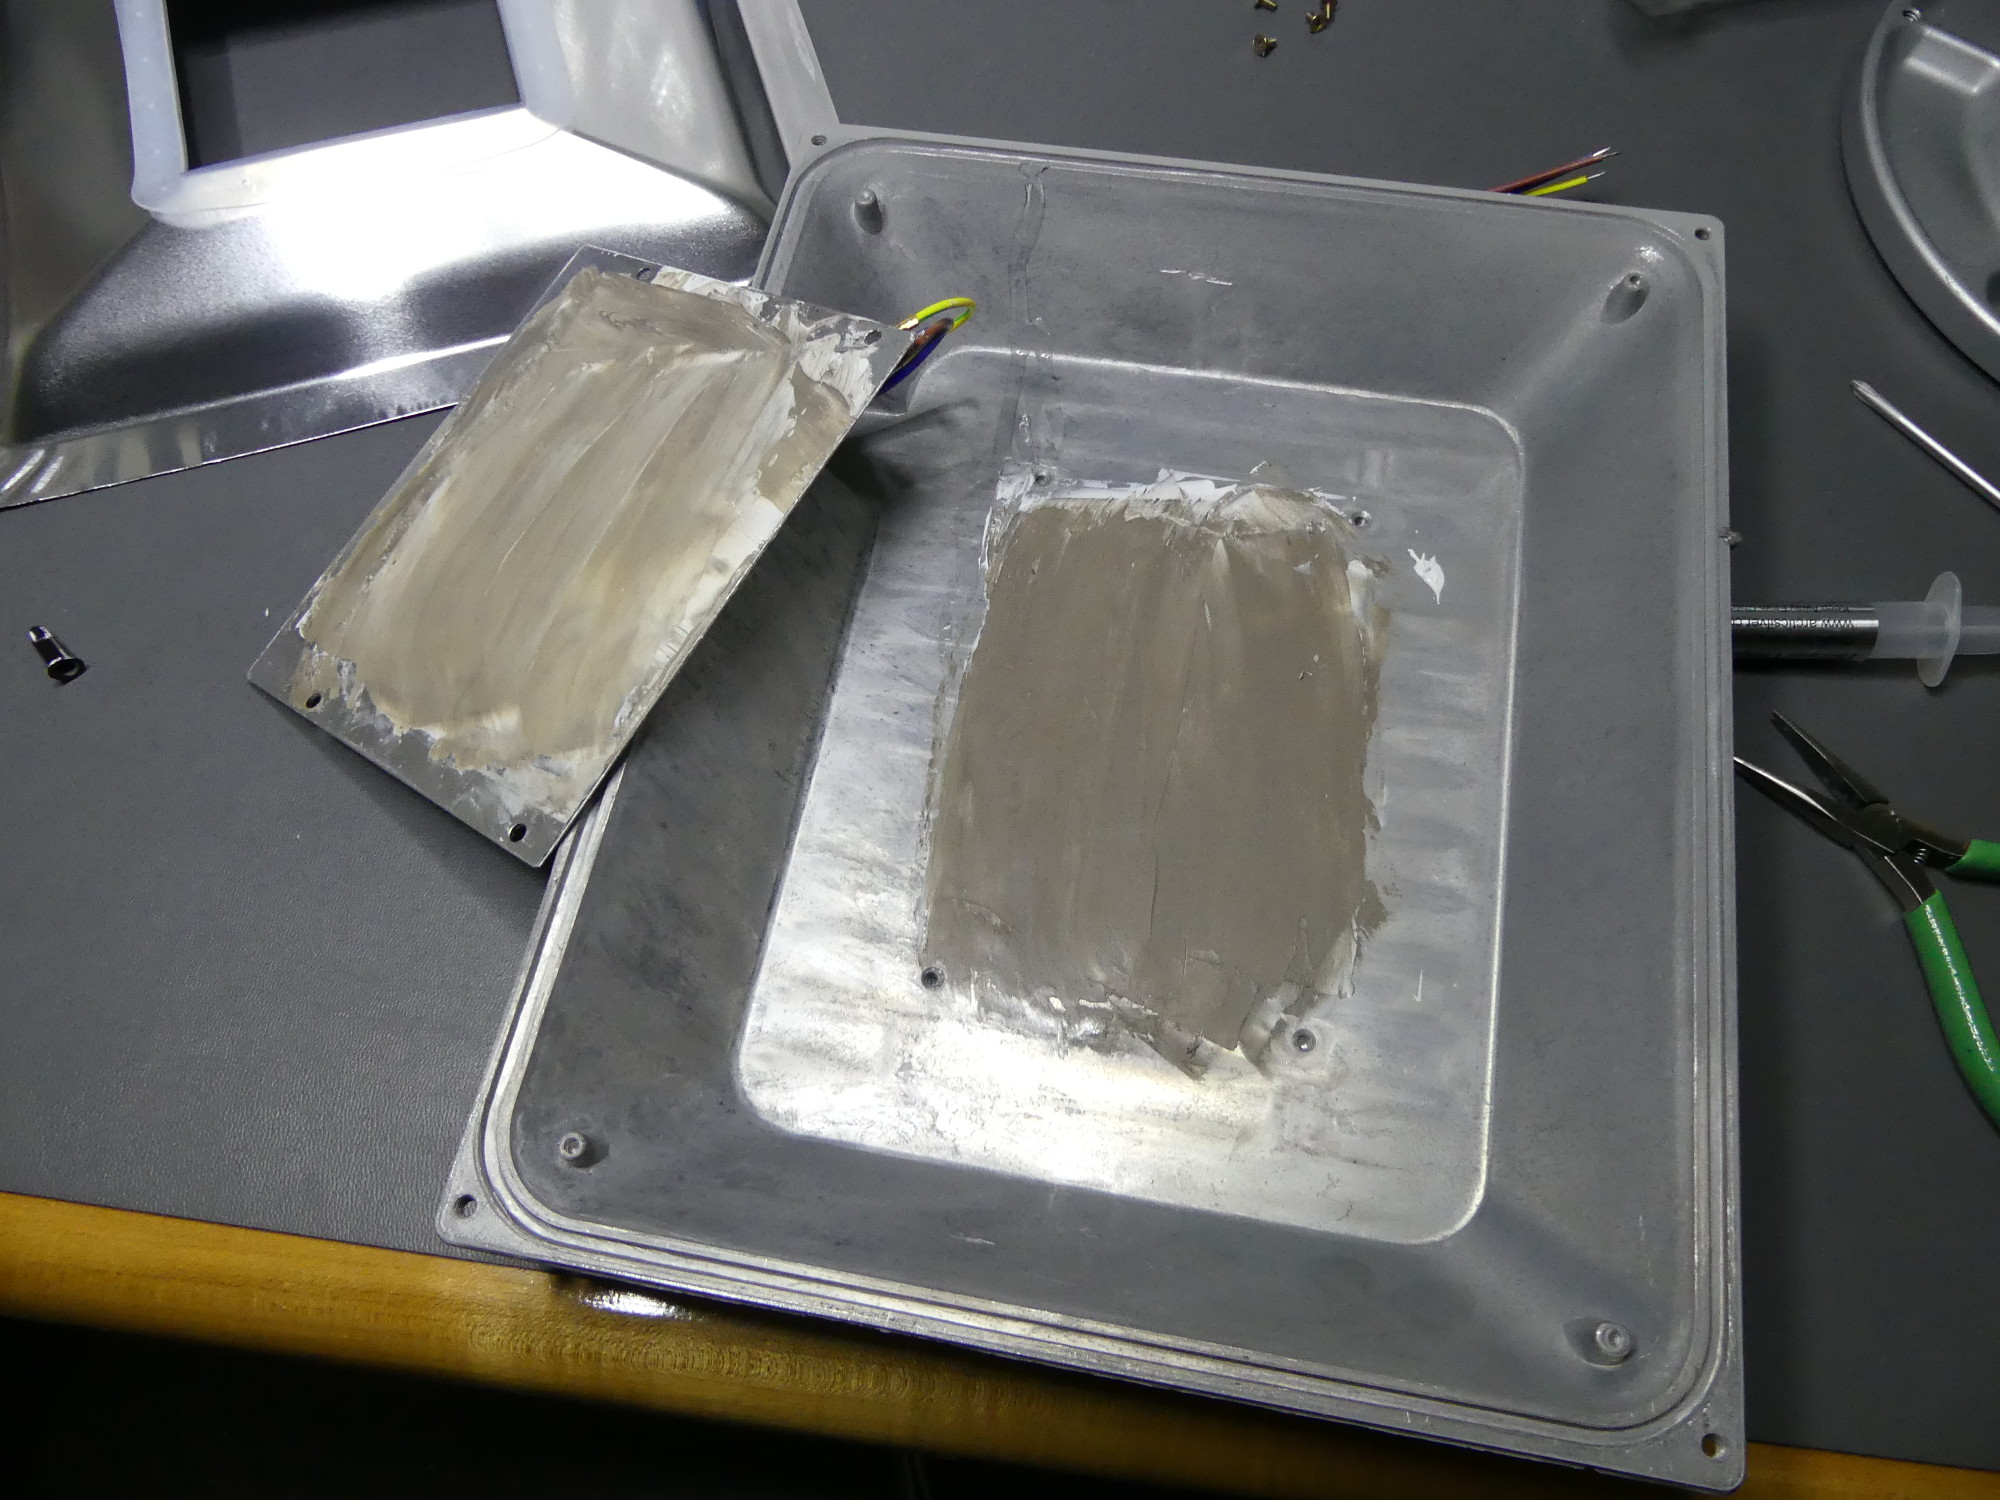
Inside the unit I found what I was expecting -- poor quality of parts and improper assembly technique. The fundamental problem with these lights is that the rear interior face of the case is not flat. I'm not exactly sure why but the end result is that the PCB does not lay flat against the case and thus voids develop underneath the PCB. I believe the voids form also because the manufacturer was not generous with the thermal paste and did not apply pressure to the PCB and rotate it sufficiently to spread the paste properly. I attempted to remedy the voiding issue by applying extra thermal paste, in this case some Arctic Silver I had left over from my CPU overclocking days. I split the paste more or less equally among the two fixtures but spent a bit of extra time spreading the material on the one I found had greater voids.
Watching the other guy's 150W LED flood light video I realized that the pigtails on his unit were not properly soldered to the pads on the PCB so I naturally expected to repair them on my units as well. I was loathing the process because rework on an aluminum backed PCB is a pain in the ass. The aluminum acts as an effective heatsink and makes it very difficult to get the pads to the proper temperature to reflow solder and, if the iron is set to too high to compensate, locally high temperatures can result and lift the pad. When I saw the leads on my unit reasonably well connected to the PCB I breathed a sigh of relief as I knew I could avoid that task.
The cheapest way to supply power to these units turned out to be a couple 12 foot long 18 AWG NEMA 5-15 to IEC 320 C15 cables (common computer power cables). I cut off the IEC connector and soldered the conductors to the pigtails. On my units the blue wire was connected to the "N" pad on the PCB while the brown was connected to the "L" pad which, despite my contempt for Chinese engineering, I think I can safely assume are the Neutral and Load connections respectively. The ground wire was yellow with a green stripe and also labeled outside the unit. Once plugged in through a Kill-A-Watt I discovered that this "100W" light consumes a mere 77W or about 0.6A. If I ignore the obvious deceptive advertising, lower energy consumption is actually a benefit, particularly because the lights are incredibly bright. So bright, in fact, that one of these lights positioned above my workspace should be sufficient to provide the task illumination I require.
The light stand also arrived and although I've seen better quality stands this should do. To properly mount the lights to the stand I had to order some aluminum angle and other hardware. When those parts comes in I'll wrap up the project and move it to the garage for testing.
Beisan Vanos Kits
As I indicated last time I've decided to rebuild my own Vanos. For this reason I purchased the seal kit, rattle repair kit, and special 18 mm socket from Beisan Systems. I was pleasantly surprised at the Beisan Systems ordering process. Not 10 minutes after I wrapped up the order on the website I received notification of shipment, and the parts arrived a couple days later. So they're obviously attending to their orders.
For whatever reason (probably 50sKid's video on the subject) I thought the Beisan rattle repair kit came with new thrust bearings. My kit obviously did not so I emailed them to ask why and whether they could provide a source for the bearings as mine had 265K on them. They responded within 15 minutes and said:
The roller bearings experience zero wear and don't need to be replaced. You can measure them yourself. They should be 2mm +/- .01mm.
While they didn't provide a source for the bearings my guess is I won't need one. If I do, based on the kit's supporting documentation it appears that the bearings are a fairly standard item so it shouldn't be that difficult to locate a supplier. So my plan for now will be to clean, re-oil, and reinstall the existing bearings.
Some time ago I wondered why Beisan offered a special 18mm socket. As it turns out this socket is only needed to install the rattle repair kit as it requires removal of the vanos piston cover. The cover casting incorporates an 18mm hex nut but the nut profile is only 3mm high. A standard socket incorporates a tapered inlet to make it easier to mate the socket with various fasteners. Normally this is an advantage but with the Vanos piston hex nut this is a detriment as it reduces the contact area and thus tends to round off the points of the nut. The Beisan special 18mm socket is simply a standard socket machined to remove its tapered inlet.
Crankshaft End Play Measurement
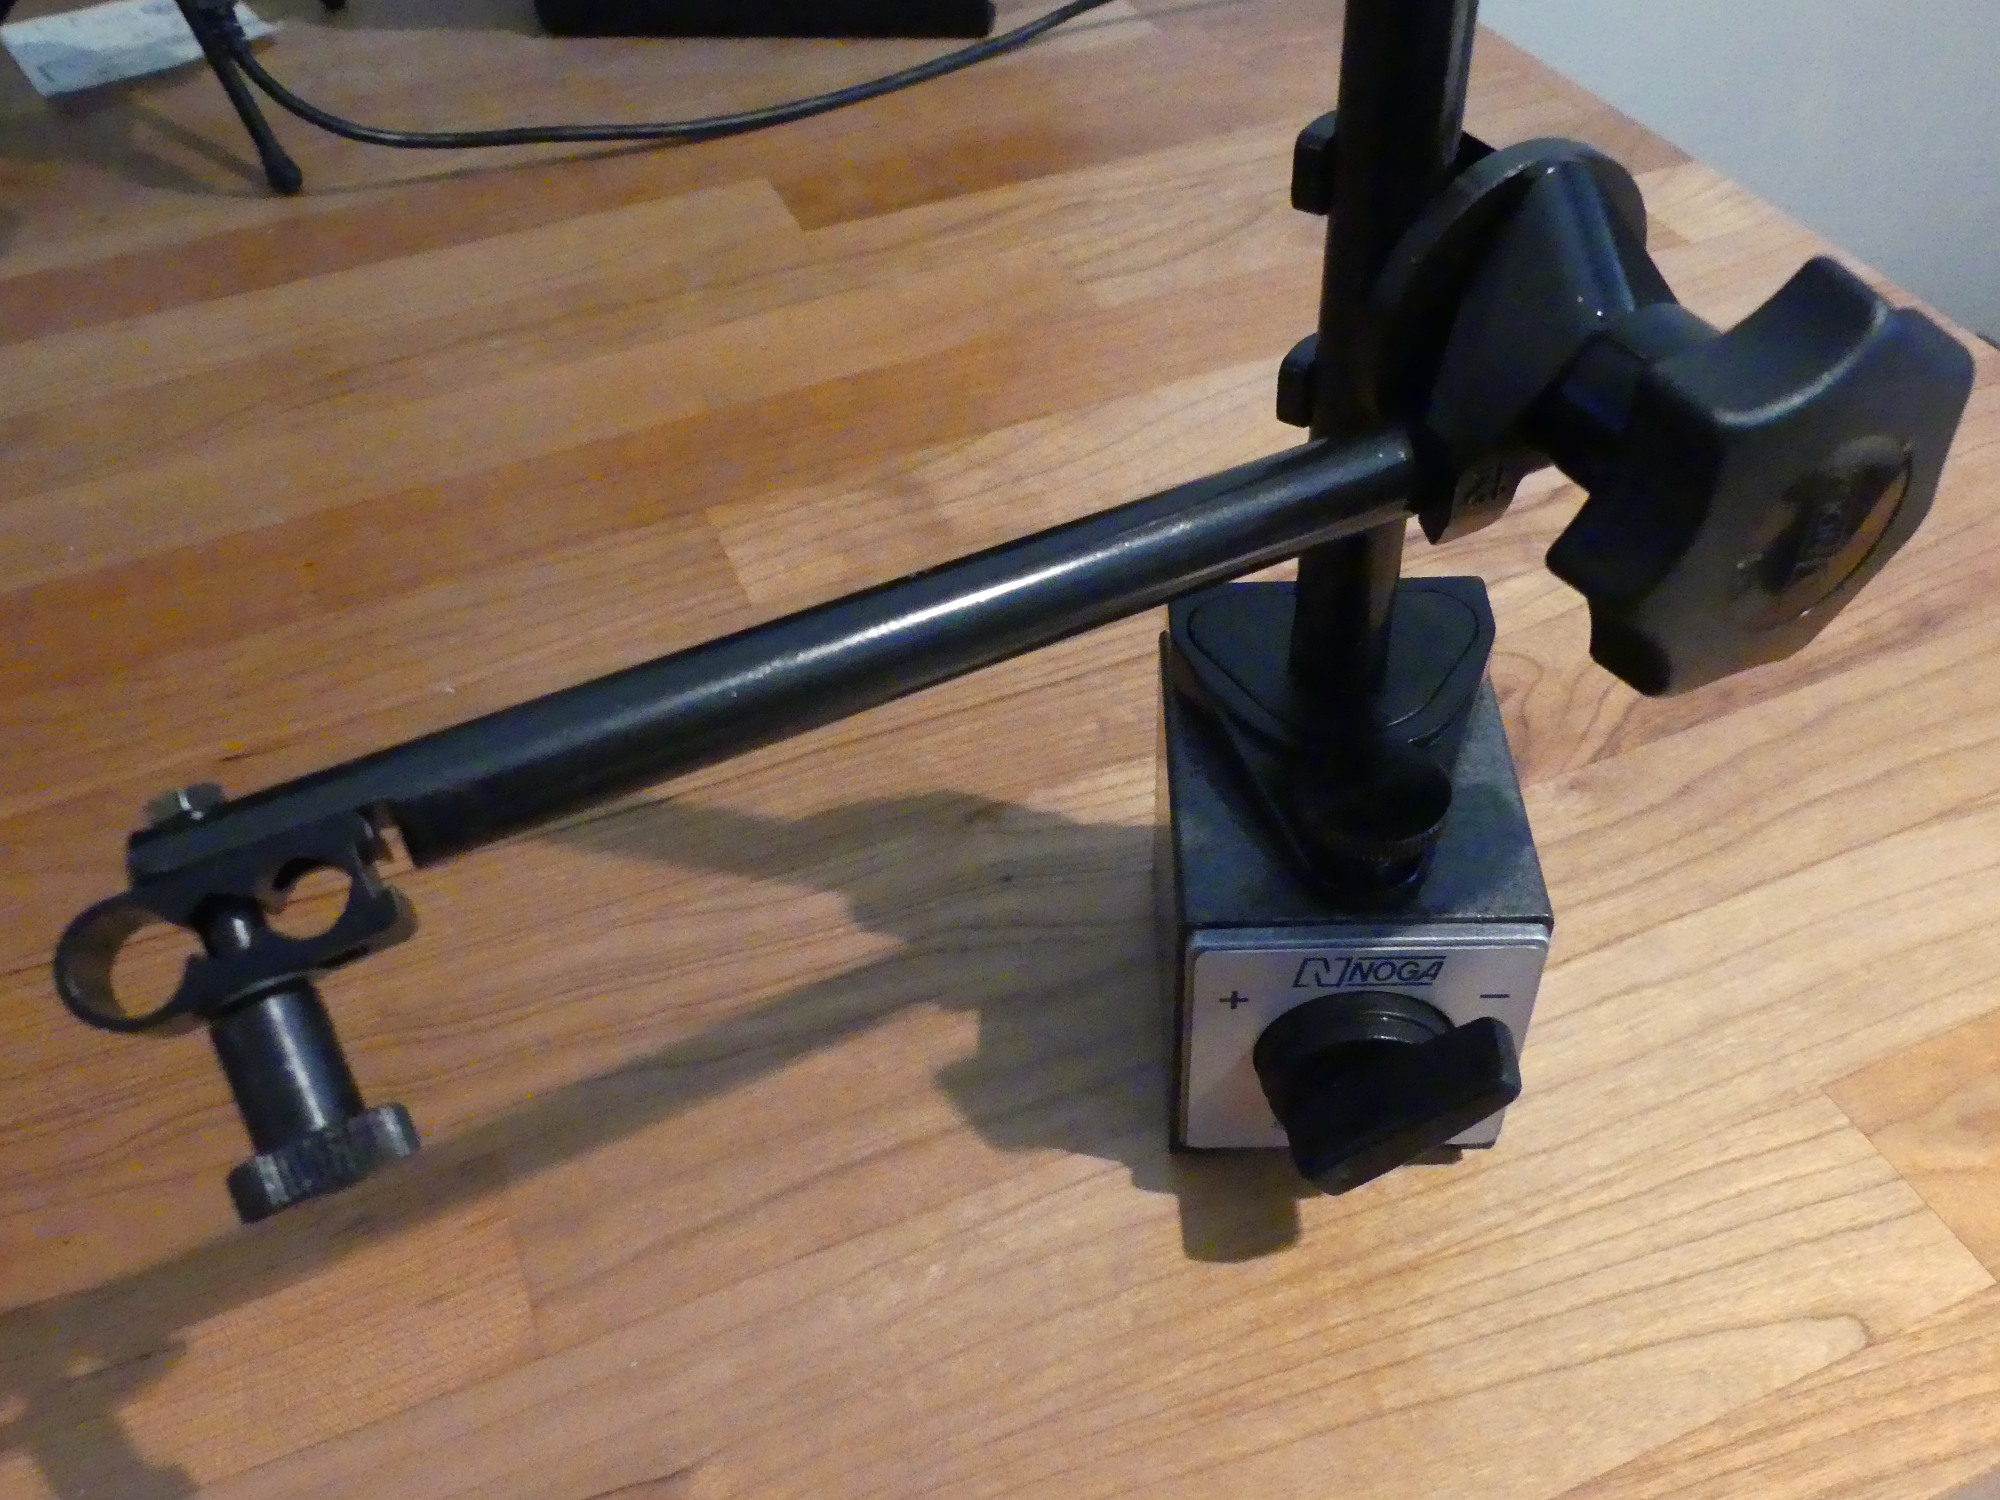
While walking through the procedures needed to rebuild the bottom end I came across the requirement to check crankshaft end play or what BMW TIS more accurately calls "axial crankshaft play". This measurement is typically obtained by using a dial indicator attached to a magnetic base with the anvil of the indicator mated with the crankshaft output flange. Using a prybar carefully levered against one of the main caps the crankshaft is pushed fore/aft and the indicator is used to measure the displacement.
For this purpose I found a NOGA mag base for $40. There were cheaper alternatives but the reviews weren't particularly good. Fortunately the NOGA base uses a clamp that should allow me to use the digital dial indicator from my bore gauge kit so I shouldn't need to buy a separate indicator for this purpose. So while I splurged on the base I'm still looking at a net savings.
I plan to take two measurements -- one prior to disassembly and one during the assembly process. The first measurement will verify whether the thrust bearing (and possibly the crank itself) has been worn out of spec. The second measurement will occur after the new bearings are installed. I can't see that being out of spec unless I have to polish the thrust bearing surface on the crankshaft in the event it has been damaged.
One question I haven't been able to answer definitively yet is whether BMW's crankshaft end play specification (0.08 to 0.163mm or 0.0031 to 0.0064" or 3.1 to 6.4 thou) is based on an oiled thrust bearing surface (i.e. the side of the thrust bearing). My assumption is that the end play measurement should be treated like any other bearing clearance and the vertical surfaces of the crankshaft and thrust bearing should be dry. But of course that does not negate the need to oil the remainder of the bearing surfaces, as moving the crank over dry bearings is generally a bad idea.
Wiseco Tapered Ring Compressor

I picked up the Wiseco 84.50 mm tapered ring compressor from Summit Racing as planned. They charged $10 for shipping so the cost came out to $40. A bit expensive as compared to the steel coil type but I still think this will make the assembly process a lot easier and, if it prevents damage to a ring, less expensive overall.
A close look at the taper inside the compressor indicates that it is not a straight line -- rather, the radius appears to change a bit toward the top of the ring, curving wider slightly, as necessary to get the rings into the compressor safely. In this way it's a lot like the compressors used by BMW on the assembly line these days (only a lot cheaper, no doubt).
Outside Micrometer Set
I initially considered buying only the micrometers I needed (1-2, 2-3, 3-4"). The Mitutoyo units matching the one I already have (0-1") were predictably expensive, at around $765 for the set. Additional research led me to some new lower cost iGaging units that incorporate their "speedmic" technology. This is little more than a spring loaded handle that allows faster opening and closing of the micrometer. Unfortunately there are two downsides to these units:
-
They lack an analog thimble scale or a ratcheting speeder. In fact, the thimble doesn't rotate at all -- it's simply a fixed handle built to look like the typical thimble and ratcheting speeder. This means the speedmic handle is the only way to use the device. The kicker is that the handle appears to be made out of plastic. If that 5 cent part breaks, your $200 mic is worthless.
-
In my opinion it's not particularly suited for work involving round objects. I surmise that if, in the process of seeking the minimum dimension of a crankshaft journal, I accidentally released the speedmic handle the spring loaded spindle could potentially slide down the side of the journal and scratch it in the process.
Looking elsewhere in the iGaging product line I found their IP65 digital units that look and function much like my Mitutoyo and add SPC (data capture over USB). I could not find these units sold individually but I did find an entire set supporting a range of 0 to 4 inches for a bit over $300. This saved around $450 as compared to the individual Mitutoyo units and $250 over the speedmic units. I will probably wind up selling the set at the conclusion of the project so the price is less of a concern, but it still represents a huge savings.
Engine Stand and Crane Decisions
Some time ago I narrowed my choices of engine stands down to a Sunex model available at Eppys for $175 and the 1/2 ton HF available for less than $50 with a coupon. Similarly, I found an shop crane sold by Eppys (I forget the brand but it's yellow) for around $265 but I knew I could get a 2 Ton crane from HF that would get the job done for about $100 less with coupon.
As I plan to throw the engine stand into the junk pile at the end of the project I want to throw away as little money as possible so I've naturally leaned toward the HF stand. While the general build quality and load rating of the Sunex stand exceeds that of the HF, the one perk of the HF unit is a smaller front crossbeam (the one to which the casters mount). This is important as too wide of a crossbeam can interfere with the legs of the shop crane and prevent the crane from getting the engine close enough to the stand to complete the mounting process. This is, incidentally, the reason I ruled out the 1 ton HF stand everyone says is far better made. Oddly, that stand will fail to mate an engine using HF's own (Pittsburgh branded) crane.
Research on the HF stand indicated that the 1/2 ton unit to buy at the moment is their part number 69520, which is apparently the one with the old-style of rear (fixed) wheels that uses a U-shaped bracket to attach them to the crossbeam. The newer variant, with the axles welded to the crossbeam, is known for dropping its wheels due to a questionable design involving a single circlip. Whoever designed this "improvement" is apparently ignorant of something called a thrust load.
The problem now is stock. The recent sales have cleaned out the stores of the crane I want. Fortunately I don't need these items until the last minute so I will continue to check stock over the next few weeks. In the worst case I'll just suck it up and buy the units from Eppys. The perk in that case is, unlike HF, Eppys is willing to sell their preassembled floor models, so that would save a couple hours of assembly time.
Mileage: 266000