


Thursday, September 14, 2017
Replacement Tunnel Insulation Arrives...Broken
The replacement tunnel insulation arrived yesterday so I went to the garage to pick up the original and take it to the dealer for the swap. Initially the parts rep told me the insulation had arrived in one piece but after I arrived he apologized and said that upon closer inspection he realized that the new part was in fact damaged in a manner similar to the original. Comparing the parts side by side it became clear that the new part was less damaged than the original so I decided to take the newer unit and commit to some kind of mechanical reinforcement of the broken seam because I'm sure as hell not relying on epoxy to keep the part together.
I found my tech in his office, having just returned from vacation, and we spoke briefly about the issue. I initially proposed adding a couple reinforcements in the form of an aluminum flatbar and screws but my tech suggested something he's seen BMW do elsewhere -- use wide flange rivets and a few aluminum fender washers. Why aluminum washers you ask? To avoid the dissimilar metal corrosion that would otherwise result from the steel washer being in contact with the aluminum rivet body.
So the plan is now to apply the epoxy and then reinforce the joint with rivets and washers. I'm still on the fence as to whether I'll tackle the insulation replacement and related brake work myself but given the fact that I'm about two weeks behind my original schedule I'm leaning toward having my tech do the work so I can get back to working on projects that make money rather than prodigiously spend it.
Block Painted
Back at the garage I donned my tyvek suit, VOC respirator, nitrile gloves and safety glasses and proceeded to top coat the primed block with Eastwood's 2K Aerospray high temperature paint in gloss black. Once I was finished painting (or so I thought), I removed the safety gear, only to realize a few minutes later that I missed a couple spots. I hastily grabbed the paint and proceeded to hit the trigger in a few short bursts over the needed areas. It was at this point I realized the effectiveness of my respirator -- I didn't smell a thing while wearing it, but a couple short pulls of the trigger without it, even while trying to hold my breath, was enough to remind me how important all this safety gear really is. If you use the Aerospray products, make sure at the very least you're wearing a proper respirator. You don't want to breathe this stuff.
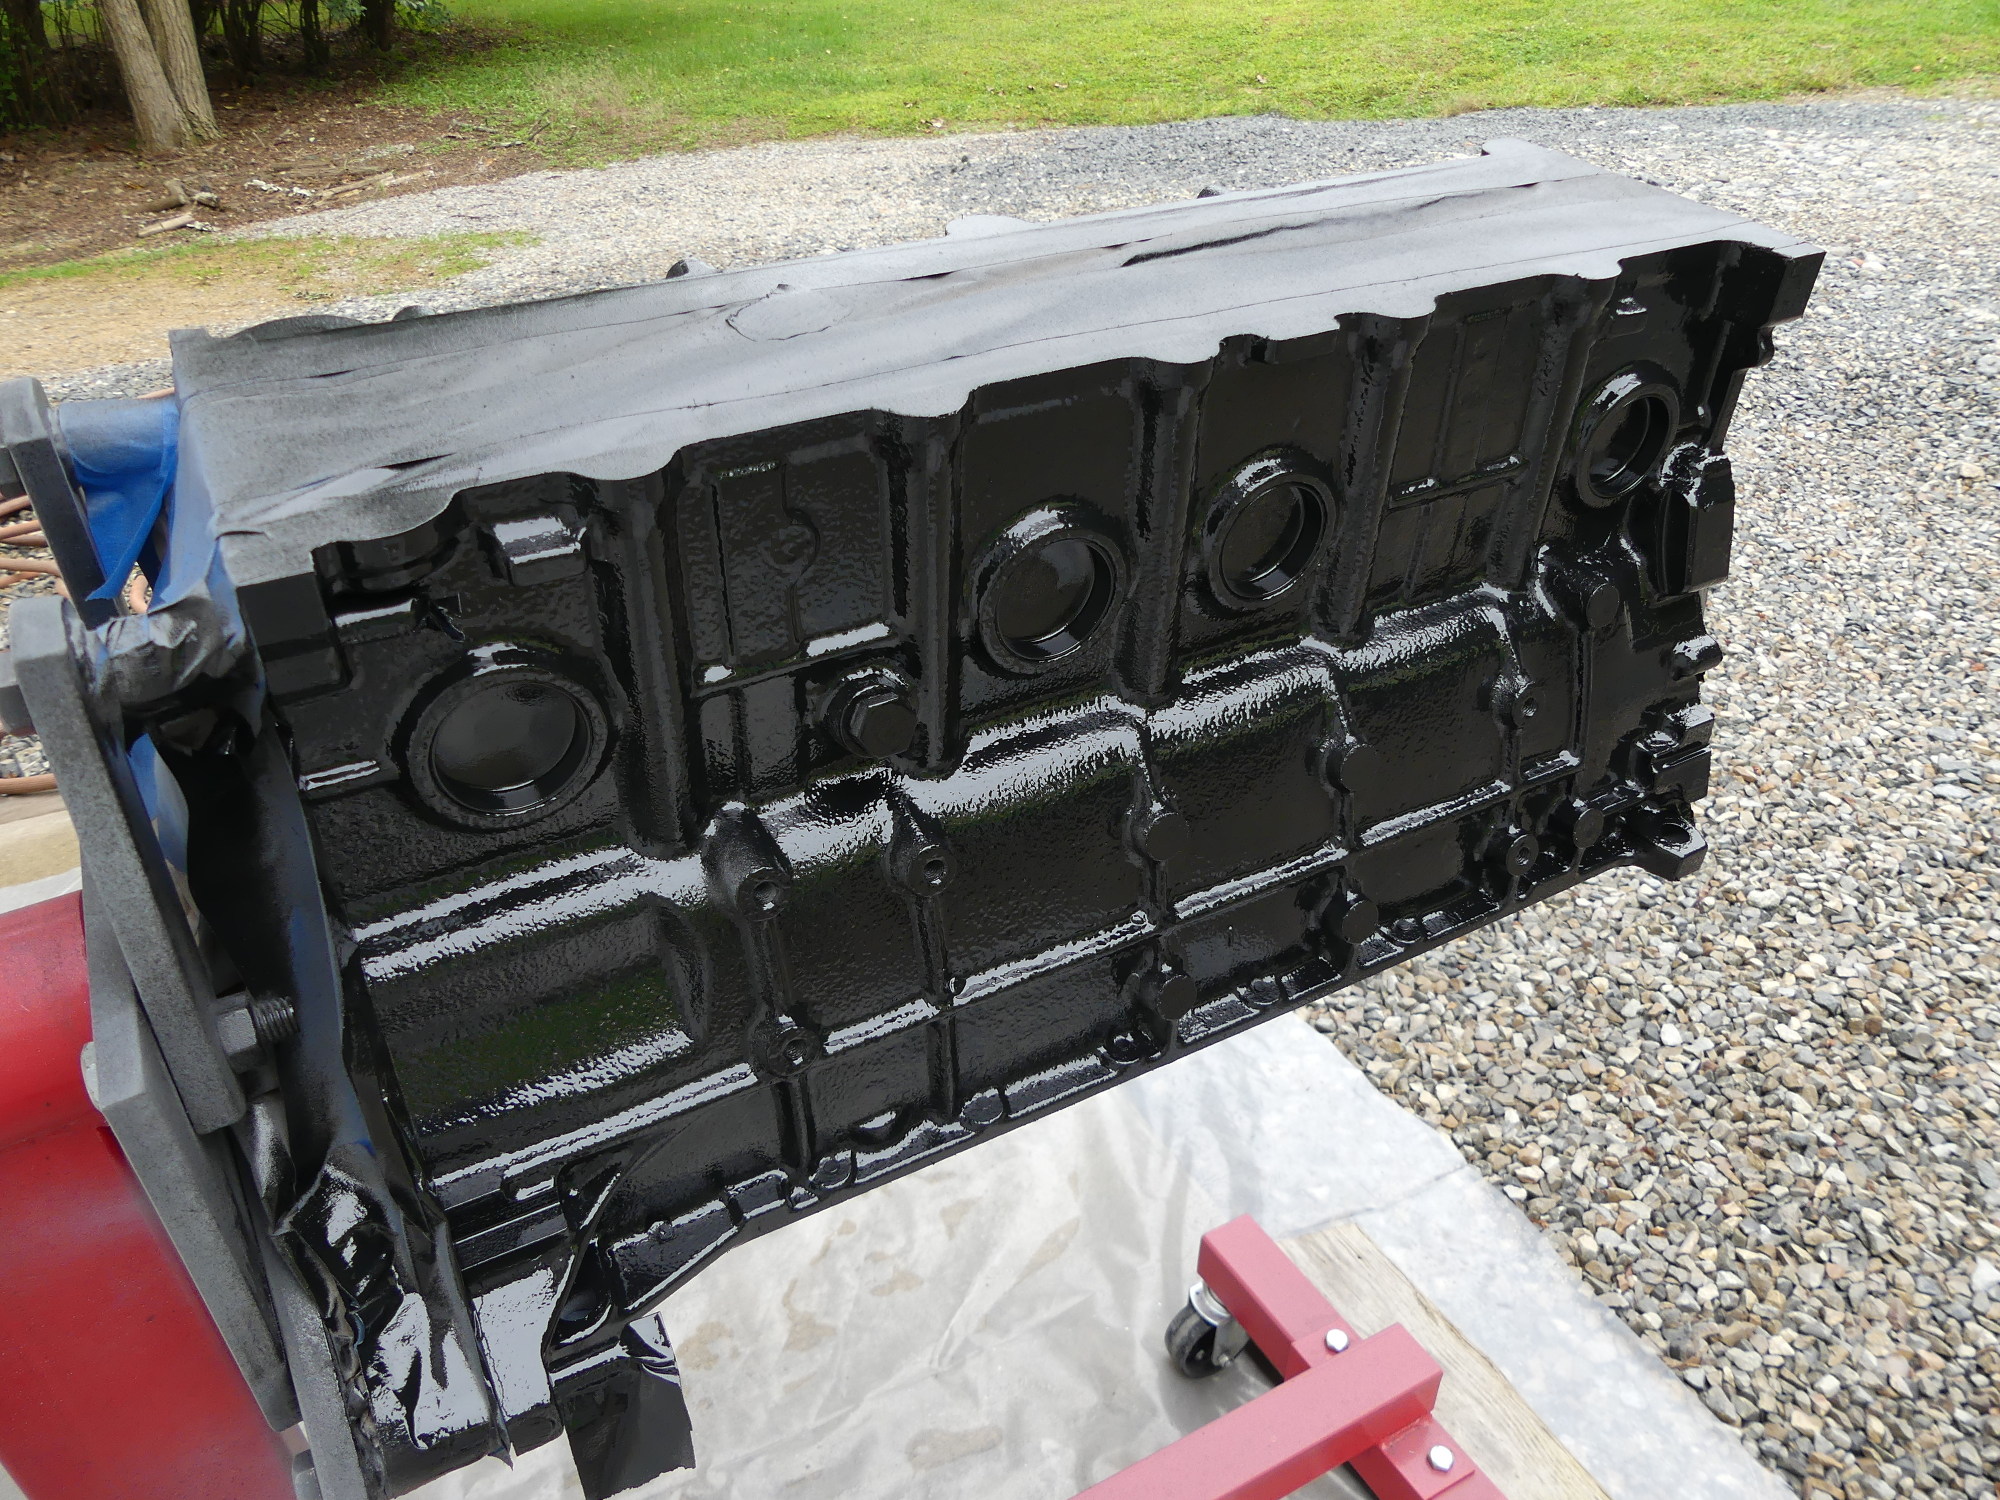 This is what Eastwood Aerospray 2K high temp gloss black sprayed on a cast iron block looks like. At this point the paint was still soft and generally tacky. By the next day it had fully cured. |
 A shot of the exhaust side of the block still masked off. Proper masking is definitely required and that takes time. But as the following pictures show proper prep definitely pays off. |
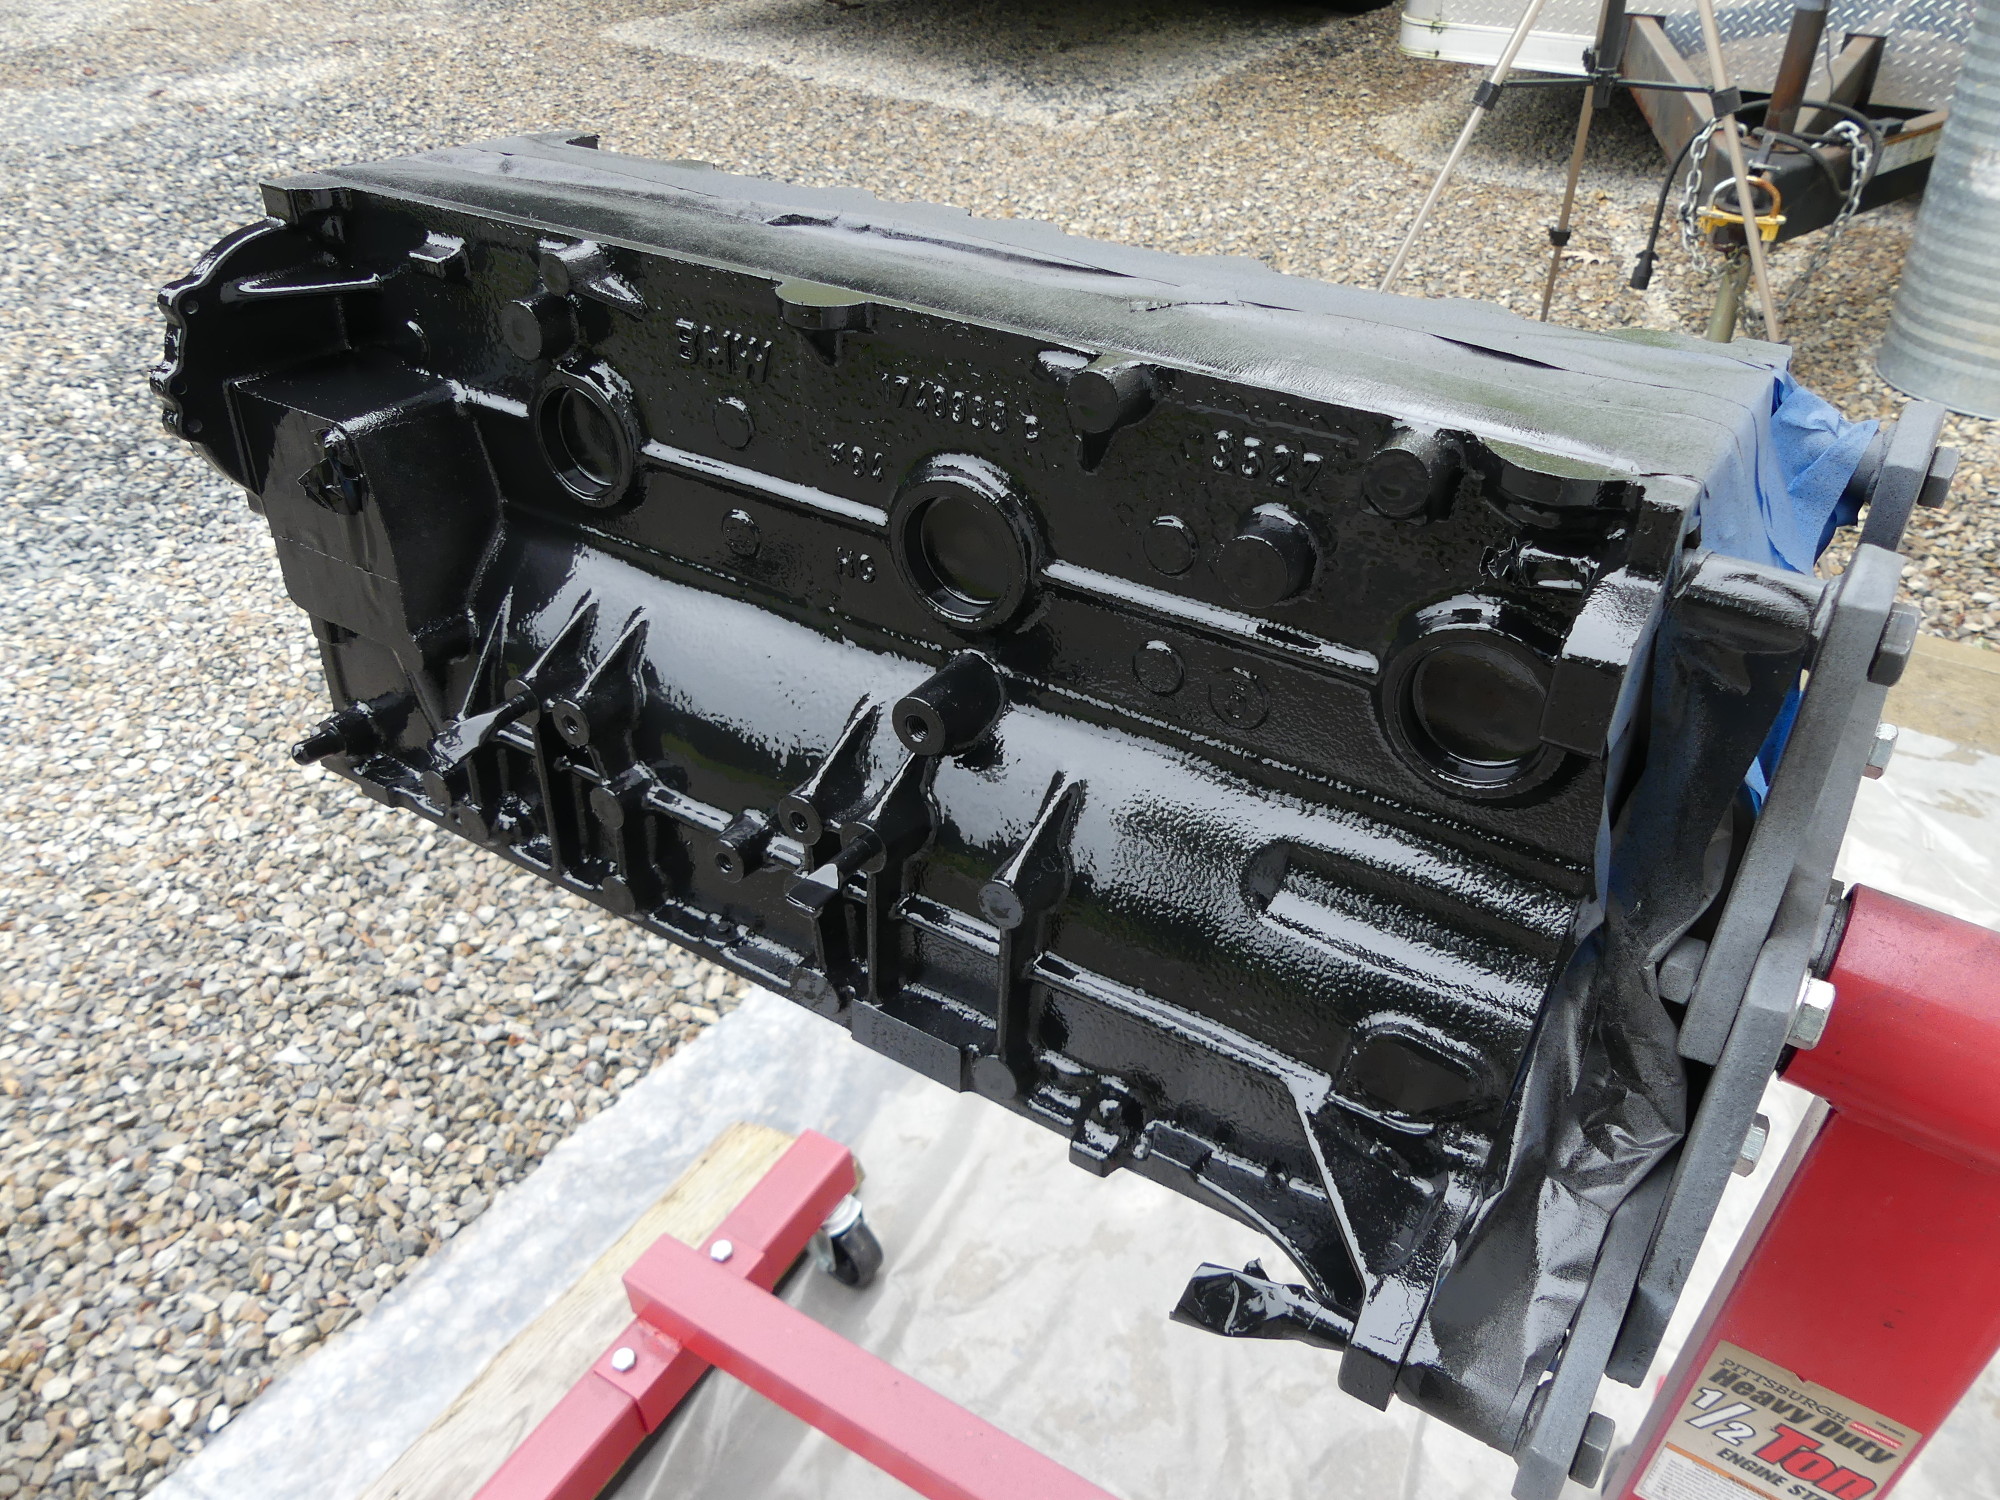
 The engine stand "locks" in four distinct positions, including in this case, horizontal. I used this position to start removing the masking. Note that I did this about a day after the initial spraying. |
 A closeup of the oil filter housing mounting flange following removal of the masking. This is one of those surfaces that absolutely must be free of paint. Note the paint around the lower dowel. That will be removed prior to installation. |
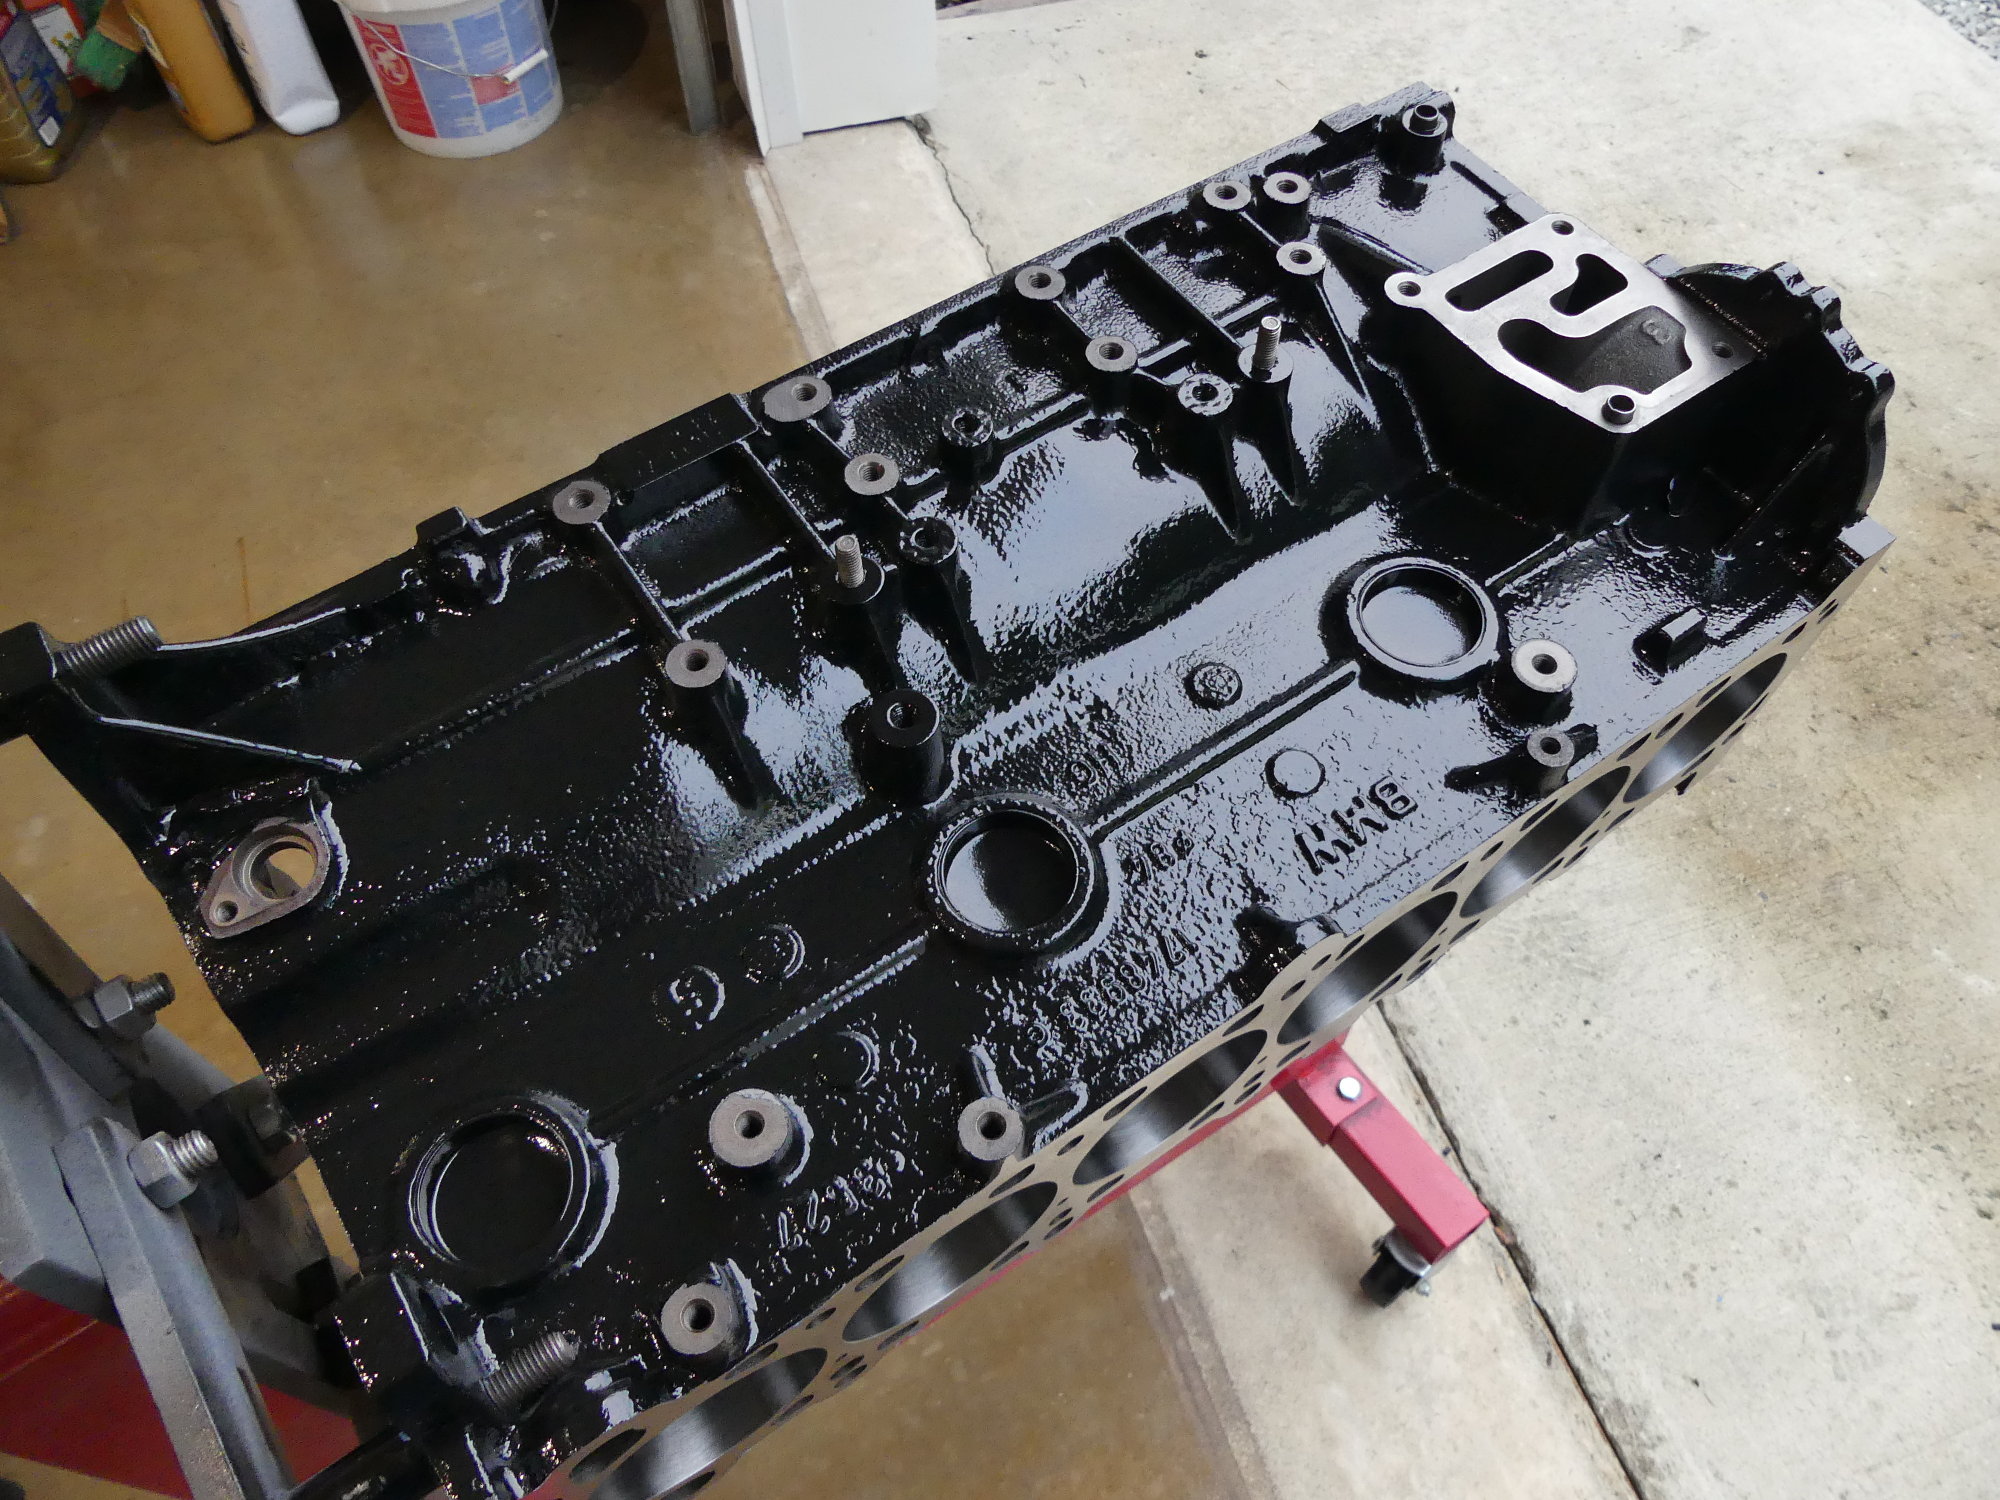
 The finished paint job. I used this opportunity to use a blue towel laced with mineral spirits to clean the cylinders and a surprising amount of dirt came out of them. I'll do that a few more times before installing the pistons. |
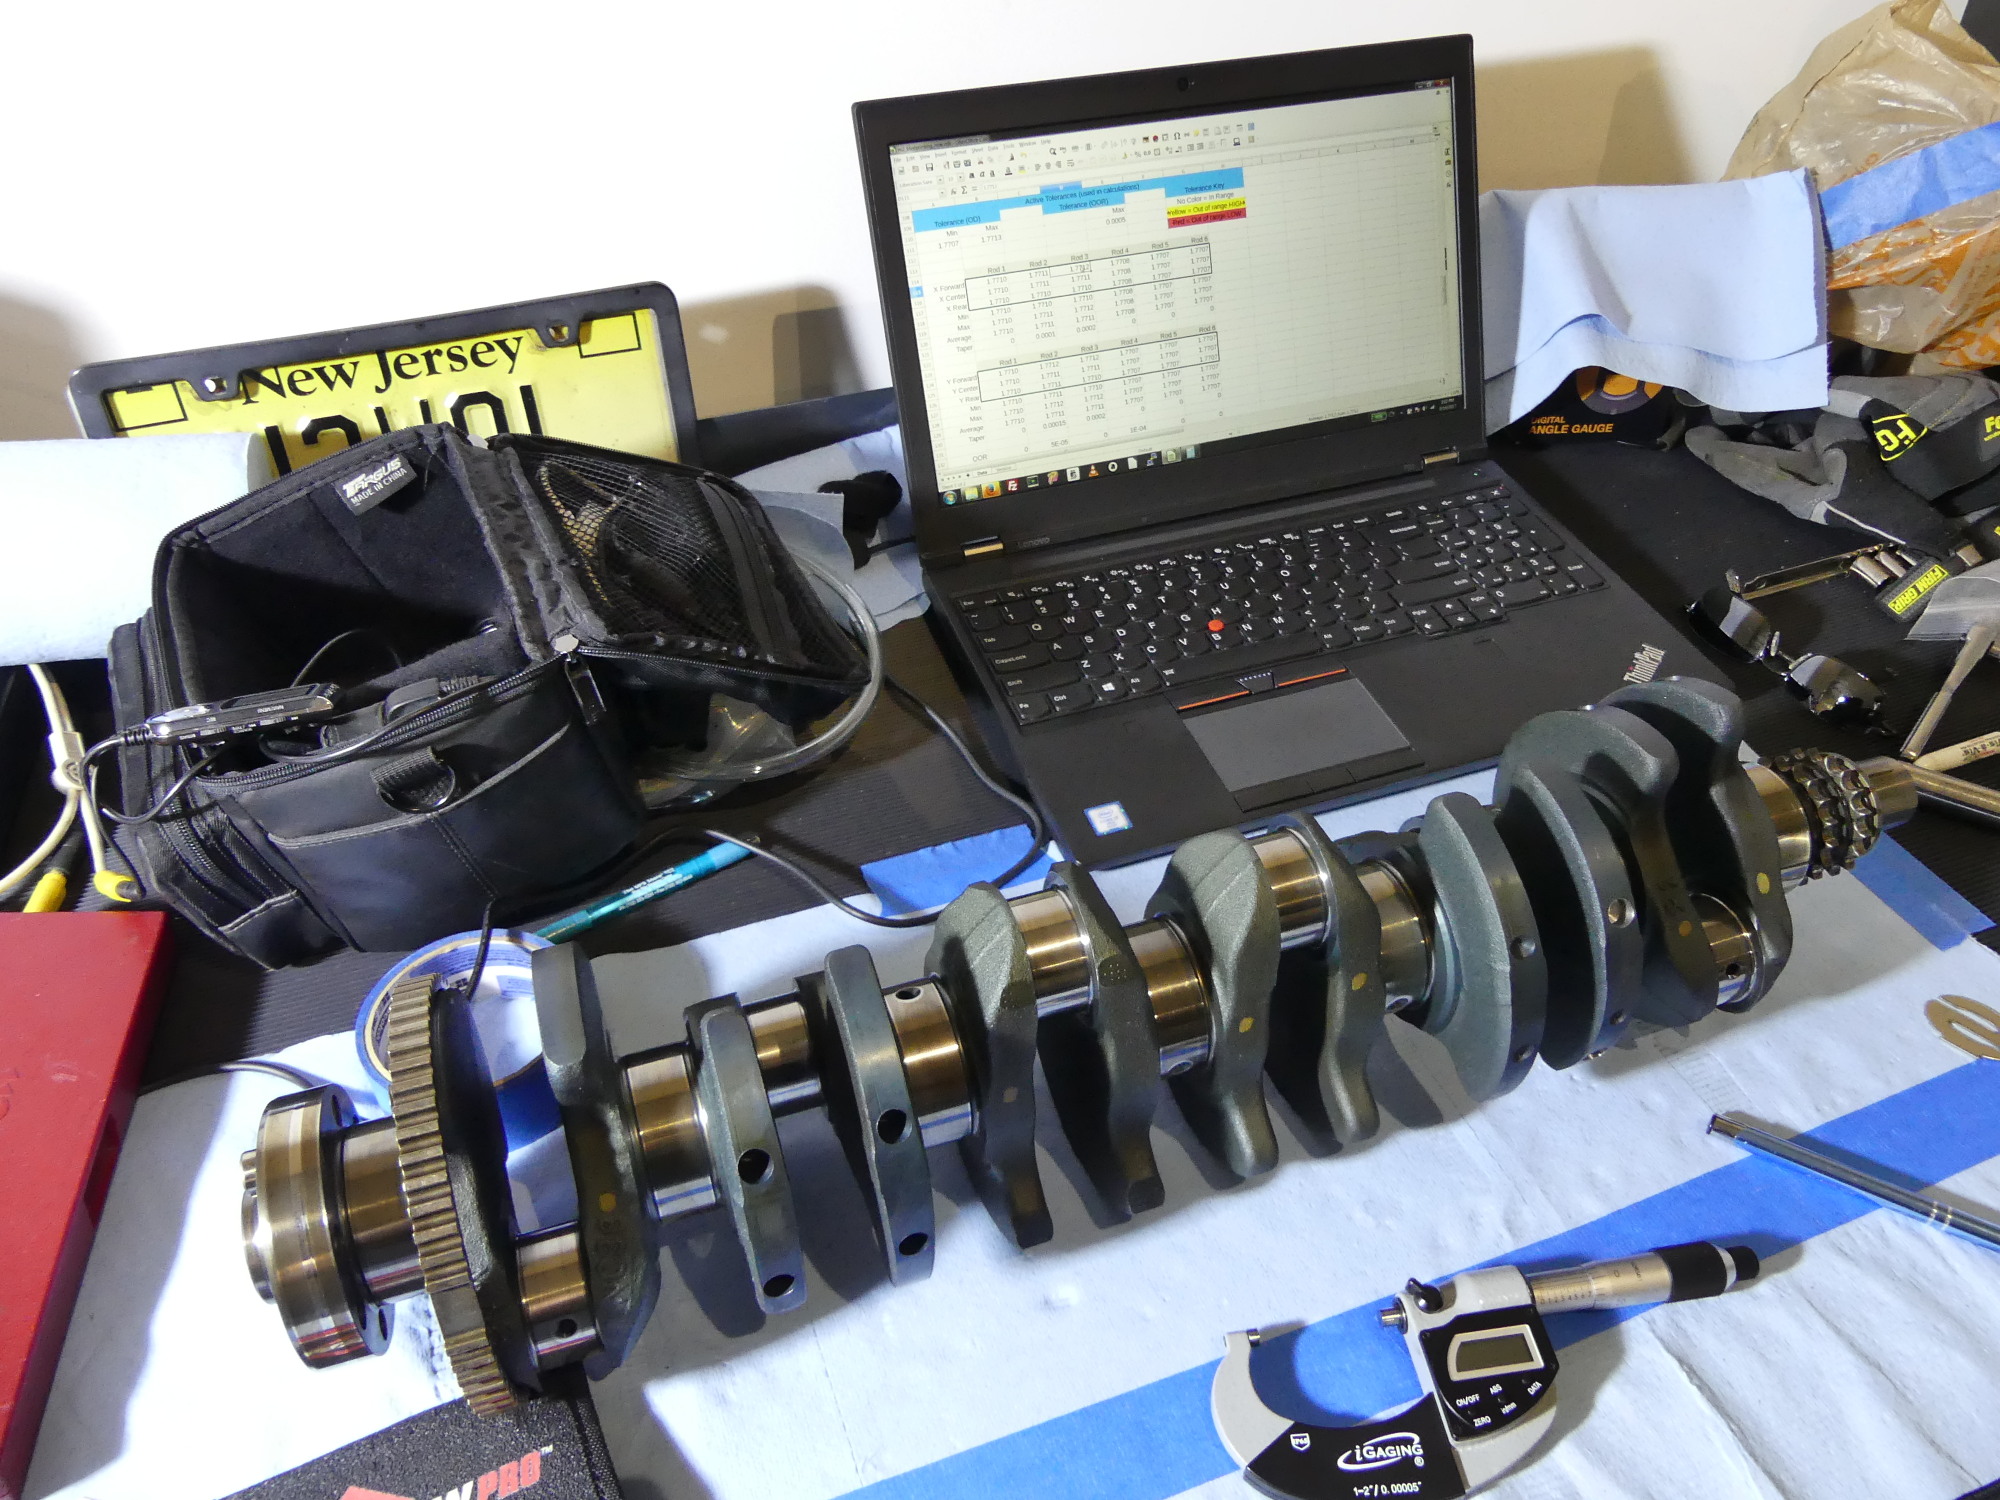 With the block painted I moved on to measuring the crank. The iGaging digital micrometers have worked pretty well but they eat batteries in storage. The laptop and my blueprinting spreadsheet have been handy in reducing clutter and automating all the related math. |
A couple hours later I came back to the block and unmasked it. Overall it looks great, though I must admit I'm not a fan of the gloss black look. The BMW factory paint was a satin finish and I really would have preferred that because it tended to hide the imperfections of the casting but, as I discussed ad nauseum earlier, Eastwood does not at present make a satin (or even semi-gloss) version of their high temperature Aerospray product. A serious oversight in my opinion -- hint, hint, Eastwood.
Precision Scale Research
Yesterday evening while reviewing the piston and rod weights provided by my machinist I realized that I would need a scale with a resolution of 0.1g and repeatable accuracy at that resolution to properly weigh the parts. I naively thought the cheap electronic scale I bought some time ago would fit the bill but turning the unit on confirmed its resolution was only 1g. That meant I needed a new scale.
I'll cut to the chase and say that what I found on Amazon and Ebay were mostly cheap garbage with faux specifications like "readability" of 0.1g, but no real specifications or guarantee of repeatable accuracy at that resolution. A particularly critical review of one of the more popular scales said that the unit tended to wander and vary by as much as 0.6g before and after taking a measurement. That is unacceptable for my application.
That led me to do something I've been doing a lot more lately -- buying slightly more expensive but generally higher quality products from an independent vendor's website rather than Amazon/Fleabay. I found a company selling a unit meeting the load, resolution, and accuracy requirements and I'm reasonably confident it will get the job done but, of course, they dragged their heals shipping the unit (despite proudly proclaiming the unit was in stock and would ship within 24 hours!) so I'm not expecting it until early next week. When it arrives I'll be able to assemble my pistons and rods.
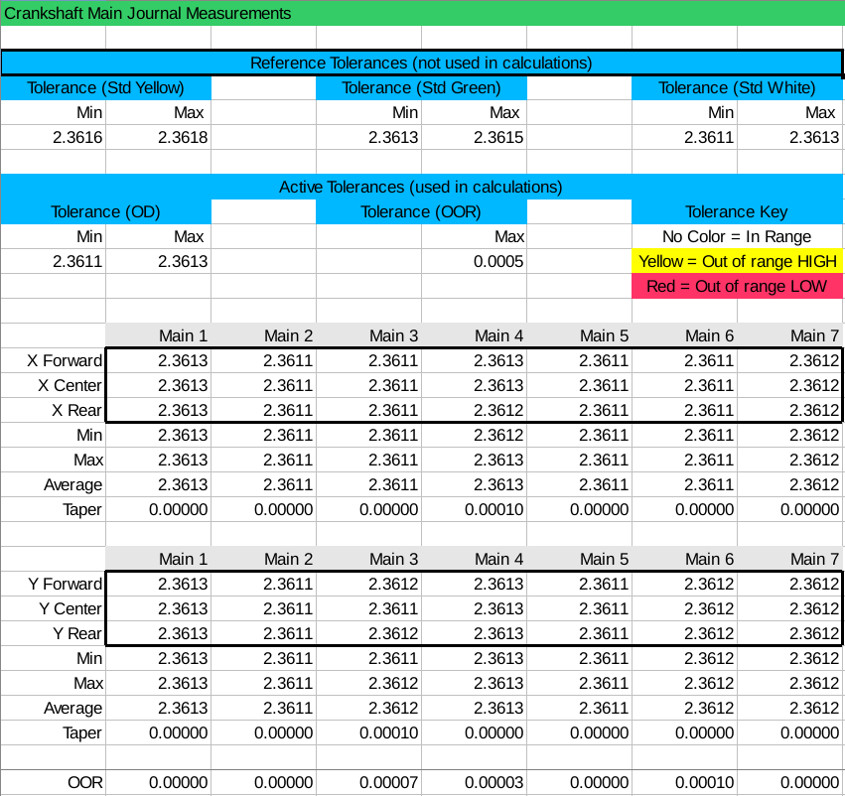
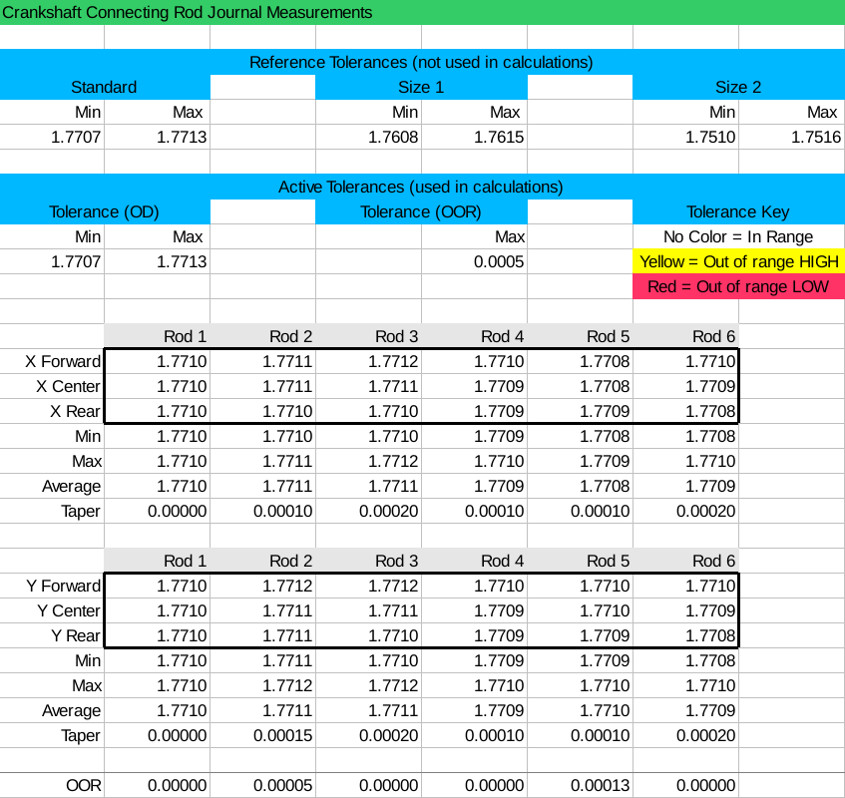
Crank Journal Measurements
Measuring the crank with a micrometer is one of those things that looks easy but can be surprisingly challenging to do properly because so many factors can affect repeatable accuracy at the required resolution. Each of the standard bearing shells for the M52 (yellow, green and white, in order of increasing thickness or decreasing ID) are applicable to a range of a mere three ten thousandths, so an error of one ten thousandth is significant.
Based on my experience the ratcheting speeder definitely eliminates much of the guesswork and is the best way to obtain consistent measurements with minimal effort. However, I'm not sure the torque applied by the clutch on my instruments is ideal. For example, most suggest that the proper torque for measurement is achieved when the mic can be rocked with just a hint of drag over the surface. Yet using my mic's ratcheting speeder to obtain a measurement I found that I had difficulty rocking the instrument over the journal. Loosening it up about one ten thousandth produced what I think is the representative measurement, but the interest of consistency and speed the values I recorded in my blueprinting spreadsheet were sampled when the clutch activated.
After measuring the main journals twice in both axes I found the measurements consistent enough to trust. They revealed numbers ranging from 2.3611 to 2.3613. Two of the mains were consistently 2.3613, or at the top of the range for a white bearing, but I can't explain why these journals were fatter than the others. My machinist may have polished some of the journals more than the others. Or perhaps it reflects the original manufacturing processes. I am more inclined to believe it's always been this way, but as I failed to measure the crank before I sent it off for polishing I can't point the finger at anyone in particular. If you're wondering about that "extra tenth" related to measurement technique, the reality is adding it to the numbers I obtained with the clutch would do nothing but cause a couple of the bearings to straddle the white / green tolerance range and that would require the purchase and ongoing accounting of two different bearing sizes. I'm not opposed to buying green shells as needed if the plastigauge reveals clearances outside of a range of 1.0 to 1.5 thousandths but I won't go out of my way to increase the complexity of the build otherwise.
The rod journals enjoy a slightly wider tolerance of five ten thousandths for each of the three available bearing sizes (Standard, Undersize 1, and Undersize 2). While I saw no particular rhyme or reason to the numbers I pulled off the rod journals, they were all in the middle of the range for Standard bearings, so that's what I plan to order. While I noted basically no taper in any of the main journals I did find some on a few of the rod journals. This wasn't exactly a surprise, given that I found a more pronounced tapered wear pattern on the original rod bearings. The taper was limited to around two ten thousandths maximum, which is acceptable.
For the obsessively curious, here are my numbers:
Cylinder Bore Measurements
As I've indicated previously, boring and honing a block with a torque plate installed is a good thing because it helps to ensure the cylinders are true when the head is installed. The downside is that unless the torque plate is installed it is not possible to double-check the machinist's boring and honing skills. I knew this going in and decided to obtain a full set of cylinder bore measurements anyway, if for no other reason than to demonstrate the effects of the torque plate or head on the shape of the cylinders.
-
The X-axis measurements in general were closer to spec. Most of the movement appears to be in the Y-axis.
-
Cylinders 1 and 6 were considerably out of round. Cylinders 2-5 were less so. My assumption is that this occurs because the inner cylinders are supported on both sides while 1 and 6 are only supported on one side. This ultimately affects the shape of the cylinders along the longitudinal axis of the block.
-
All cylinders were generally more out of round at the bottom as compared to the top. I don't know why.
If I bought another set of head bolts, installed the torque plate, and remeasured the cylinders I would probably get a much better picture of the accuracy of my machinist's work but I'm not sure it's worth the cost and the risk. Granted, the cast iron blocks don't have a history of pulling threads (probably because they're helicoiled already), but why tempt fate? At some point I have to say "whoa!" and trust the professionals, and I think this is one of those times.
Miscellaneous Tasks
Before I left the garage I decided to do a couple small tasks. I installed the sticker on the front support that indicates the proper charge of refrigerant. The old one was, of course, left behind on the old support and the new one conveniently came in the box with the new condenser.
I also placed two small squares of 3M paint protection film on the support where the plastic upper radiator retainer clips mount. The clips had worn the original paint down to bare metal and so I found rust under the clips. My hope is that the film will prevent or at least delay abrasion of the paint. The perk is that I can replace the film periodically.
Next Up
I'm expecting a few parts to arrive tomorrow including the head gasket and rod bolts. At the same time I'm planning to order the bearings. Unfortunately, there's nothing else for me to do until either the bearings or scale arrives. Both are expected early next week.