


Ending 2025 With Good Progress
After nearly three months and several online meetings, including a video conference with all of the contractors that I'm planning to use for this build, I managed to work with Legacy Post and Beam to finish the construction documents.
For the most part the design has not changed much beyond the initial redesign, but the changes are important so I figured I'd highlight them here.
Additional Residential Space Added
I decided to have Legacy reserve additional residential space in the rear of the center bay to satisfy the 50% rule required by the underwriters. This seemed like the most logical place to add it as the high ceiling was already part of the design, and as I learned some time ago it's cheaper to add space by building upward (or downward into a basement) than increasing the size of the building footprint.
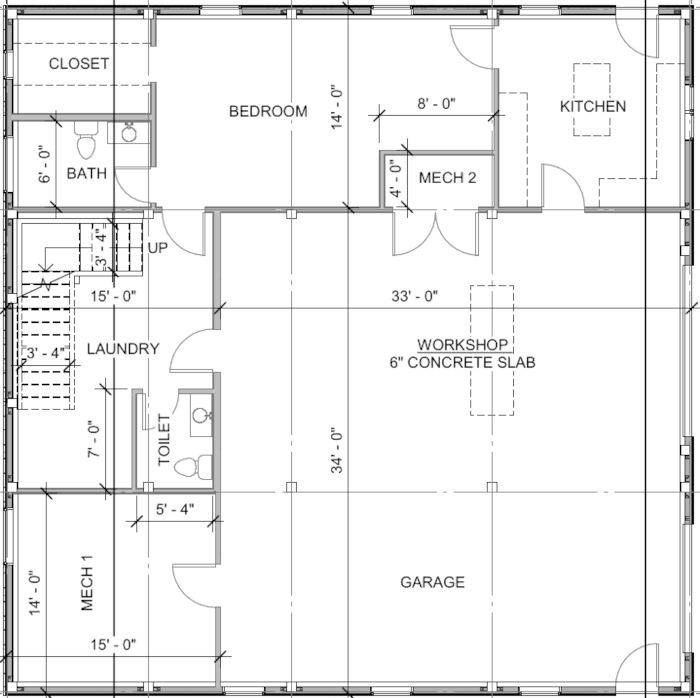
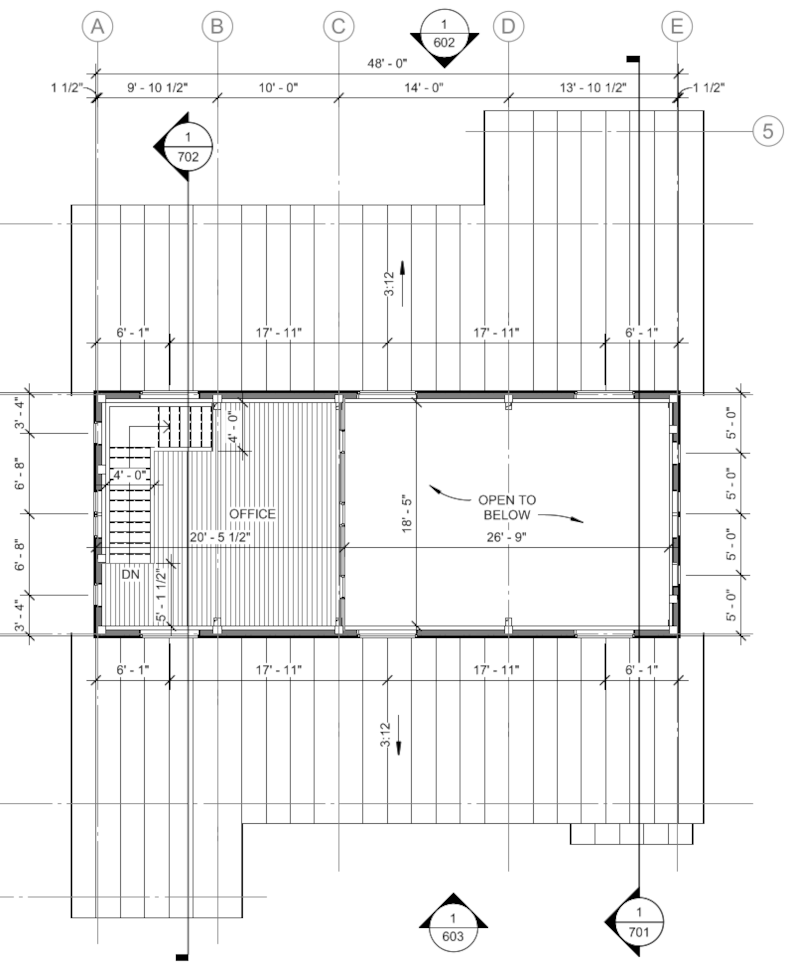
This change produced a roughly 20x20 room on the second floor that I'm referring to as the Office, but in reality it will serve many functions including a media room / living room, computer workstation environment, and R&D space for my business. With the addition of a convertable sofa, it could also serve as a crash pad for friends. Below the Office is a laundry / utility / storage room. The depth of this room was intentionally limited to 15 feet so I would be able to store two of my vehicles in the center bay when the lift is not in use.
The perk of this design, from a structural perspective, is that the second floor spans between the bents are relatively short (only 10 feet) and the wall that divides the laundry room and workshop will further divide one of those spans in roughly half, leading to additional support for the second floor framing. This should result in an exceptionally stable (non-bouncy) second floor -- an important trait given how much time I will spend on the second floor. Also contributing to the stability of this floor assembly will be 1x tongue and groove flooring that is part of Legacy's "loft" option.
You'll also notice a set of stairs leading from the door near the bedroom up to the second floor. Given a variety of options, I selected Legacy's "Lodge" staircase which is built out of rough cut 4" timbers. Even the treads are 4" thick. Not only is the look of this staircase impressive, code does not require risers with treads this thick. That will allow the staircase to remain "open" in a way not possible with traditional lightwood framed stairs, and both light and air will flow through it, making the laundry room less dark and crampt.
While this change is a compromise in that it will preclude the installation of a second lift in the rear of the center bay that I originally intended to provide additional vehicle storage and service options, the reality is the design simply wouldn't have moved forward without this change. The upside, I suppose, is that the additional residential space will be fully utilized and the laundry / utility room will provide additional storage space that was somewhat lacking in the original plan.
Window Placements
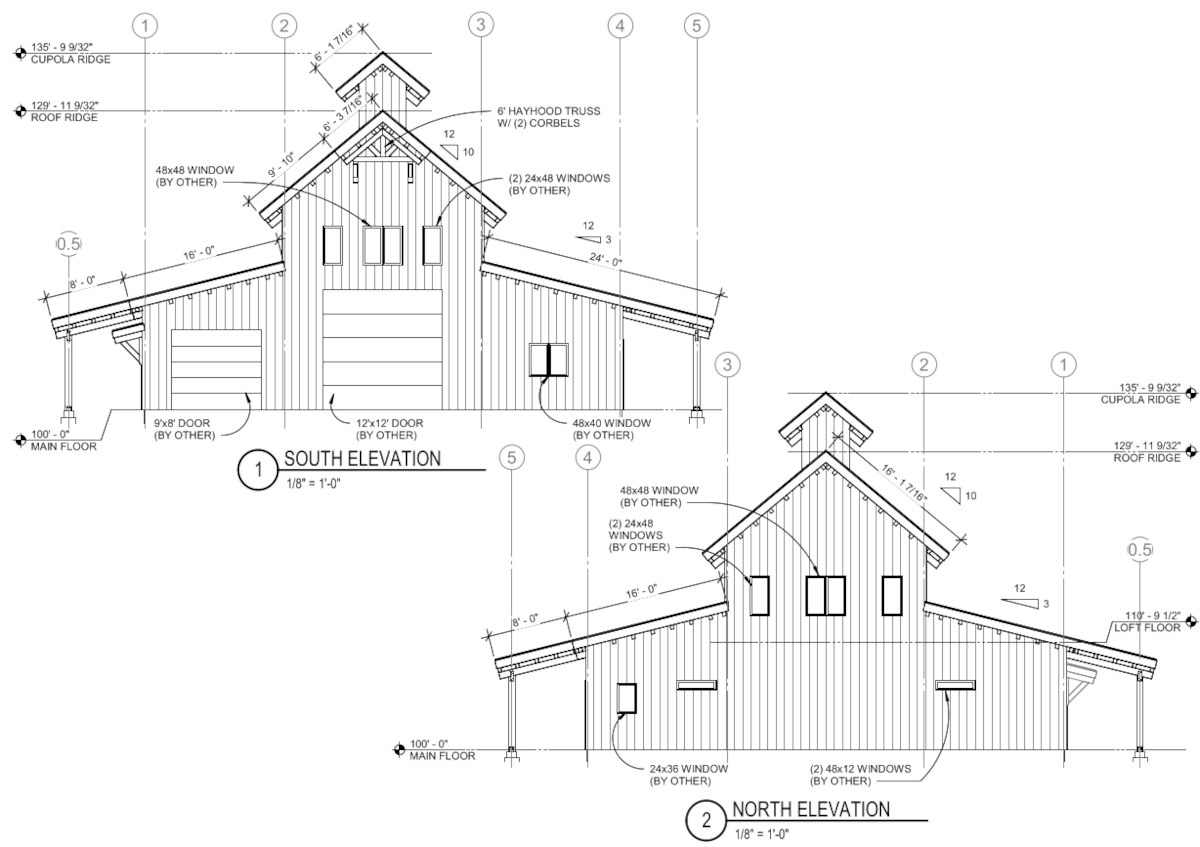
I've strategically placed a variety of windows in the structure to permit a good amount of light to enter the building, including traditionally dark spaces like the bathroom and walk-in closet. The number of windows has been reduced from the original design, mostly as as cost saving measure, both in terms of the bill of materials as well as future utility costs. More windows generally means a worse overall R-value for the structure, and I think it's fair to say that utility costs are going nowhere but up over the next 20 years.
To promote security and maximum available wallspace for equipment, I originally planned to have no windows in the primary mechanical room. Around the time I was working on a preliminary equipment layout for that room, Legacy provided a revision to the design including the windows I'd asked for during one of our zoom meetings. Looking at the rear face of the building I saw an assymetry with respect to the windows in the residence so I decided to add a small transom style window, placed high on the wall in this room, to complement the one installed in the residential shower area. The perk is that this room will now be a bit brighter during the day.
I also added windows on the second floor wall separating the loft and the workshop, allowing a view into the workshop. It's my intent to allow at least one of those windows to open so I can allow some cross ventilation or permit communications between people in the office and workshop. I believe it's been against code for some time to install operable windows between a garage and any living spaces but as there are no county or state inspections required in my rural location I plan to go ahead with this plan and do something the code books and governments in general assume no one can do these days -- use my brain and not open the window if I'm running a vehicle in the workshop so exhaust gases don't get into the residence.
Overhangs
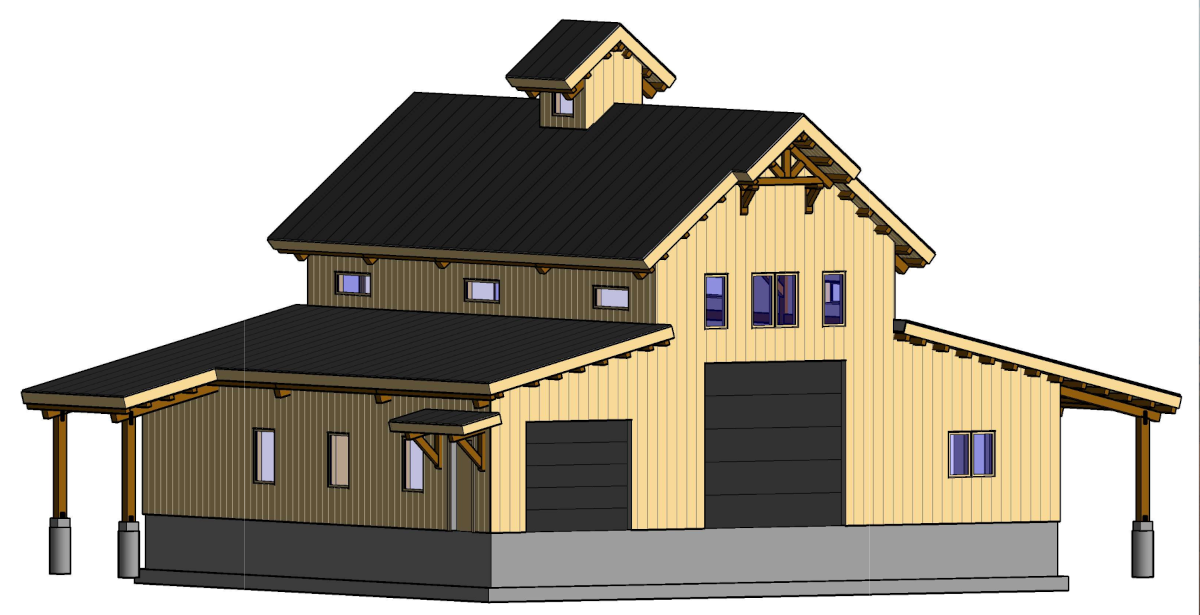
I've added two overhangs to the property. In the initial drawings these overhangs were separate from the roof assembly but in order to maximize ceiling height Legacy proposed eliminating the separate roof overhangs and instead extending the roof assemblies in these areas. The end result is a minimum 8 foot ceiling height at the eaves and a more polished appearance.
The overhang on the front right side of the building will serve as a porch or entryway, solving the problem I fumbled with some time ago with the original building design. This space will initially be open to the outdoors and serve as little more than cover from the elements while I fumble for my keys, but I intentionally made the space large enough so I could later convert the space into a screened porch that will facilitate outdoor cooking -- something I plan to do more of in the future so I can keep the stink of cooking outside and improve indoor air quality.
The second overhang will be located in the left rear of the building to serve as a covered generator pad. I originally wanted to create a separate structure for the generator to be placed far enough away from the structure to limit fire risk and noise, but this was a compromise to permit the benefits of a generator (in my case to efficiently charge battery banks connected to hybrid inverters) at minimum cost.
I recently purchased a 10KW tri-fuel generator and that will be used for emergency purposes in the first couple of years there, but my long term goal is to buy a slow-turning 40KW diesel or LP generator and enclose the pad, either with solid walls to reduce the noise signature or a fabricated steel cage to prevent vandalism or theft. I intentionally made this space big enough to meet fire code requirements with regard to the clearance between an open-frame generator and the neighboring structure. If I install a generator with a metal enclosure around it (less ideal for servicing purposes), the clearances are a bit smaller.
Mounting Provisions for HVLS Workshop Fan
I added a beam centered between the second and third bents (as viewed from the front) to allow me to hang a high volume low speed (HVLS) fan in the workshop area. I felt this would be necessary to help mix air to reduce stratification and energy costs. The engineer has specified a maximum of 500 lb load on this beam, which more than covers any HVLS fan on the market I'd care to install.
The only issue at present is that I have researched several HVLS options and they're all ridiculously expensive. The "cost-reduced" (E-Series) fans available from Big Ass Fans do not appear to have a good reputation for longevity, with the motor electronics being the primary failure mode, and the company does not have a particularly good reputation for support of those fans out of warranty, so they won't be considered. Skyblade Fan never responded to any of my inquiries and only Hungongous Fan seems to get the aerodynamics right but they're the most expensive at nearly $8000. That's ludicrous for a simple fan with a 1/2HP motor and VFD (Variable frequency Drive). I mean, that's 80% of the cost of my in-ground automotive service lift, which required a lot more thought and engineering to produce.
What fan will wind up the shop? At the moment, I simply don't know. I may initially punt and buy a cheapo 10' or 12' fan from Amazon and take my chances. At $1000 I can replace the damn thing six or seven times as compared to the Humungous fan and still come out ahead. Message to all HVLS fan manufacturers: wake up from your delusion and lower your prices by at least half. Your juice ain't worth the squeeze.
Additional Tie Beams for Shear Performance
At one point a couple canted jack beams were added by the Legacy designers between the first and second bents for shear purposes and I initially saw these as potential mounting points for the 12 foot garage door tracks, but I soon realized that the door would encroach on the ceiling height needed to provide clearance for vehicles on the service lift.
The solution was simple -- place the beams horizontally at ceiling height. This will allow the 12x12 garage door to slide up nearly parallel with the front wall and then turn 90 degrees to parallel the ceiling. In turn, this will permit a nearly 18' ceiling clearance in this area -- more than enough to put a modern (ridiculously tall) truck on the lift.
Foundation Design Solidified
An initial revision of the plans showed a slab-on-grade construction despite my request for a T-style insulated slab foundation. Of course, I understood why -- the relatively short and mild winter weather in the southern US generally negates the cost and efficiency of hydronic heating, so the designer assumed (incorrectly) that I would be okay with that.
Over a year ago, just around the time I started the project design with my former architect, I conducted research into a variety of aspects of the property's location, including historical weather, average temperature, humidity, annual rainfall, seismic activity, etc. During this process, and subsequent monitoring of actual weather on the mountain, I came to the conclusion that it gets surprisingly cold on the mountain during the winter months -- typically in the mid 30's or low 40's -- weather surprisingly similar to my home state of New Jersey. In fact, the peak temperatures throughout the year are about 10 degrees cooler as compared to the nearby city of Chattanooga, and the mountain itself is about 1000 feet higher in elevation than the city, or approximately 2100 feet MSL.
To reduce initial construction costs and hence minimize the size of the loan I'll require to fund the project, I've elected to go with an insulated T-style foundation and install PEX in the slab but install the equipment to support hydronic heating later. In the meantime I'll depend on forced air heat pumps. I've always wanted to design and install a hydronic heating system so, as I have no plumbing inspections required on my property, I may very well do that at my leisure and save a LOT of money in the process.
Initial Engineer Review
When the design went to review by the engineer he made a few changes.
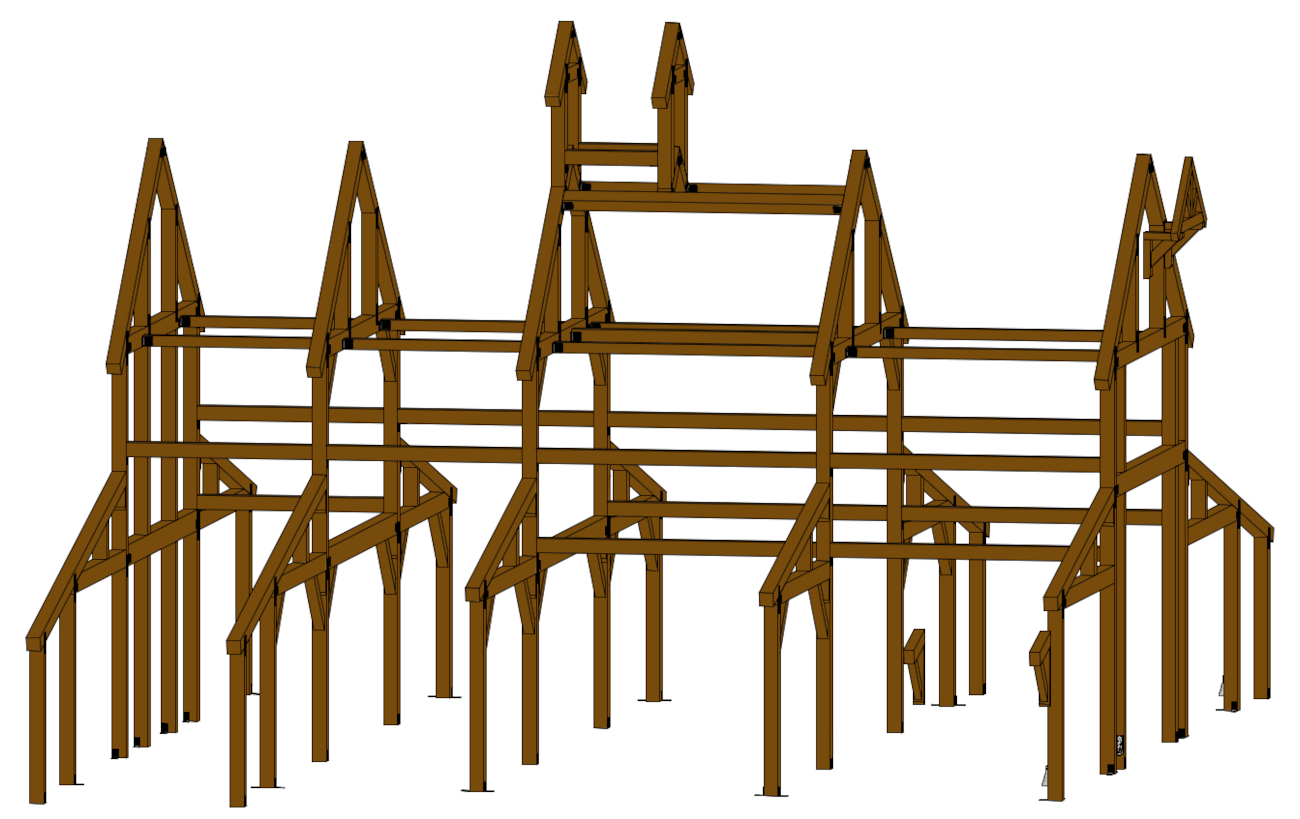
First, he added additional horizontal tie beams between all bents to allow the structure to meet shear requirements. This wasn't a surprise, however, as my Legacy project manager told me this was a likely outcome ahead of time. This structure is almost 30 feet tall including the cupola and tall structures are vulnerable to wind, especially on mountains where a venturi effect can cause average wind speeds to increase significantly. Needless to say I'm glad I'm working with people who recognize that.
To negate the potential for uplift when the garage doors are open the engineer added Simpson hold-down units (HDUs) to the front bent to ensure the post and beam frame was securely locked to the foundation. He also increased the density of structural screws in critical locations to tie the entire structure together and help prevent wracking or other shear effects.
The porch and generator overhang support column piers were dimensionless until the last revision and the engineer specified dimensions that will resist uplift. After all, the overhangs serve as big sails in windy conditions. The uplift risk will be largely mitigated once I enclose the spaces but bigger, beefier foundation elements never hurt anything (well, except my wallet).
Preliminary Rural1st Review
I submitted these plans to Rural1st and got some positive news back from them -- the plans will be sufficient from a content perspective and appear to comply with the 50% living space requirement, though the underwriting process is not over until I have a funding commitment.
So now it's just a matter of submitting the plans and a new pre-approval application to underwriting, since my last one was valid for only 90 days and just ran out. Then I have to wait approximately 45 days to approve and fund the loan. Fingers crossed.
The other good news is the last few months have been particularly productive at work and I've managed to save enough money to replace the cash I gave to Legacy a few months ago as a down payment, and that will make it a bit easier to swallow the sizable payment I'll give them to lock down a production slot for the frame in a few months.
I think we're on target for a shovel in the ground sometime in April or May and the installation of the frame roughly two months after that, as it will probably take about a month to prep the site and install the foundation and a month to cure to near full design strength before the structure can be attached to it. After that it's anyone's guess as to how long it will take to wrap it up and move in but I am hoping for sometime in the Fall.
Remaining Tasks
The next step is to update my requirements document to align with the current project, including MEP drawings.
Now that I have a window layout I may try my hand at some HVAC calculations including Manual J, D, and S, though it's sometimes difficult to get the necessary data from the equipment manufacturers so I may need to blindly rely on the HVAC contractor for this purpose. The problem with doing so is that if the HVAC contractor chooses to be lazy and apply rules of thumb rather than do the math, there is a risk they might oversize the cooling system, which would result in short cycling and a greater dependence on the standalone dehumidification system.
I also have to come up with a PEX layout for the residential space and workshop / garage spaces, but I may wind up simply outlining the hydronic heating zones and leaving it up to the plumber to design the layout. As plumbers in the south have less experience with hydronic heating systems I would prefer to have my own design criteria ready, if for no other reason than to serve as a comparison to their solution.
Finally, I need to define every electrical and data circuit for the structure. This will allow me to gauge the number and size of conduits required to connect everything, as well as clarify the location and size of the panels I'll need in the structure. These tables will also serve as a checklist of sorts for the trades so they can easily reference and check off each item as they complete the building process.