


BMW E36/E46
Brake Replacement DIY
A DIY brake job is one of the easiest ways to save LOTS of money on maintenance
BMW Balance
Brakes are just one of the ways that contribute to the "balance" of BMW performance. I mean, any idiot can put a big engine in their car and make it go fast in a straight line -- but ask the vehicle to take a turn just as quickly and you need a great suspension to keep up with it. Similarly, once you get a vehicle up to high speed, you need a reliable means to bring it to a stop -- in a hurry if necessary. To borrow a well-worn marketing slogan -- power is nothing without control. BMW brakes give you that control -- provided you replace them when required.
This article aims to communicate the insights gathered while servicing the brakes on my E36. The E46 shares the same basic platform as the E36 (except in the case of my 330, the brakes are just a bit bigger), so the procedures should apply to either model. However, I still recommend you reference a copy of the Bentley repair manual for your specific vehicle to make sure you use correct procedures and torque values.
Prerequisites
BMW recommends brake fluid be flushed every two years. Every year would be better. If you haven't flushed your fluid in that time and you're about to replace the brakes, it's a good idea to do that while the wheels are off. If you choose to do this you may find my Brake Fluid Flush DIY article helpful.
To perform a brake job, you should have ready access to the following:
- Rubber gloves
- Brake cleaner (aerosol)
- A parts washer or other makeshift wash basin
- Permatex Anti-Seize in brush top can (silver is fine, copper is better)
- Plastilube high temperature grease (essential -- don't do a BMW brake job without it)
- Floor jack (2 ton rating or higher)
- 2 Jack stands (3 ton rating or higher) on lowest height setting
- 16mm standard depth socket for caliper carrier bracket
- 17mm deep socket to remove wheel lug bolts
- 6mm allen (hex) head socket for rotor retaining screw
- 7mm allen (hex) head socket for caliper guide bolts
- 1 or 2 flat blade screwdrivers to aid in removing the retaining clip
- 24" 1/2" drive breaker bar for removing lug bolts and caliper bracket
- Torque wrench(es) capable of 22 and 81 ft*lbs.
- One large ("irrigation-type") syringe (optional; depends on the level of fluid in your brake reservoir).
- WD-40 (optional, depending on whether the rotors come off the car easily or not)
- A sturdy hook tool (optional, only required for work on the parking brake assemblies)
- Appropriate rotors and pads. Include wear sensors if the brake lining warning has illuminated (check realoem.com)
- About 2.5 hours per axle if this is your first time, less if you know what you're doing. Book labor is 2 hours per axle.
Part Highlights
 When you see the red brake wear indicator illuminate, it's time for a brake job! BMW recommends driving for no more than 1000 miles after this illuminates, but due to individual driving style it's not a hard limitation. |
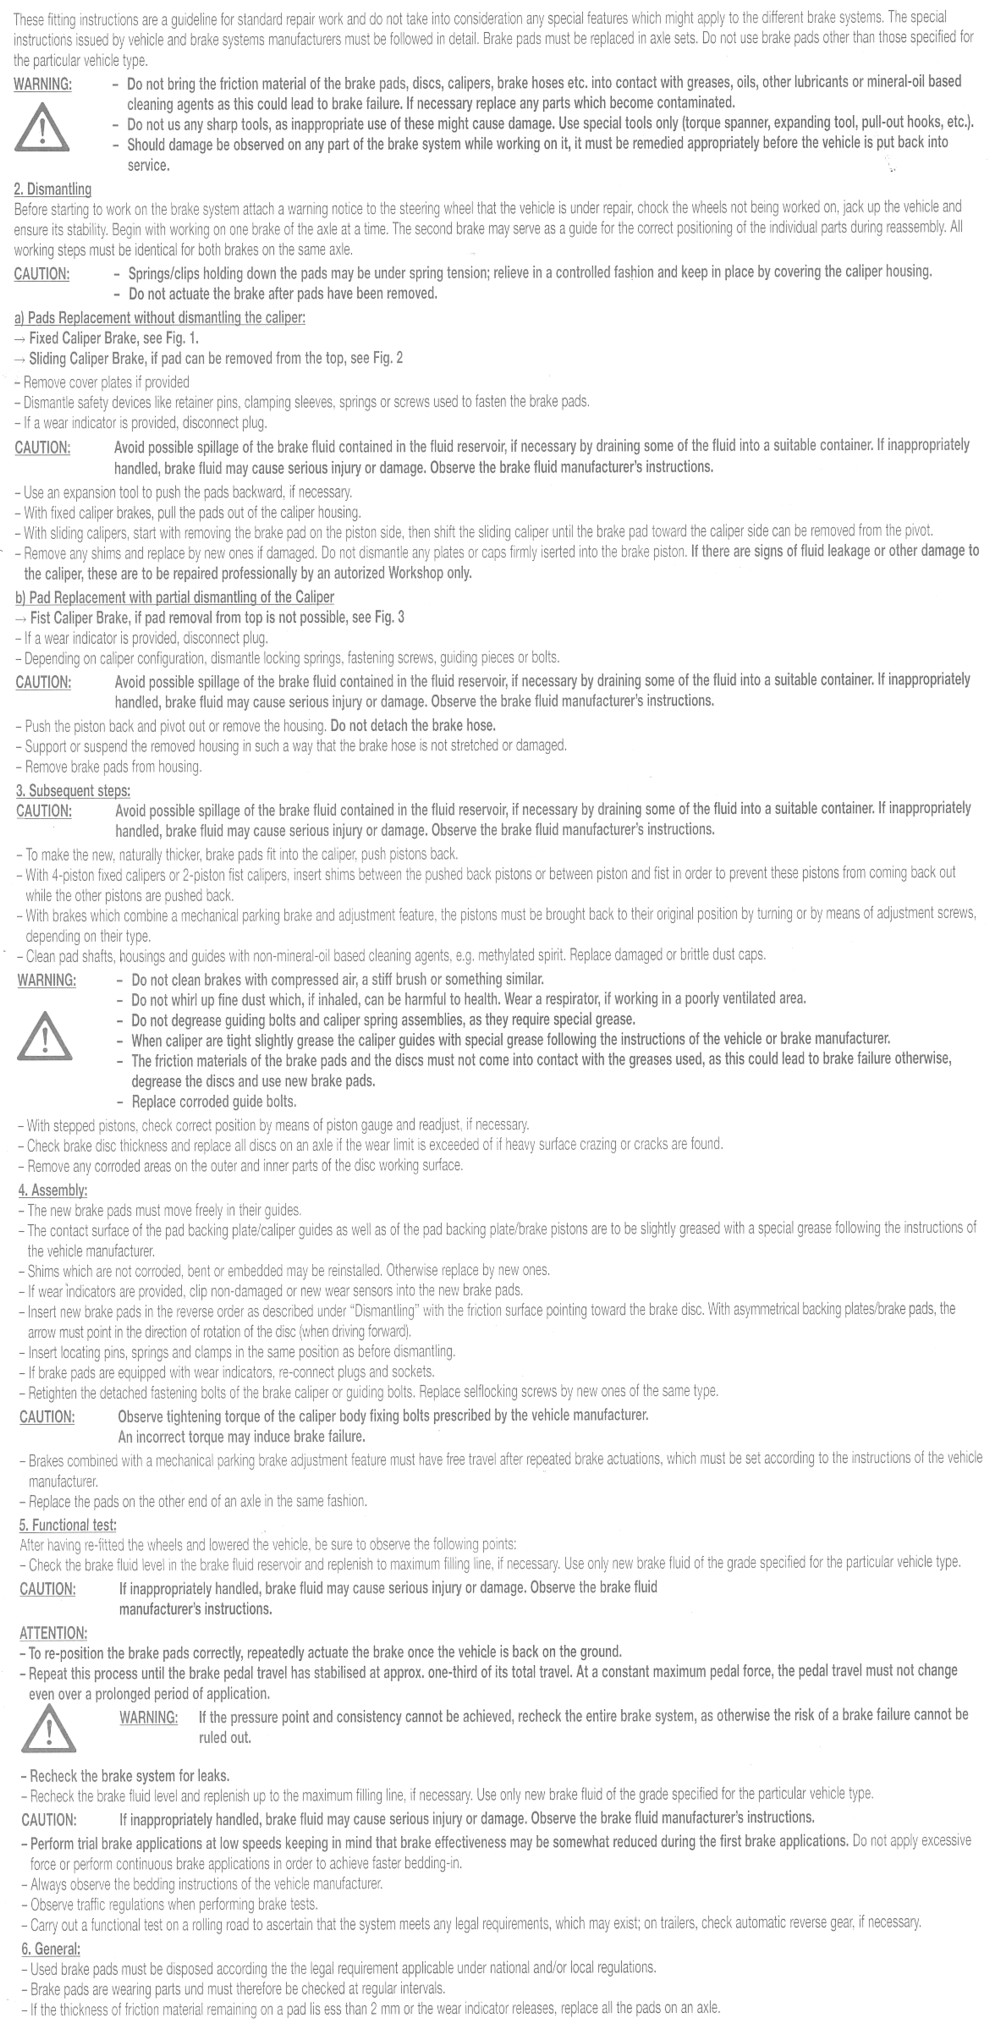 The most important thing you can do is read the directions for the specific brake pads you install. These instructions are for the BMW OE units and they explicitly prohibit any "bedding-in" of the pads after installation. |
 E36 vehicles come with jack pads but they do have a tendency to fall off as the plastic dries out so some people don't realize the car is intended to have them. Pick up a couple if your car doesn't have them installed. |
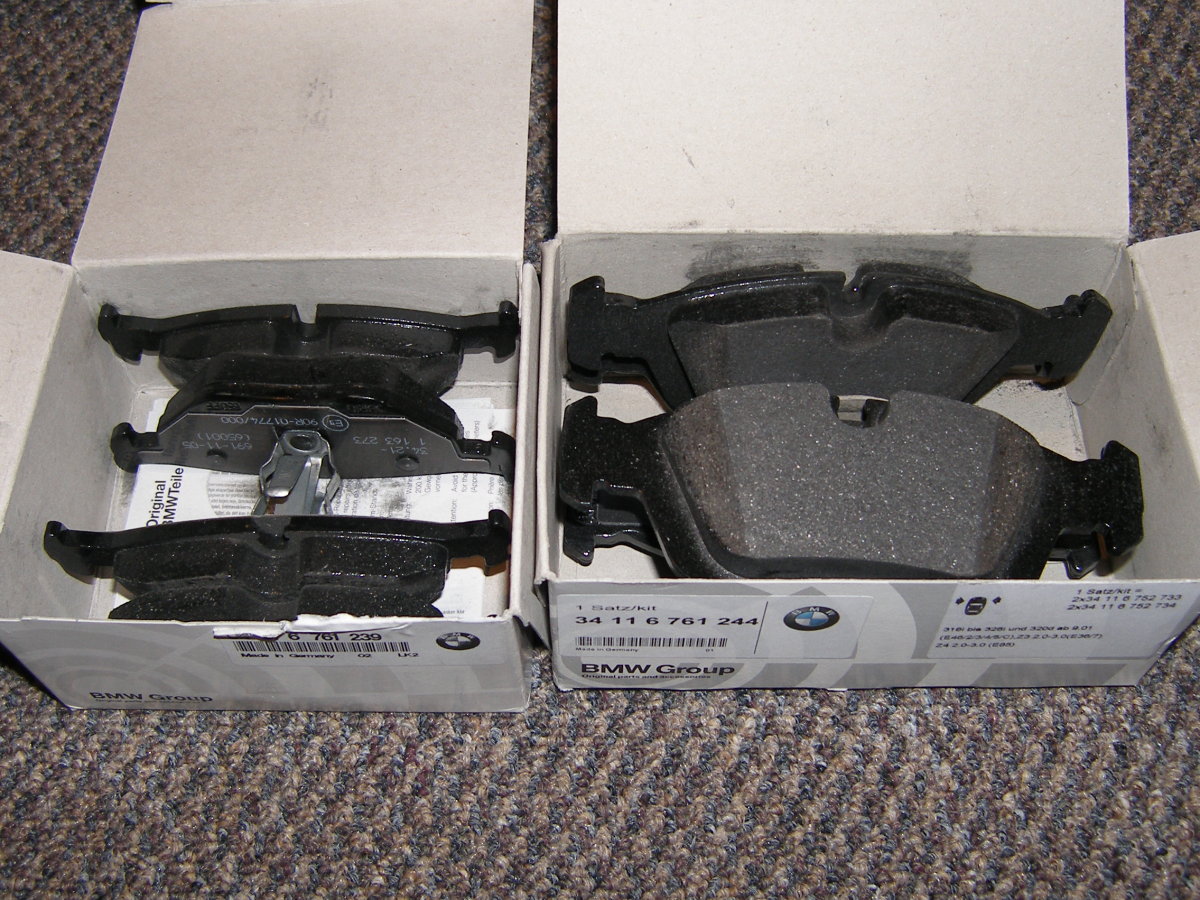 Note that the pads come as a set for each axle. Front pads on the right, rear on the left. Order quantity one (box) for each axle. |
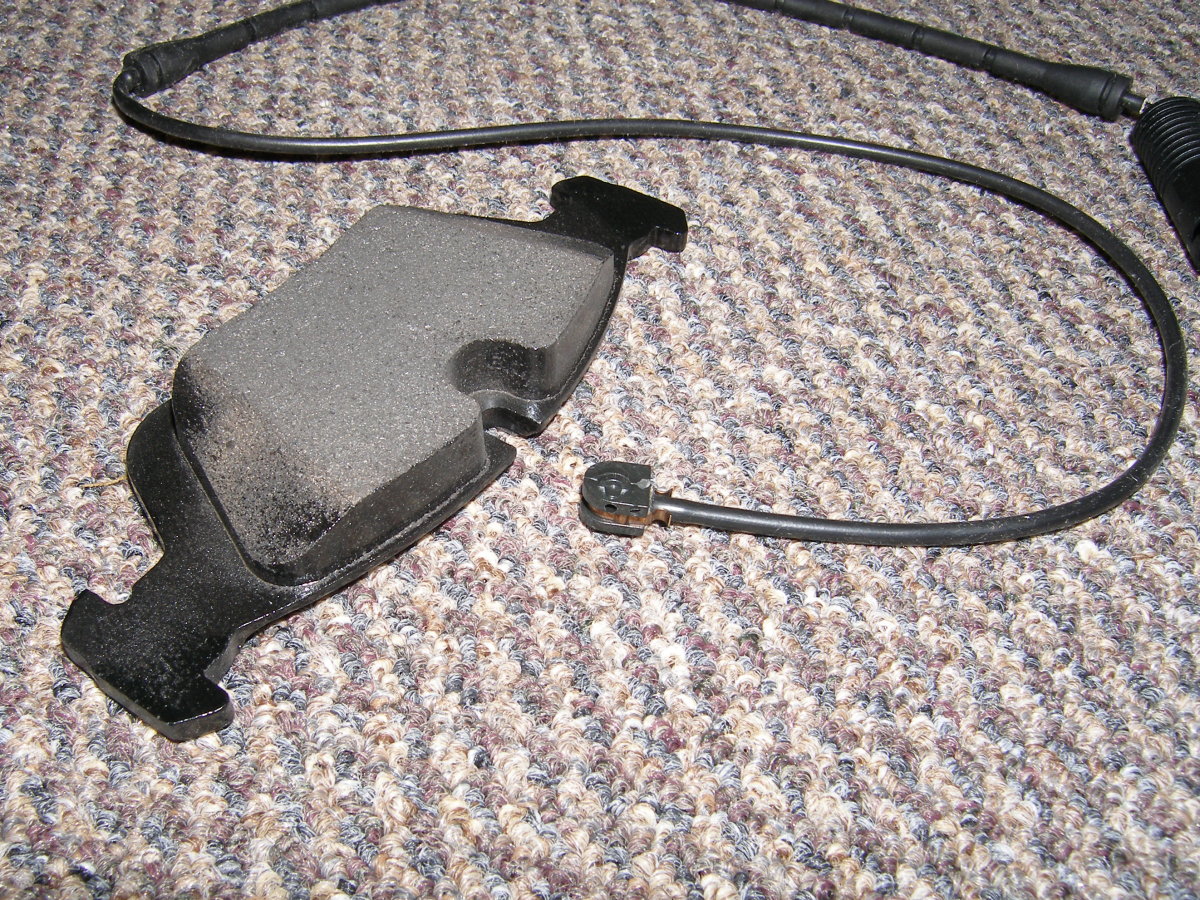 Here is a closeup of how the brake wear sensor mates with the inner pad. When the pad wears to the prescribed limit and rubs through the little nub on the sensor, the sensor signals the DME to illuminate the brake pad wear indicator. |
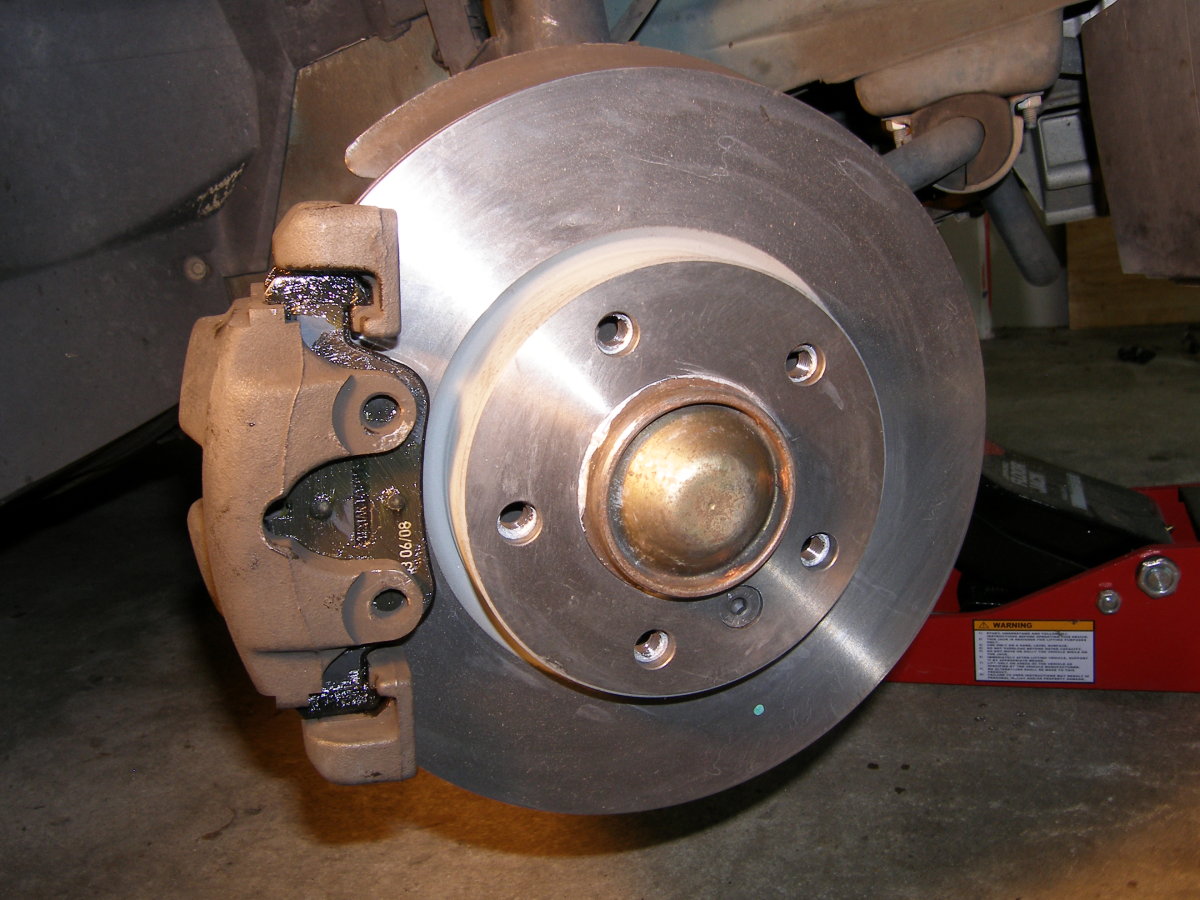
 Just a picture of the front vented rotors. Contrary to all the marketing BS today, plain rotors like this offer tremendous performance. There is no need for slotted / drilled rotors on a street car. |
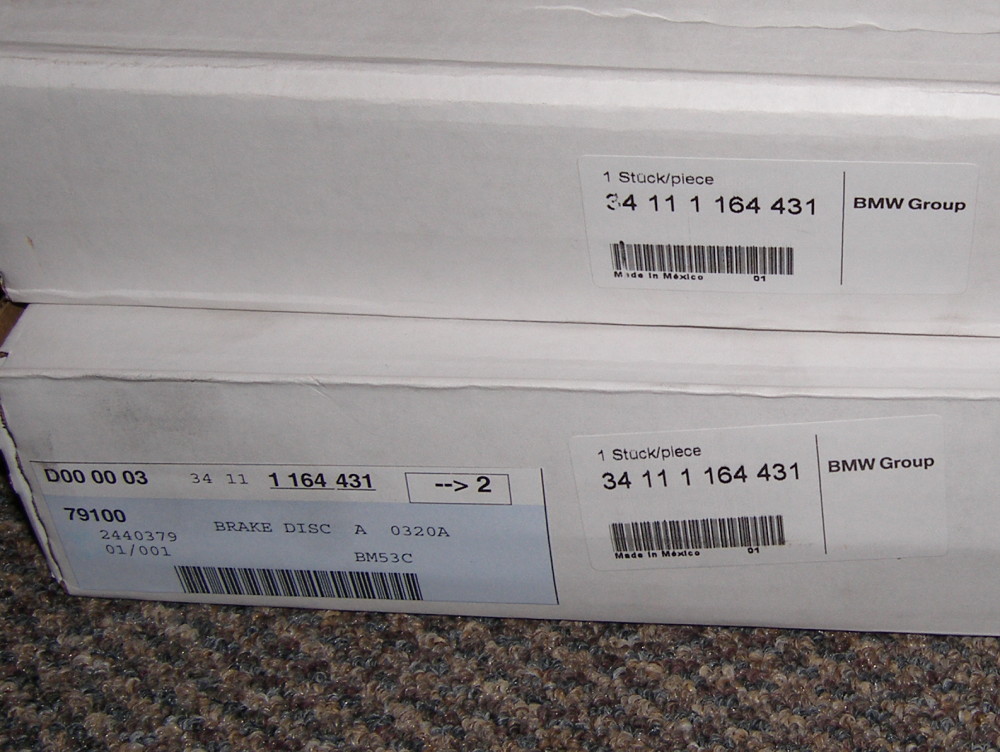 A closeup of the part numbers for the front rotors for reference. Unlike the pads, these are sold per side, so you'll need quantity two per axle to get the job done. |
 This is BMW's guide bushing "repair kit". Each package contains two guide bushings, two caps, and an extra cap with a white retaining clip for another application. One package is needed per caliper. Best to replace the bushings every three brake jobs or 100K miles. |
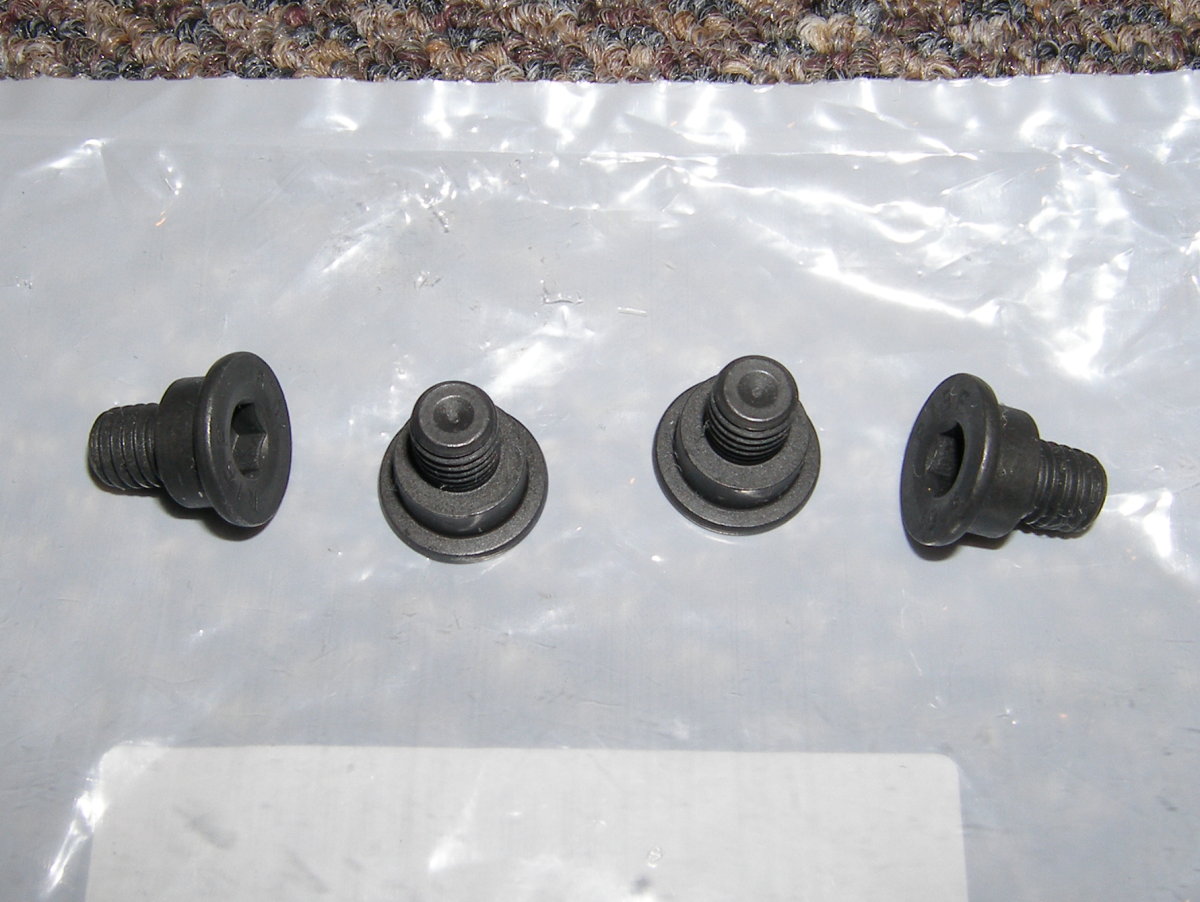 The infamous rotor retaining screw. These have a tendency to strip because few people put anti-seize on the threads. While you can reuse the existing screws if they are removed undamaged, you should always have at least one spare per rotor you intend to work on. |
Front Brake Replacement
- Take a look at the instructions that come with your brake pads. See the highlights for a scanned copy of the instructions that accompanied my BMW OE pads. You may note some statements in these instructions conflict with BMW recommendations. In those cases, always follow BMW's recommendations, since these pads are but one part of a complete system and only the system integrator (BMW) can know what's best for the entire system.
- If you don't have air tools at your disposal, break the wheel bolts loose with a breaker bar. Do not remove them. The goal here is to leverage the weight of the vehicle to keep the wheels from turning as you hang on the bar.
- Jack up the front of the vehicle and support it on jack stands. I won't detail how to do that here. If you don't know how to jack up a BMW, STOP RIGHT HERE and learn how before your life really depends on it. Free advice that might just save your life: NEVER RELY ON A JACK ALONE TO SUPPORT YOUR VEHICLE!
- LOOSEN (but do not remove) the rotor retaining screw on each side. If the screws have been fastened a long time and no anti-seize was used when they were last installed they may be difficult to remove. I have never stripped one, but I've come close at least one time. It's best to lightly hammer a hex socket into the screw before removing it with a property supported ratchet. If you do manage to strip the screw try a technique suggested by a reader: hammer a 6.5 or 7mm torx socket into the screw (aligning what's left of the hex points with the points on the torx) for extra grip. If that fails, the only solution is to drill out the screw, being careful to select the drill bit size to avoid drilling out the threads in the hub. If you do that you'll have to live without the screw (tolerable because it's technically only required for assembly) or replace the hub.
- Start on the right side. You can start on either side of the vehicle, but if you've never done a BMW brake job before, I recommend you start on the RIGHT side (as viewed from the driver's seat) first so you don't need to concern yourself with the brake pad wear sensor. It's not that it's a big deal, but it's one less thing to worry about the first time around. Put your key in the ignition and turn it to position 1 to free the steering lock and turn the wheel to the left until it stops. Turn the key back to position 0 (off) so you don't drain your battery. This will give you better access to the caliper on the right side of the vehicle.
- Remove the retaining clip. It seems like such a simple thing, but the clip does its job and doesn't want to leave the caliper. The trick is to take a small flat-blade screwdriver and approach each hole in the caliper from the center of the wheel, wedge the tip in and under the clip as close to the hole as possible and pry it up. An additional flat blade screwdriver may come in handy keeping one side of the clip out while you pry the other side.
- Remove the protective caps over the caliper guide bolts and then remove the guide bolts. See the Highlights. When you remove these caps, the point is not to grab the "shaft" but the very edge of the cap. The shaft is a flexible rubber sleeve and the cap fits into the end of that. I was able to pry the cap out with gloved fingers, but a small screwdriver may help. With the cap removed, remove the guide bolts. These are only torqued to 22 ft*lbs, so it shouldn't take much effort to remove them unless someone overtorqued them during the last brake job.
- Remove the caliper. Once the guide bolts are removed, you'd tend to think the caliper would just pull off, but if the rotors are worn, you'll have to get the pads past the ridge on the outer circumference that forms as the rotor wears because the pads are slightly smaller than the rotors. The problem is the ridge can prevent the inboard pad from pulling away from the rotor, and since the inboard pad is connected to the caliper piston the caliper won't move unless you can compress the piston as required. You can use a c-clamp for this, but note that if you intend to reuse the rotor, be sure to put some kind of shim (wood or otherwise) between the clamp and the rotor face, or else you may damage the rotor surface.
- Do yourself a favor at this point and take a look around. Note of how the outer pad sits in the carrier, how the inner pad is fastened to the piston, and the size of the piston. The areas of the pad backing plate that contact the face of the piston and the carrier will need to be lubricated with Plastilube high temperature grease during reassembly. Speaking of pads, the highlights show what remains of the front linings when the brake wear indicator lamp illuminates.
- Push the piston back into the caliper. With the caliper removed and the inner pad still connected to the piston, use your C-clamp or other compression tool to push the piston back into the caliper. This is required to get the caliper to fit over the new, thicker pads. On my first time around, I used a compression clamp like woodworkers use, but based on that experience I can tell you that the c-clamp is the way to go simply because it takes a good amount of force to get the piston to fully retract. It's pretty amazing how far out of the caliper body the piston extends. This is one of the reasons why pushing the pistons back into the caliper causes the fluid level in the reservoir to rise so much (about 1/4" per axle). And speaking of reservoir level, here's a tip. If you're bleeding the brakes prior to the brake job (always a wise choice), fill the reservoir only to the minimum mark. That way when you push all four pistons in you'll wind up with the level at or near the maximum and you won't risk overflowing it. Of course, you should always check the reservoir after compressing each piston anyway just to make sure you're not going to make a mess. Brake fluid is corrosive and will gladly remove paint from any surface it touches.
- With the caliper removed and supported, remove the caliper carrier from the steering knuckle by loosening the two 16mm bolts. Note that these are torqued to 81 ft*lbs, and may very well require a breaker bar or air tools to remove. My 24" breaker bar made very quick and easy work of this. With the bracket removed, it's a good idea (though certainly not required) at this point to clean up the carrier with some brake cleaner. I took the part over to a plastic storage tub I bought for this purpose and went to work. I got a lot of gunk off of it including a lot of old grease and brake dust.
- Remove the rotor. Now the fun part, where we get to look like a pro mechanic. Grab the nearest metal hammer, baby sledge, or (in my case) a dead blow hammer, and hit the rotor once at the 3 o'clock position, then at the 9 o'clock, followed by six, and 12. If you're lucky, the rotor will brake away from the hub after the six o-clock hit. This is the way the BMW techs do it, and it works. Note that using anything but a dead-blow hammer will likely damage the rotor and make it unsuitable for reuse.
If you've gotten this far, congrats. You're half way there. Let's start the reassembly process.
- Clean up the hub. Now that the rotor is removed, you're likely to find a lot of old anti-seize compound on the hub. I used brake cleaner combined with a Scotch-Brite pad to remove that and generally clean up the face of the hub and the threads of each bolt hole. Again, this isn't strictly necessary. Wiping it with a towel would probably be sufficient, but I like to be thorough. Once the hub is cleaned, apply a very thin coat of anti-seize to the face of the hub. You don't want to go overboard here...this is simply to aid removal of the rotor at some future date.
- Install the new rotor. While grabbing the rotor via the center hole clean both friction surfaces using some break cleaner and paper towels. This will remove any preservative oils or grease and allow the pads to bed in properly. From this point on, try not to touch the friction surface. If you do, simply clean the surface again before continuing. Put a touch of anti-seize on the threads of the rotor retaining bolt and thread it through the rotor into the hub. The torque spec on this screw is 12 ft*lbs, but I didn't bother to use a torque wrench for it. I tightened it until the rotor was fully seated and the bolt head is recessed relative to the face of the rotor hub. The bolt is only there to aid in manufacturing and to retain the rotor if the wheel is removed. As you've probably figured out by now, after a while the rotor binds itself to the hub (yes, even with anti-seize applied), so the bolt serves little purpose in the real world. Whatever you do, do NOT overtorque it or forget to apply anti-seize, or you'll hate life when it comes time to do the next brake job.
- Clean the carrier bracket in the wash basin and pay particular attention to the area in which the pad backing plates slide in the carrier. Use a small toothbrush to remove the old bits of grease and pad material before shooting them one last time with brake cleaner and letting them dry. Reinstall the caliper carrier bracket and torque the bolts to 81 ft*lbs, and remember that for the most accurate torque settings, the torque wrench must be "moving" when the click occurs to achieve an accurate result. Do not apply anti-seize to the threads. They're a dry fit.
- Apply Plastilube high temperature grease on the lubrication points of the pads. Start with the outer pad first and then insert it into carrier. When ready to install the inner pad, in addition to the lubrication points on the corners, put a bit of grease around the clips in a circular pattern that will contact the caliper piston when installed. Although the pads come with an anti-squeal shim bonded to the inboard side of the backing plate, this grease helps prevent the pad from vibrating against the piston at high frequency and generating that lovely, comforting sound we know as "squealing brakes".
- Reinstall the caliper. If you've fully retracted the piston it should fit over the pads and rotor very easily. Before inserting the guide pins clean them with some brake cleaner, scrubbing with something as non-abrasive as practical, and then apply a thin layer of silicone paste lubricant. Do not use grease as that will cause the stock rubber bushings to swell and cause the calipers to hang up. That, in turn, will cause excessive outer pad wear. Also, do not apply anti-seize to the threads or you'll risk overtorquing the pins. And speaking of torque, one of the pictures demonstrates one of the advantages of buying a torque wrench with a pivoting head. I took advantage of the extra clearance as I tightened the bolts prior to final torque. Just as the bolt started to firm up, I straightened the wrench so I didn't need to do any math to compensate for the offset.
- Reinstall the guide bolt caps and the retaining clip.
- Take a moment to pat yourself on the back. One down, three more wheels to go.
Repeat the above for the left wheel. The procedure is the same except that you'll need to contend with the brake wear sensor. The connection between the vehicle's wiring and the sensor wiring is contained within a small plastic box at the top of the wheel well. Simply open the door on the box and pull the connector out of the box and disconnect it. You needn't disconnect the sensor from the pad if you're tossing the pads (as I expect you are...otherwise why are you doing this?)
Front Brake Procedure Highlights
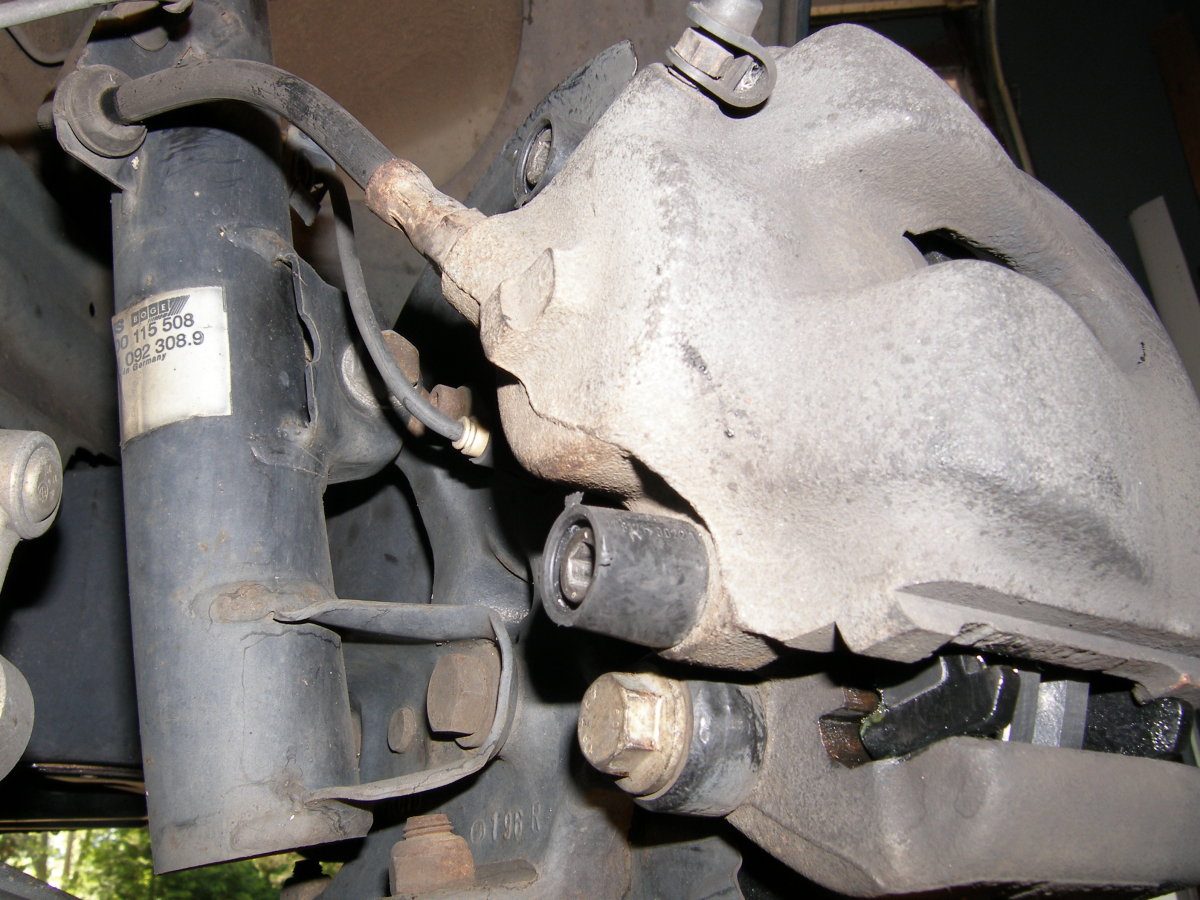
 A picture looking at the caliper with the wheel turned for better access. The guide bushing caps shown just to the top and bottom of the round center of the caliper must be removed to gain access to the guide bolts. |
 Here you can follow the wiring of the brake wear sensor from the inner brake pad to the junction box that also houses the connection for the ABS hall-effect sensor used to determine wheel speed. |
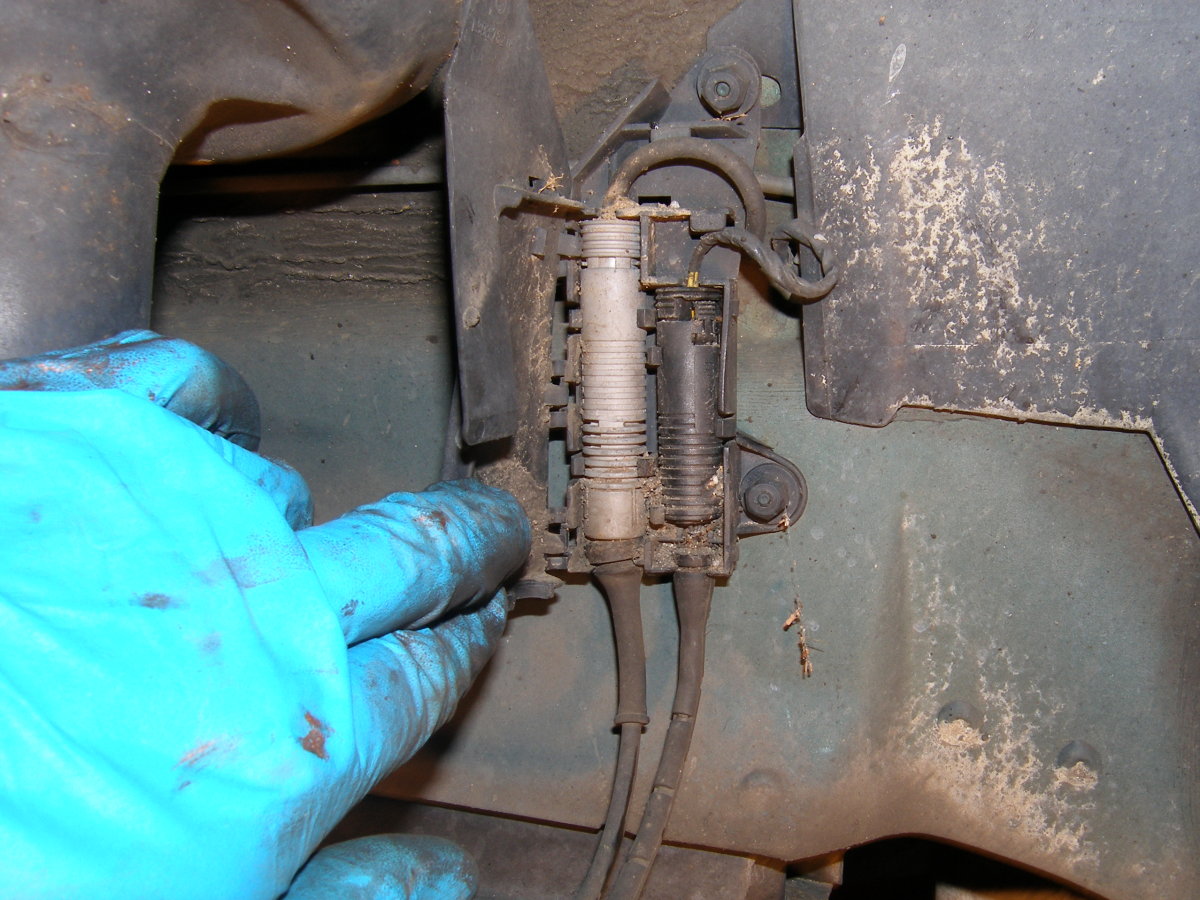 The junction box is shown open here. It's pretty obvious when you follow the wires, but the wear sensor connector is on the right. Right after this picture was taken, I blew all the dirt and crud out of the box with compressed air. |
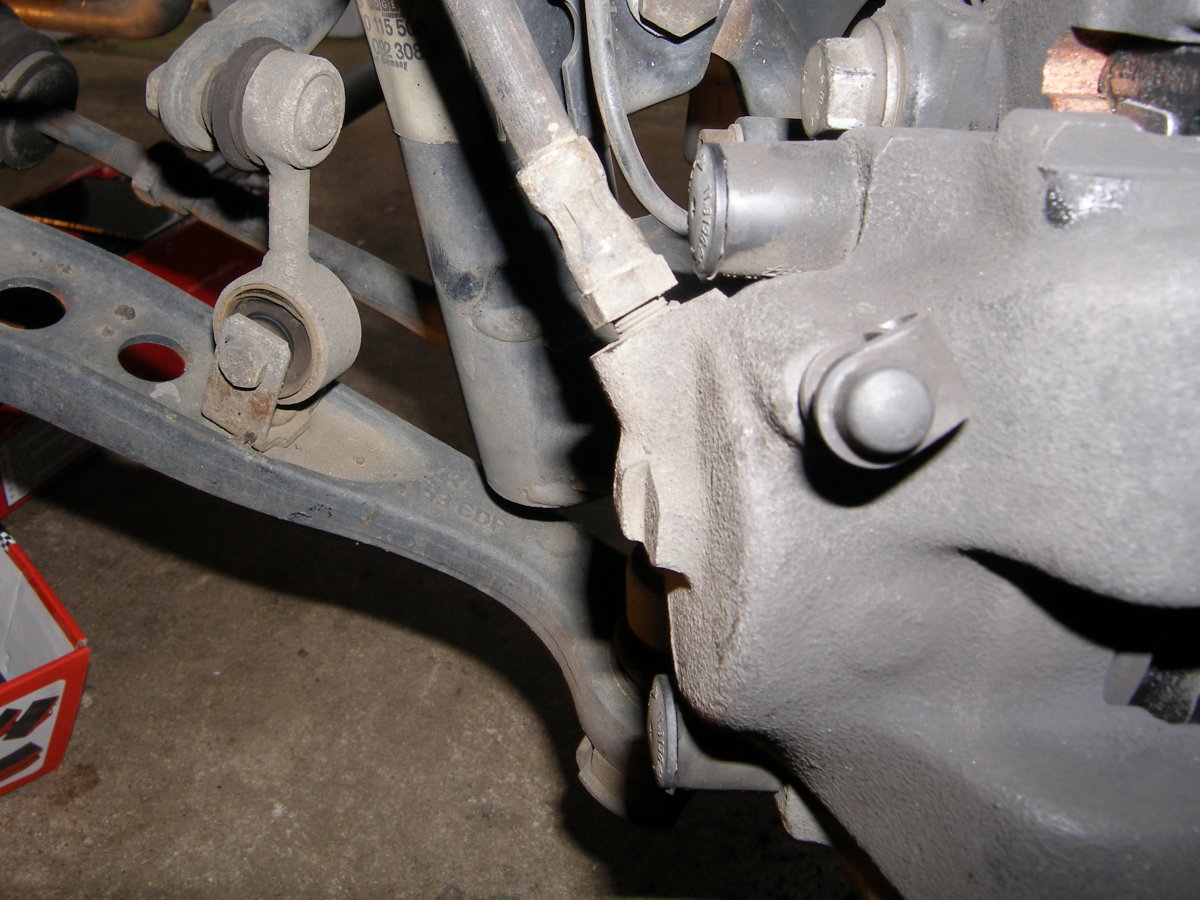
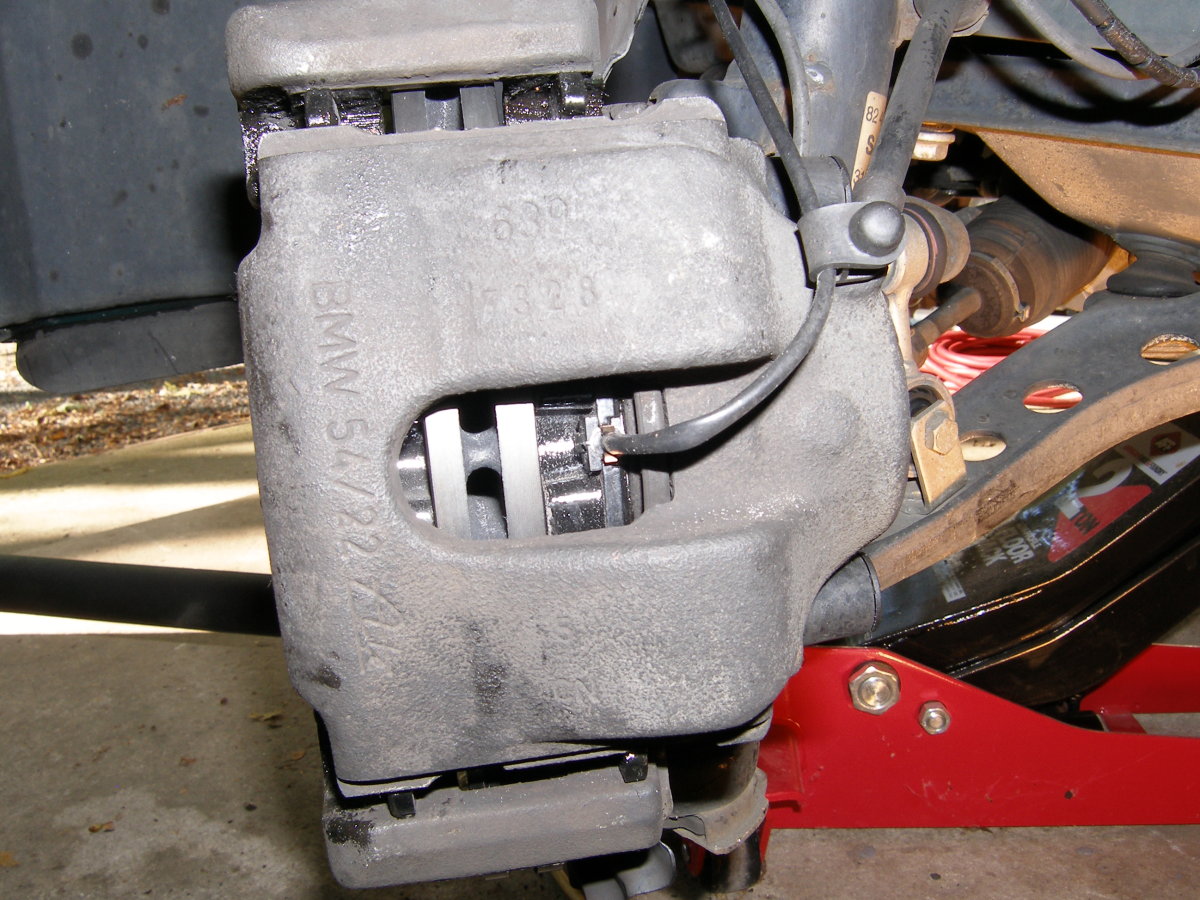
 This picture was taken after installation of the new guide bushings and reassembly of the carrier bracket and caliper. Note that the guide bolts require a relatively light torque, while the carrier bolts (one of which is shown just below the bushing) requires a much higher torque. |
 A four inch C-clamp easily returns the piston to the caliper bore. I used a piece of cardboard to protect the old brake pad just in case something went wrong and I had to reuse it (always think ahead and don't box yourself into a corner while doing work like this!) |
 Condition of the inner and outer pads of the left and right front wheel, respectively about 500 miles past the point at which the wear sensor tripped. Definitely still usable for the street, but they won't let you on the track with pads like that...and for good reason. |
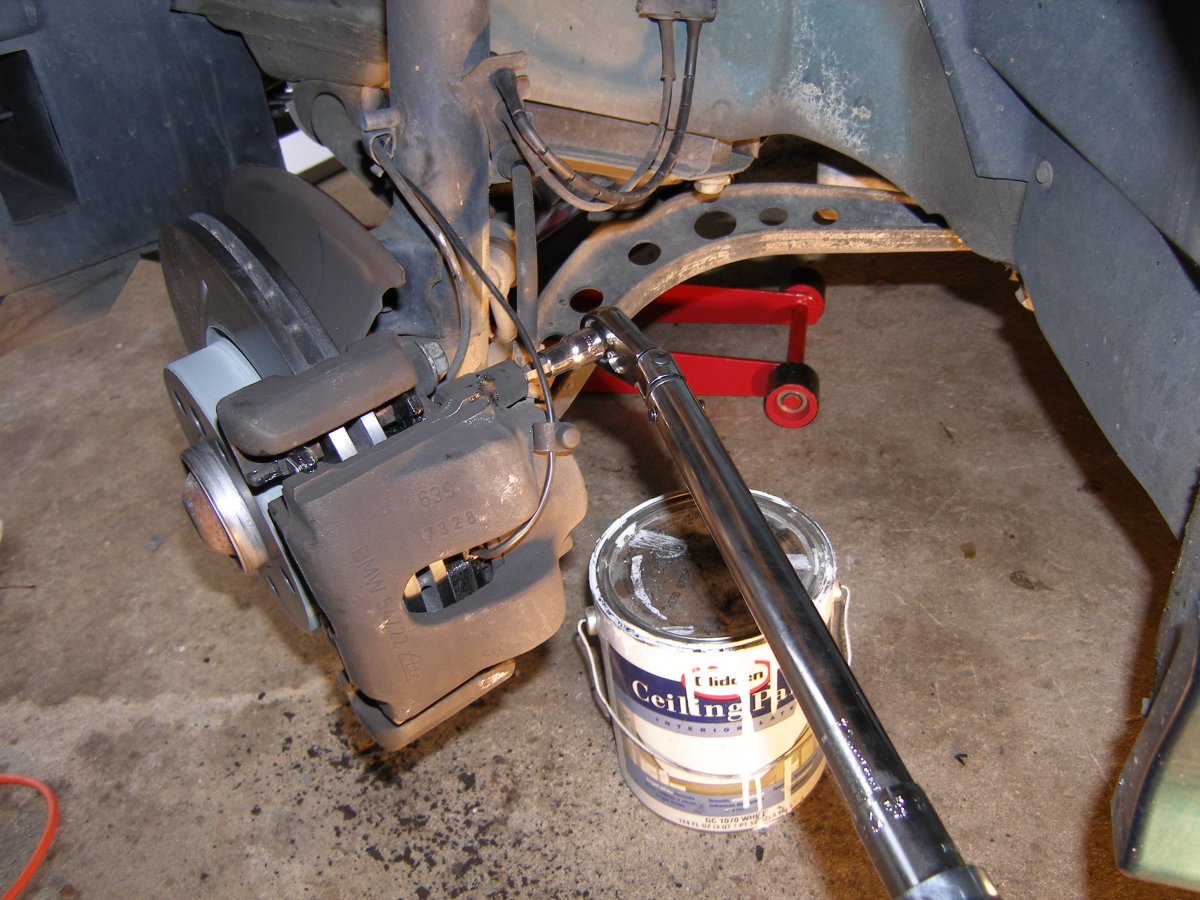 Retorquing the guide bolts to 22 ft*lbs. I'm taking advantage of the pivot feature only to bring the bolts close to final torque. The final torque is applied with the wrench handle straight, or else a simple calculation must be made to adjust the torque value. |
 A nice closeup of the new brakes installed. Check out how thick those new pads are, and also take note how the wear sensor is installed on the pad. The little nub on the sensor must face the rotor. |
 Just before installing the retaining clip. Take a close look at the application of high temperature grease on the outer pad. The goal is to coat the ears and the area of the backing plate that comes into contact with the "ears" of the caliper. |
Rear Brake Replacement
The rear brakes follow the same procedure as well except the carrier bracket is torqued to only 50 ft*lbs and you can expect the brake wear sensor to be on the right rear. Also, if your parking brake needs adjustment, now's the time to do it. Mine was fine because I never use it, so I didn't bother with it.
The only snag I had with the entire process came when I tried to remove the right rear rotor. I pounded on the rotor several times but it didn't budge. I then carefully applied a bit of WD-40 to each threaded lug bolt hole and waited a while before rotating the hub and repeating the process. The goal here was not to do a full blast trigger application of WD-40 because the overspray might contaminate the parking brakes. Rather, I used the red tube that comes with the bottle to apply the fluid directly to the seam between the hub and rotor. Ten minutes later, I grabbed the rotor with my hands and it came off. I followed up by cleaning the hub with brake cleaner before applying a fresh coat of anti-seize and installing the new rotor.
Incidentally, the left rear rotor came off very easily, but that was likely because it had been removed recently to replace the wheel bearing. Rear rotors are more likely to get stuck simply because they're typically replaced half as often as the fronts. Remember to apply anti-seize to the hub!
Rear Brake Procedure Highlights
 It's certainly nice to have a garage to do the work, but it's not required. What IS required is a stable jacking surface, which explains why I do everything inside. |
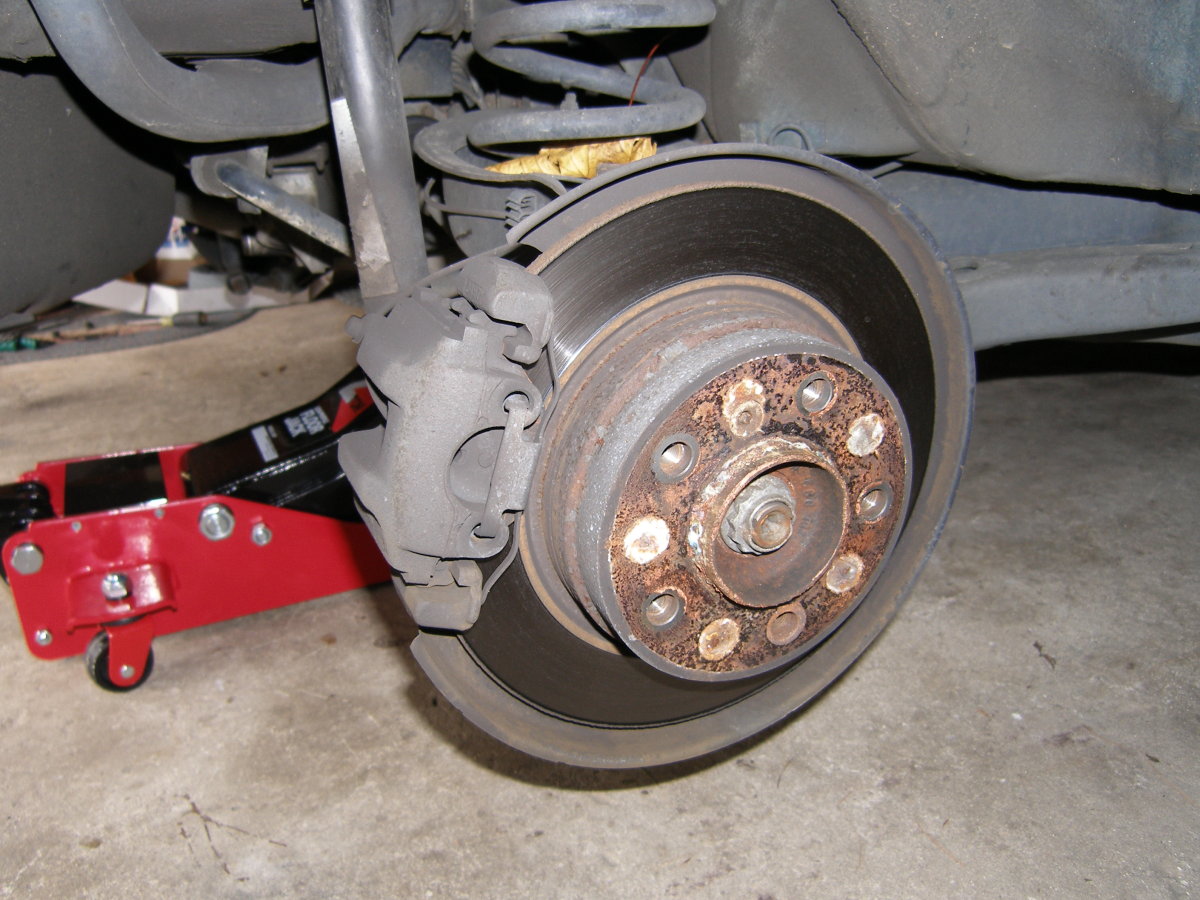 This is what the rear rotor looks like with the wheel removed. Note all the dissimilar metal corrosion and rust on the rotor hat. If you don't put anti-seize on the face of the hat, the wheels will practically bond to the rotor. |
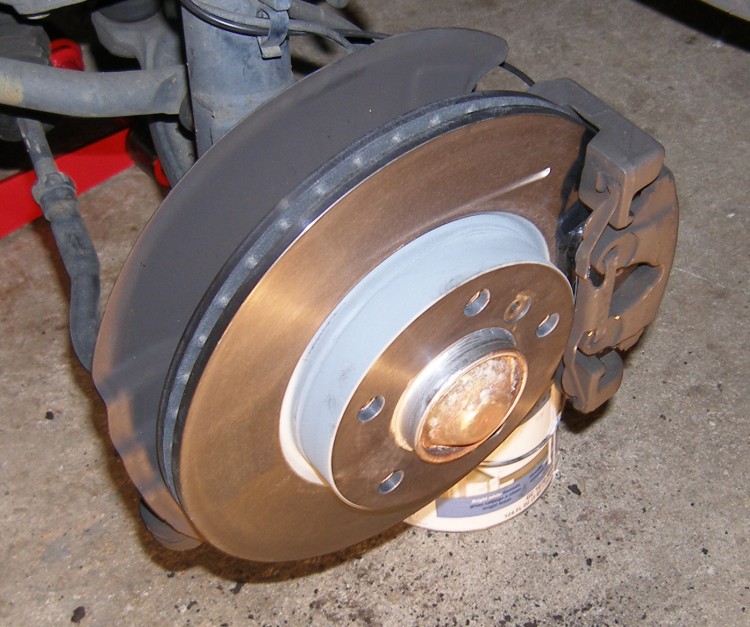
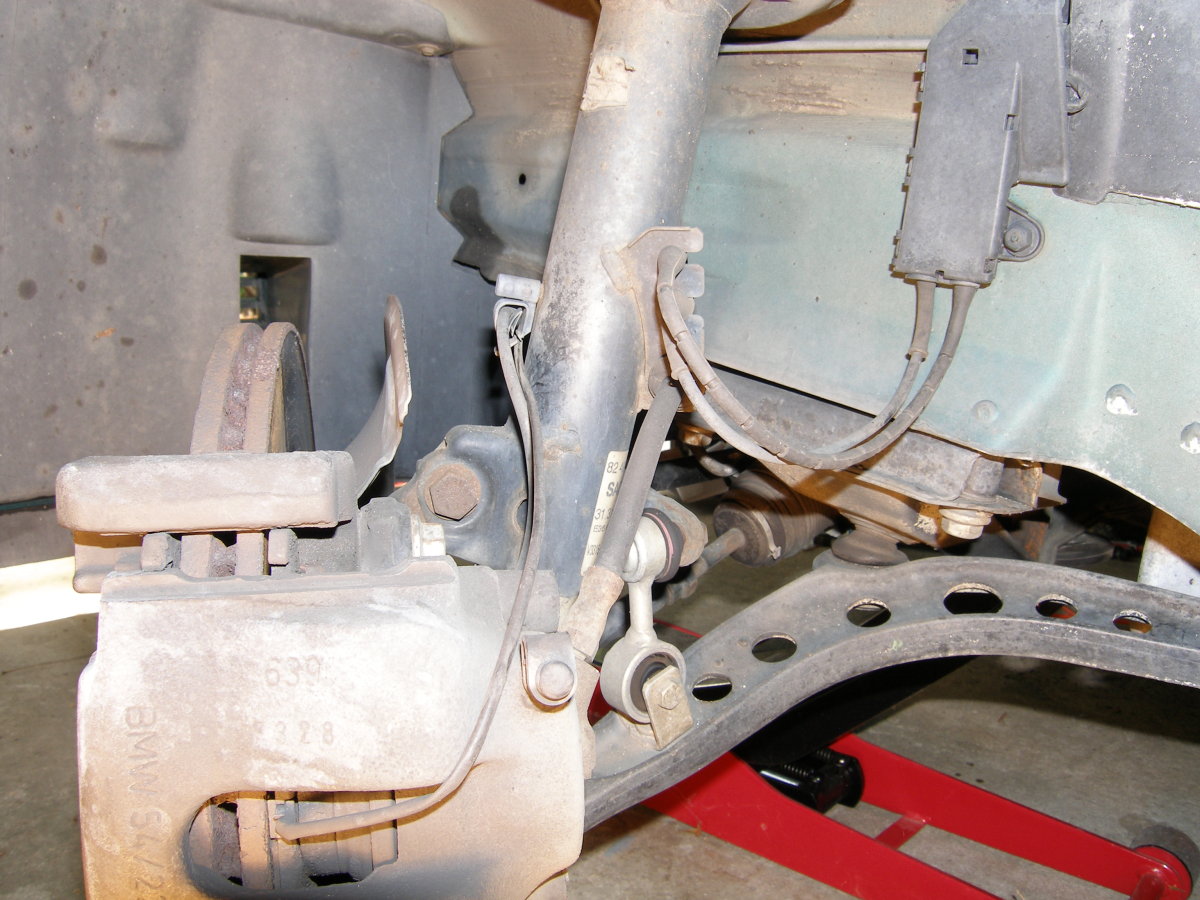
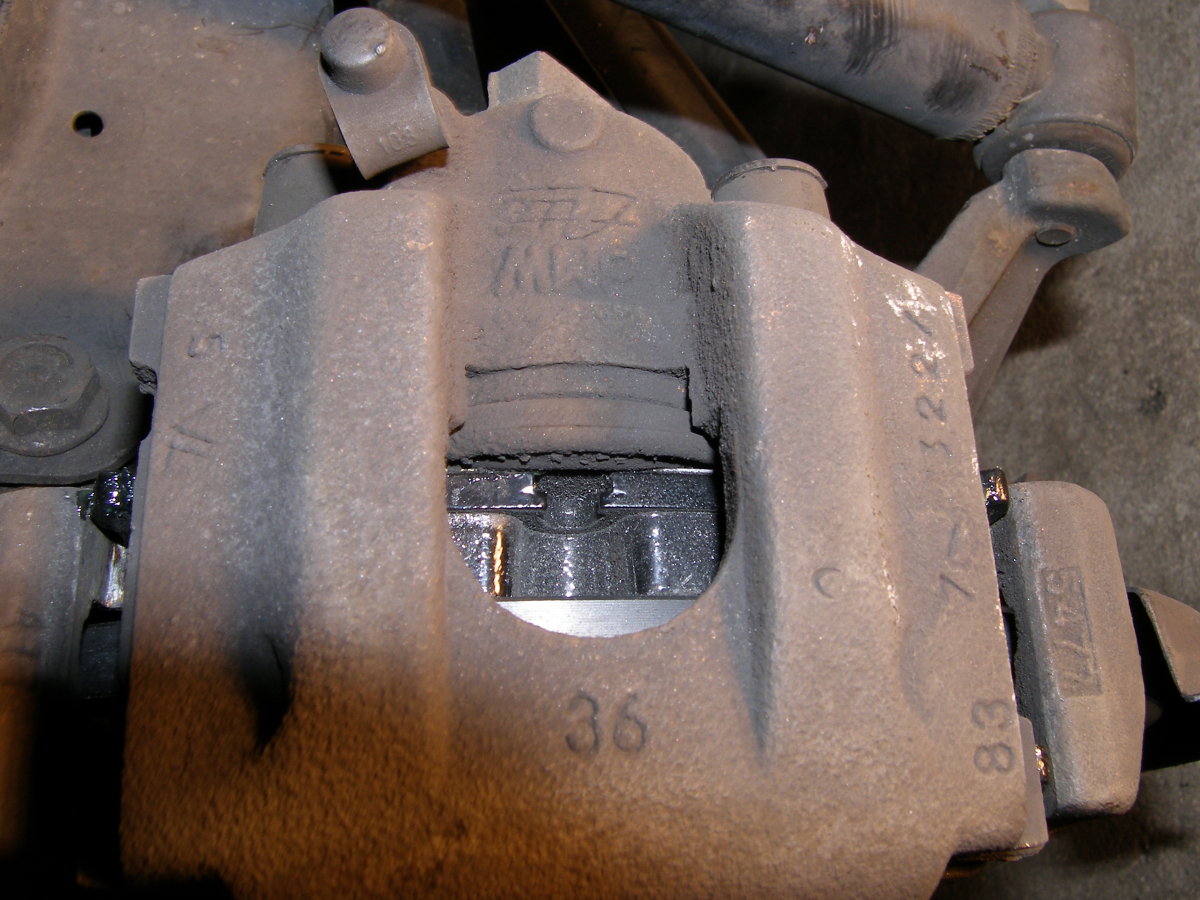
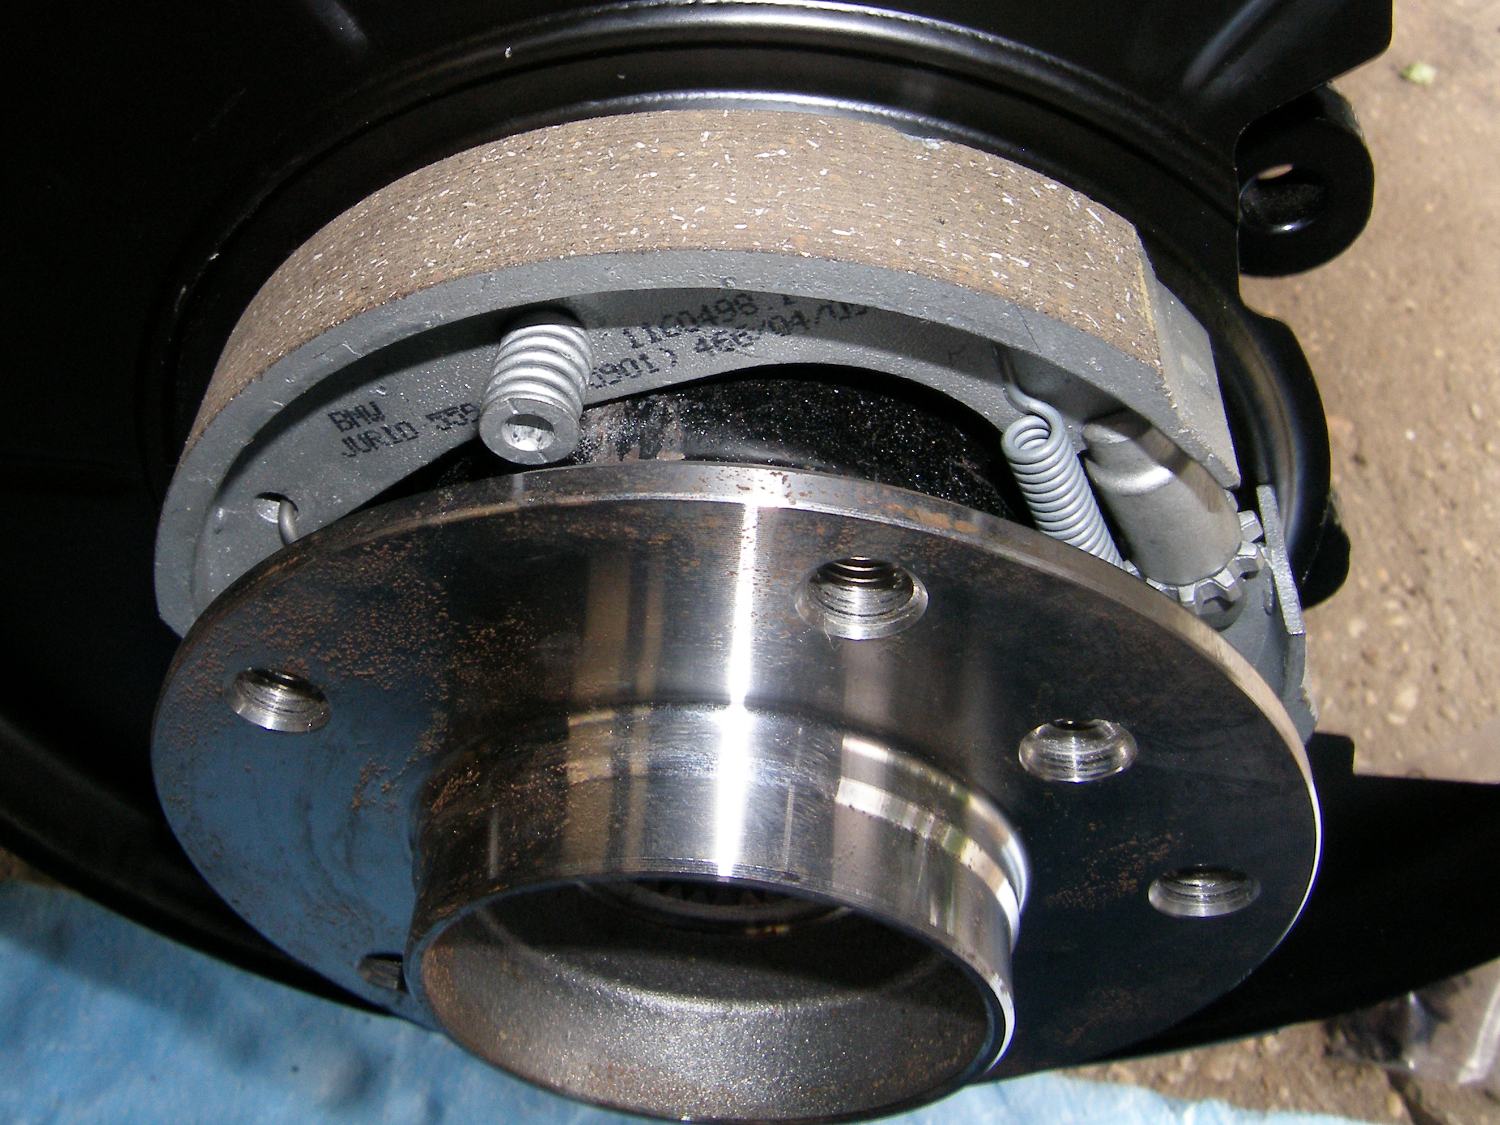
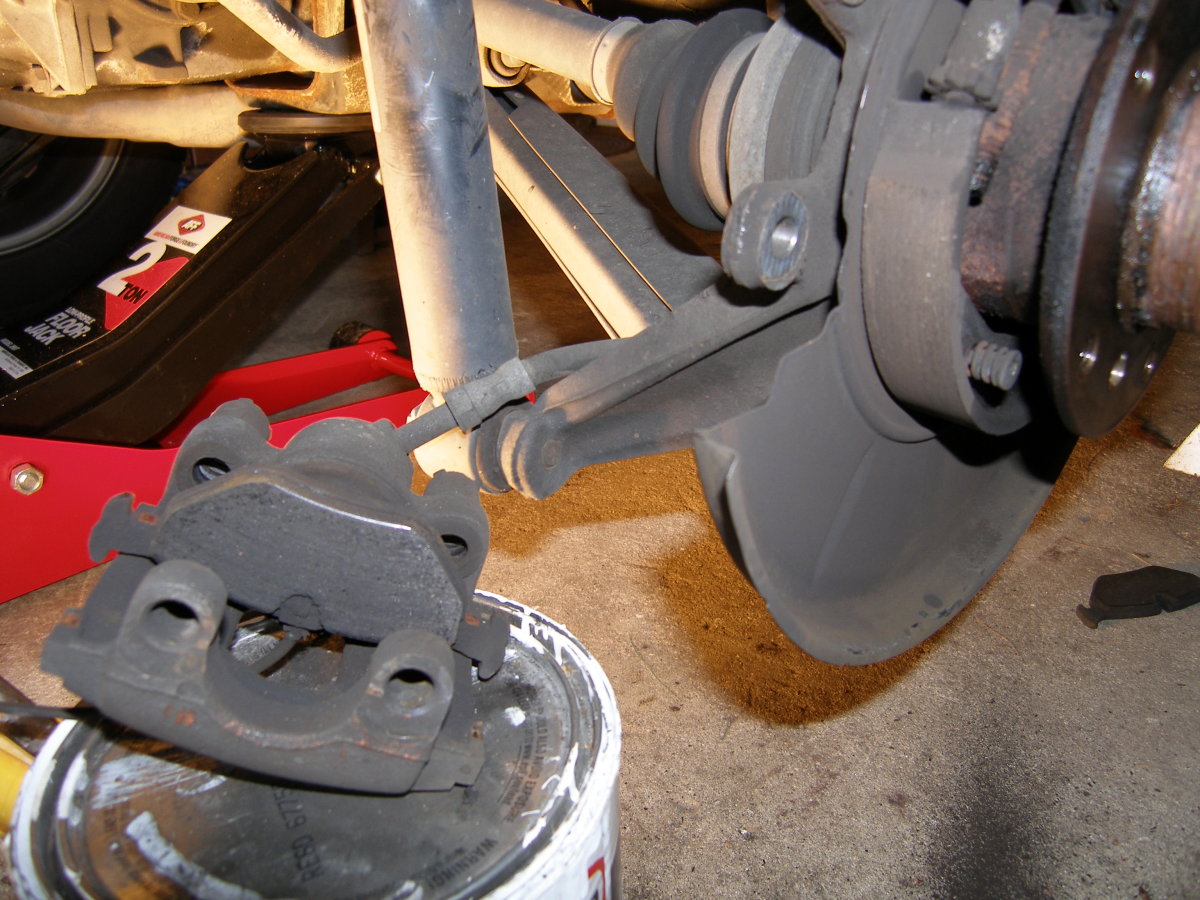 Here I've removed the caliper. Take a peak at the upper right of the picture. The little cylindrical component with teeth on the end is the parking brake adjustment, which is normally accessible from the hole in the rotor / hub. |
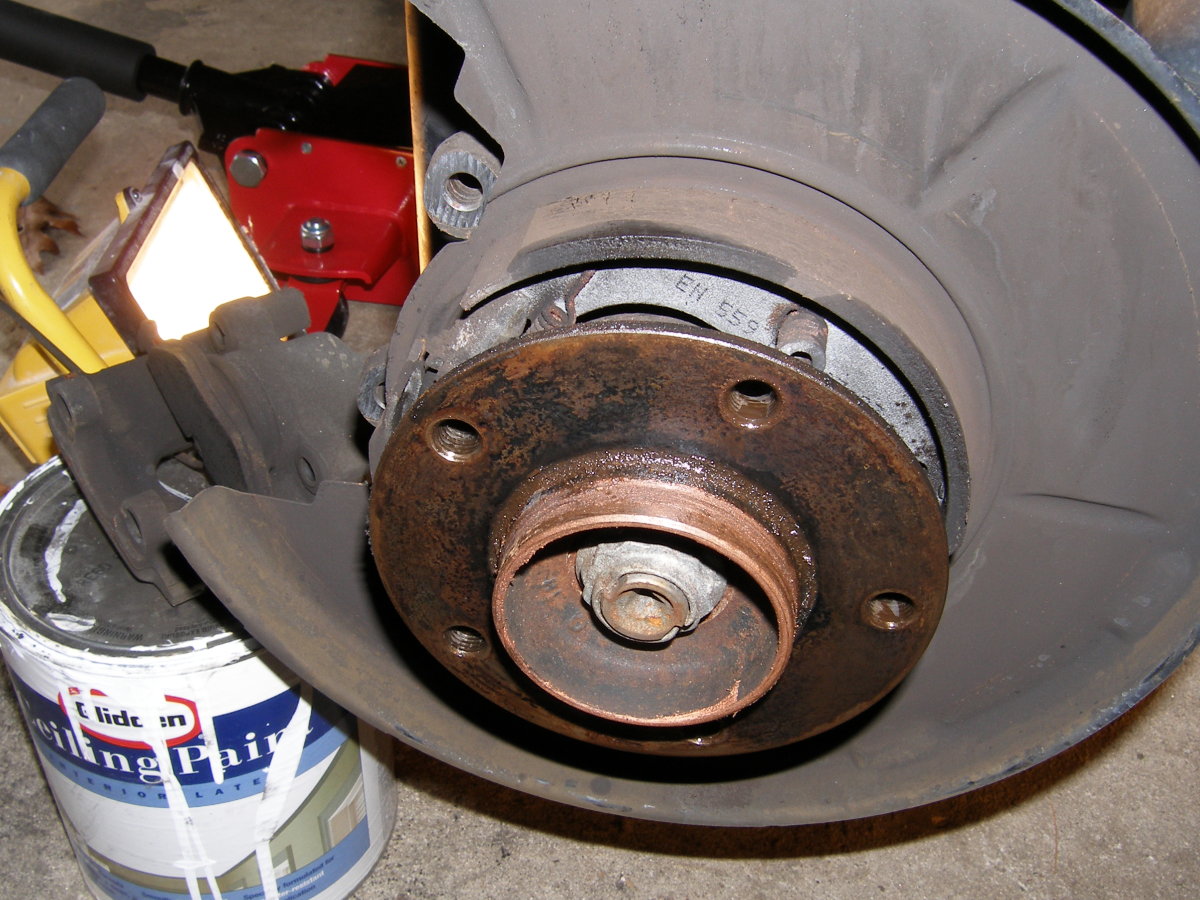 Taken just after I applied some WD-40 to the lug bolt holes in the rotor to free it from the hub. Note the slight contamination of the parking brake pads. Be careful with the WD-40 so you don't drench the pads with the stuff. |
 Just a perspective shot of the new rear pad and rotor. This is the left rear, which does not have a wear sensor attached to the pad. As the rear brakes do only about 30% of the work, these will easily last 80K miles or more, depending on driving style. |
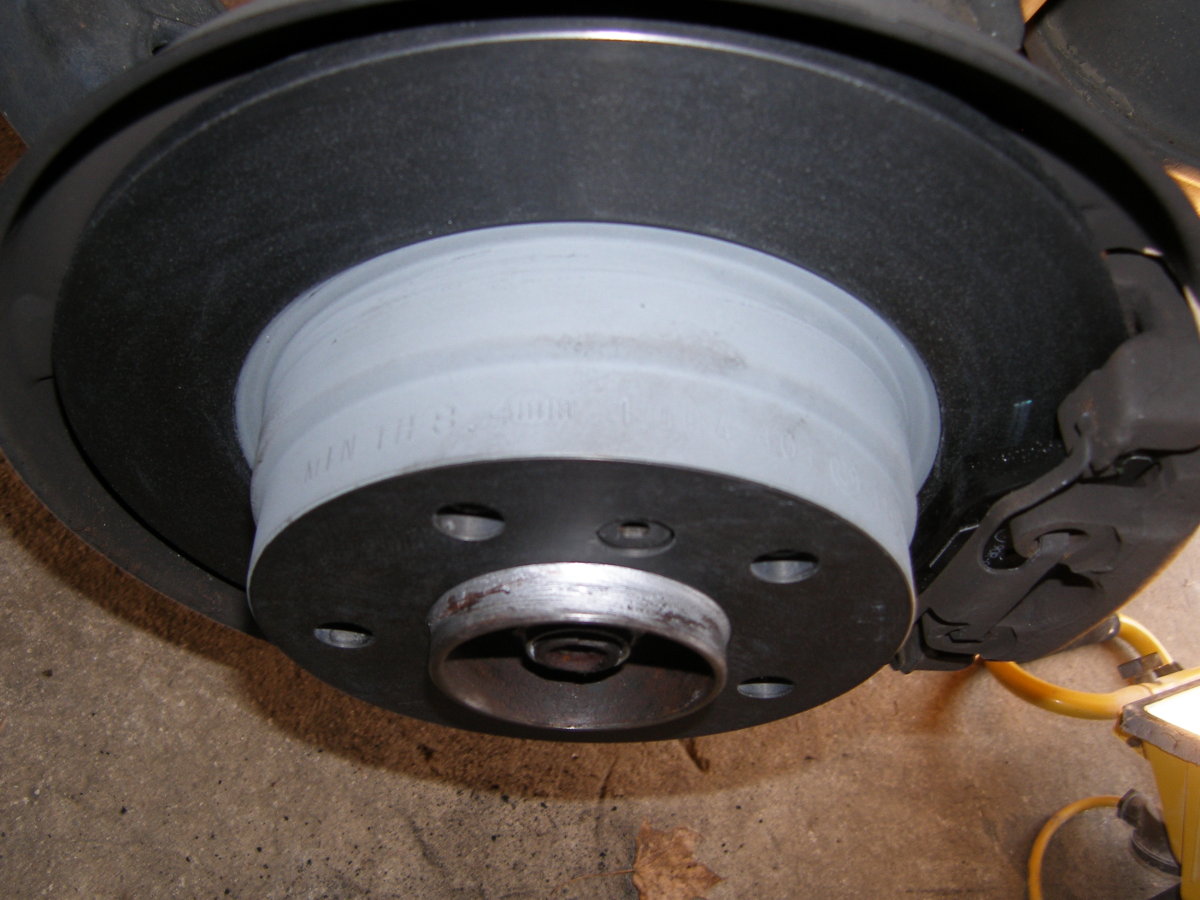 While I typically replace the rotors with every set of pads for various reasons, they MUST be replaced if they are below the minimum thickness stamped on the rotor hub. This rotor's minimum is 8.4mm. |
Parking Brake Replacement
The parking brakes on E36 and E46 BMWs are implemented with drum brake assemblies on the rear axle. The parking brake assemblies, each consisting of two shoes, an expander, an adjuster, two return springs, and two spring-loaded retaining screws, work to hold the car stationary on a slope or slow the car in the event of a failure of the primary hydraulic brake system. Several possible scenarios may result in the need to replace the parking brake shoes or overhaul the parking brake assemblies in general:
- Rust can cause the parking brakes to bind up, particularly on vehicles that don't utilize the parking brake regularly (i.e. vehicles equipped with an automatic transmission).
- Rust can also cause the return springs or retaining screws to fail and this can cause the parking brakes to drag and wear unevenly.
- Overzealous use of any solvents during removal of the rear rotors can contaminate the parking brake shoes and prevent them from working as intended.
- Overzealous use of the parking brakes during the break in procedure (required whenever the rear rotors or parking brake shoes themselves are changed) can eventually cause the pads to wear below minimum thickness.
If the parking brake assemblies must be repaired, it's best to do them during a rear brake job as the rotors must be removed to accomplish the task. I replaced my parking brake assemblies as part of a rear suspension overhaul at roughly 170K miles and I would consider 150-200K a reasonable overhaul interval for these components on most vehicles.
To remove the parking brake shoes:
- Release the return springs. You'll need a strong (i.e. not flexible) hook tool and a set of non-slip gloves for this task. Be very careful during this procedure. Use both hands to grip the tool, and be very aware of what part(s) of your body are directly below the line of fire of the hook. Should it slip off the spring and contact something critical, you'll be in a world of hurt. Do not underestimate the amount of force required to remove these springs and the likelihood that the tool may slip. You have been warned.
- Remove the spring loaded retaining screws from each shoe. Line up one of the lug bolt holes in the hub with the retaining screw and then remove it with an allen wrench by pushing in and twisting it counterclockwise 90 degrees. They are similar in design to a Dzus fastener. The screws are NOT threaded.
- Remove the pads and set them aside. They will be quite dirty, so resist the urge to lick your fingers.
To install the parking brake shoes:
- Orient the shoes for installation correctly. Note that the shoes have a notch at each end. The norrow notches mate with the expander and the wide notches mate with the adjuster. I don't think you can install them the wrong way but the sooner you figure this out, the less time you'll spend fumbling with the parts.
- Collapse the adjuster. If the shoes were considerably worn, the adjuster is no doubt extended (meaning, threads are exposed). Assuming you're installing new, thicker shoes, collapse the adjuster by threading it closed and then open it a couple turns to expose a thread or two. The goal is to set the adjusters such that they can be continually expanded over the life of the shoes to compensate for their loss in thickness, but it's best not to fully close them so they won't rust solid. As an aside, original adjusters on my car were raw steel and rusted, while the new ones purchased in 2010 were zinc plated and I fully expect them to resist rust.
- Install the shoes. Mate the shoes with the expander on the vehicle and install the return spring on that side. While holding the shoes together with one hand, install the adjuster between the other sides of the shoes and then install the return spring adjacent to the adjuster. The second return spring will be the most difficult install, as the adjuster -- even if nearly closed -- will spread the shoes apart and considerable force will therefore be necessary to stretch the spring the required amount. This will be a bigger pain in the ass than I'm making it out to be unless you have some whiz-bang tool I lacked for this job. Easy there, fella.
- Install the retaining screws. These are left until last because they tend to restrict motion of the shoes and you'll need them to be somewhat flexible while you're inserting the adjuster, etc.
Parking Brake Highlights
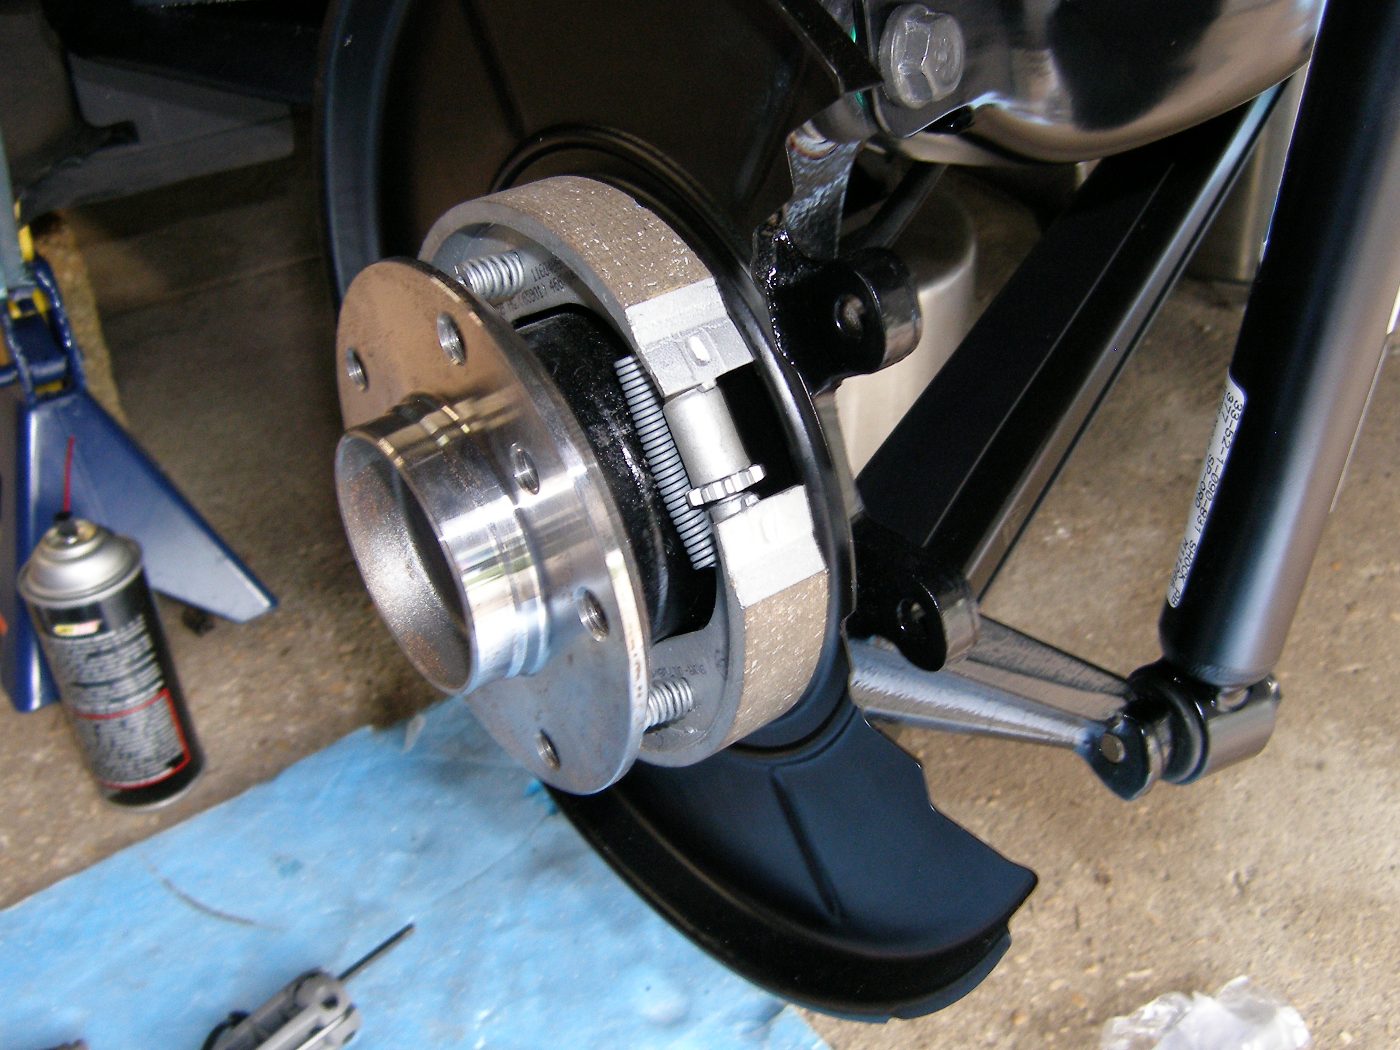 After much swearing and sacrificing of goats to the Evil Emperor of Return Springs, the parking brake assembly installation is complete. |
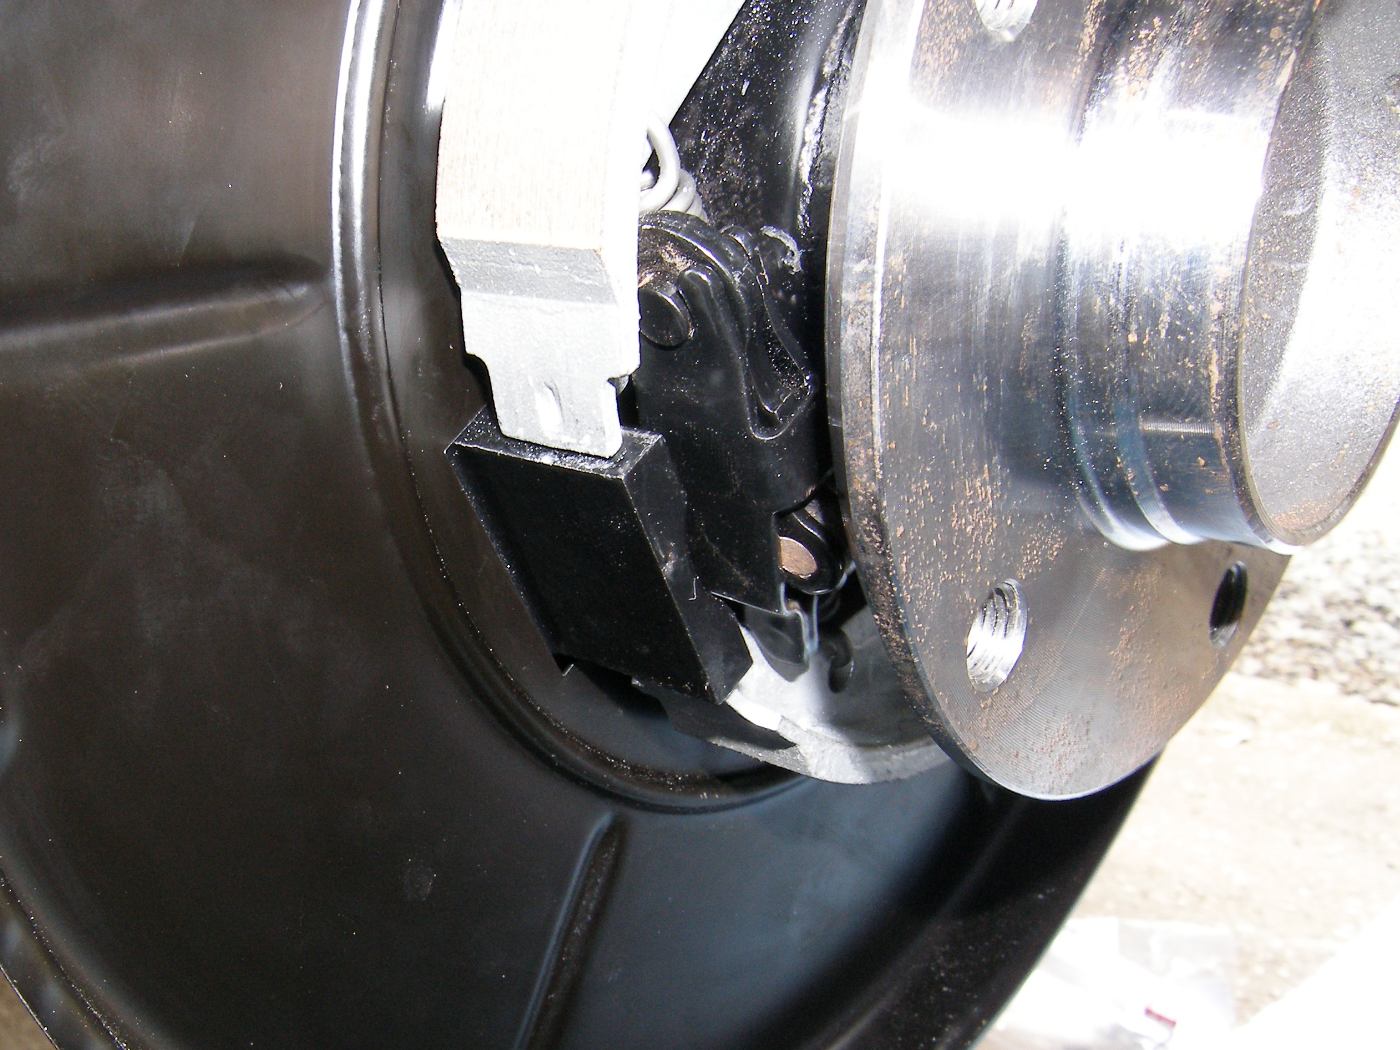 A closeup of the installed expander. Note that the expander is usually raw steel or zinc plated. This one is black because I removed it and had it sandblasted and powder coated. |
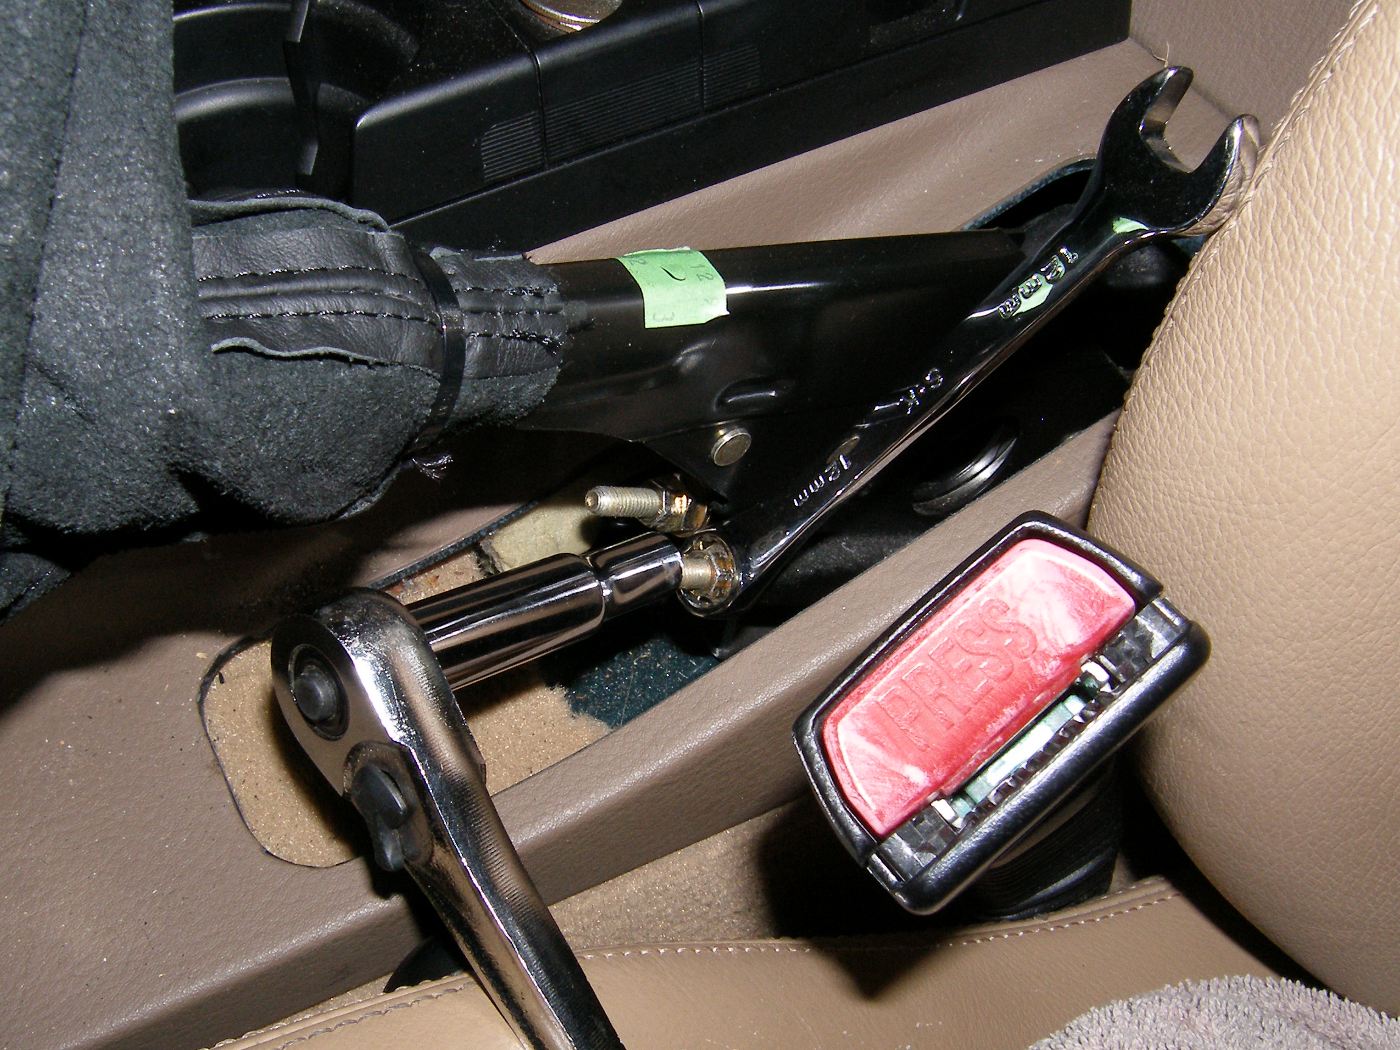 After the lower 12mm nut is used to adjust the brakes, it is held with a box end wrench so the 9mm stop nut can be secured. |
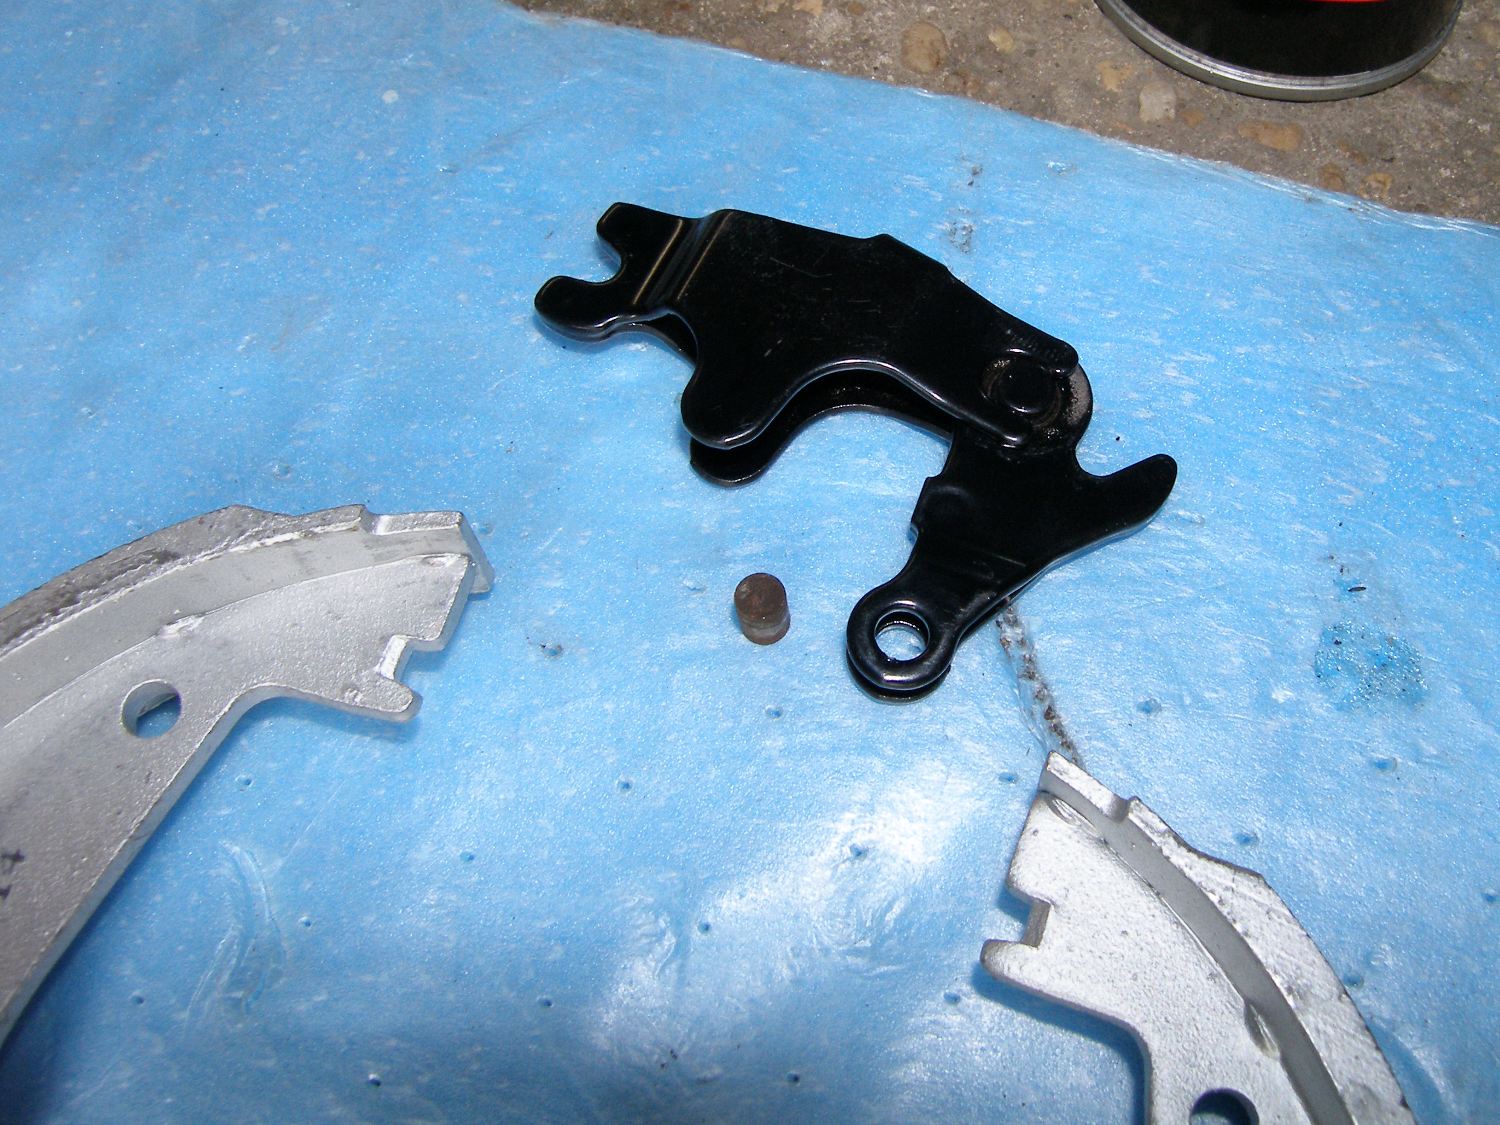 A closeup of the expander removed from the vehicle. The little cylinder retains the cable end. It fits loose, but is retained when the expander arm is retracted into the expander body. |
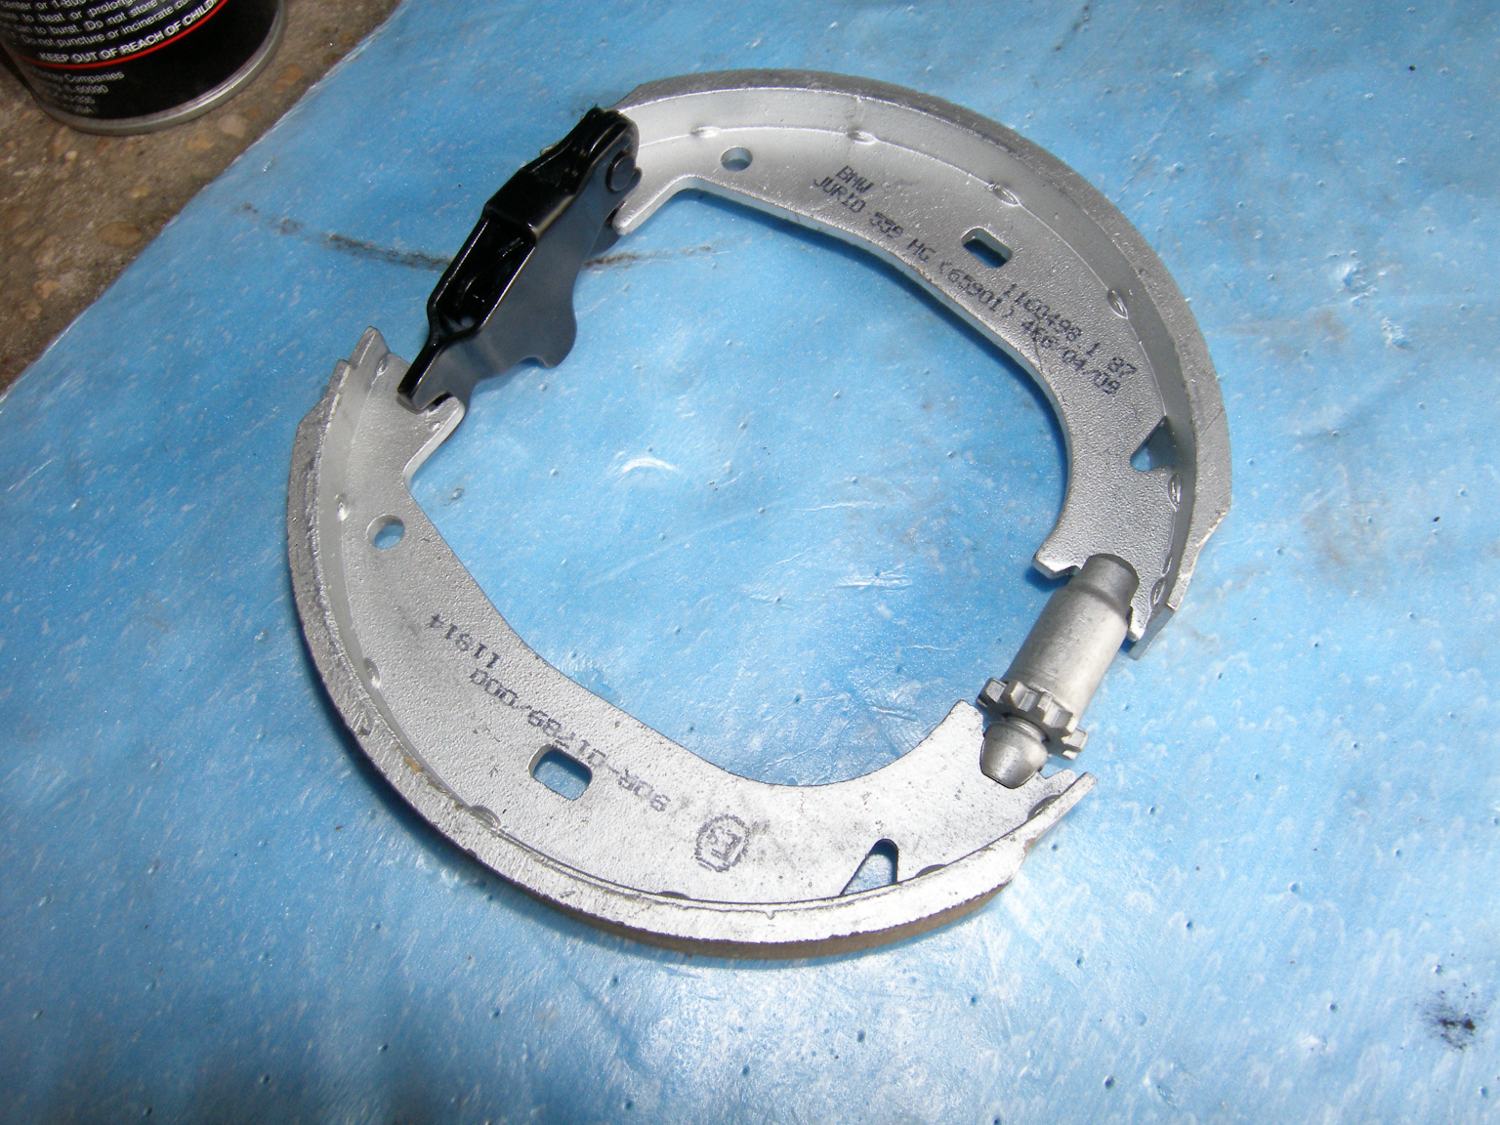 Another perspective of the parking brake shoes along with the expander and adjuster. This is how it should look when installed on the vehicle. |
 This shows the spring loaded retaining screw. There is one such screw per parking brake shoe. |
Parking Brake Adjustment
After both parking brake assemblies are installed, they will need to be adjusted. The adjustment process is adequately described by BMW in this TIS document so I won't bother to repeat it here, but I will provide a few points of interest:
- There are two methods of adjustment that I choose to call "simple" and "advanced". The simple method involves adjusting the, er, adjusters, while the advanced method requires adjustment of the cables where they are attached to the parking brake handle in the center console. Most of the time, if you're just doing a standard rear brake job with a new set of rotors (i.e. not replacing the parking brake shoes) the simple adjustment will likely be all that is necessary. However, if you don't feel any resistance when pulling the emergency brake handle up past about 6 clicks, you'll need to use the advanced method because in all likelihood you'll run out of travel in the adjusters before you achieve the correct setting.
- If you have to resort to the advanced method it is best to collapse the adjusters FIRST (as described above) to make things easier in the future.
- The process required to manually adjust each independent parking brake so they work in unison (meaning, one doesn't "grab" more than the other) is a fundamentally imprecise, trial and error process that requires a modicum of mechanical judgment and some patience. It's not hard but it does require a lot of trips between each wheel and the interior of the vehicle to set or adjust the parking brake handle.
- According to BMW, the brakes should begin to grab at 2 clicks of the parking brake handle and in my experience that means the handle will be "firm" (i.e. the brakes fully engaged) at around 5-6 clicks.
- Incidentally, the PARK BRAKE annunicator should always illuminate in the gauge cluster after ONE click. If it doesn't, expect to do some troubleshooting that is outside the scope of this article.
- I found it necessary to readjust the parking brake after I completed the break-in procedure. Since I had already tweaked the adjusters at the wheels I simply tightened each cable's adjustment nut by an equal number of turns in order to preserve the symmetry I worked hard to establish.
I did the initial adjustment on my car in about 20 minutes and the second adjustment following the break-in in only a few minutes. The brakes now start to grab at around 3 clicks and the handle is firm at 5-6 clicks. Good enough for me.
Test Drive and Break-In
When you're ready to take the car for a test drive hop in and press the brake pedal several times. The first few times you press the pedal it will feel soft but will firm up nicely when the pistons are once again pushed out of the calipers and close up the gap between the pads and the rotors. If the pedal continues to feel soft there may be some air in the system that should be bled before the vehicle is driven. This is much more likely if you have bled the brakes for any number of reasons. The average brake job will not introduce any air into the system.
The break-in procedure varies among pad manufacturers. The instructions that come with the BMW pads strongly advise against aggressive braking or "dragging" the brakes to speed up the bedding process for the first 125 miles. So, contrary to all that you've heard, you don't do anything special to bed in BMW OE brake pads. Just take off slowly, test the brakes to make sure the car will stop, then go for a normal drive at reasonable (residential) speeds, while using the brakes only as required and letting them cool down between uses. The instructions also point out that braking performance will be lower than normal until the pads are fully seasoned. For what it's worth, my technician always told me to take it easy on the brakes for the first 250 miles and after completing several break jobs myself I'd have to agree that's a reasonable number.
If you replaced the rear rotors and/or the parking brake pads you'll need to conduct a special procedure to break-in the parking brakes or they won't function as expected. Slow to 25 MPH, depress and hold the parking brake release button, and apply upward pressure to the handle. Initially, you will likely find that the parking brakes have little effect, but within a few seconds they should firm up. Apply pressure until the car slows noticeably, or no more than 1200 feet. If after conducting this procedure the car will not remain stationary with the parking brake handle at 3-4 clicks, adjust the the parking brakes (left and right, equally) as required.
Conclusion
Most people seem to get 30K out of a set of front brakes and 60K out of the rears. These intervals are highly dependent upon driving style and whether you have equipped the car with larger wheels and tires.
There is no reason to do brakes before the brake lining indicator illuminates, unless you plan to take the car to the track, are planning a very long trip, or there is something else wrong with them.
I can't believe I paid other people to do this job for so long. Ask me to rebuild a transmission and I'll be the first one to bend over and give the dealership my credit card, but I can tell you with confidence that BMW brakes are easy to replace. Of course, like most automotive work, it can get a bit messy (be ready to sacrifice an old pair of jeans and a t-shirt to the task), but I think the reward of learning something new, having the knowledge that the job was done right, and saving big bucks on labor is worth the inconvenience.