


BMW E36 M52 (6 Cylinder)
Water Pump DIY
Infamous for its failures, the BMW water pump must be replaced every 60000
miles.
Introduction
This DIY outlines the procedure required to replace the water pump on a M52 (6 Cylinder) engine in an E36 BMW. The basic concept applies to many other vehicles in BMW's product line, however.
BMW produced three versions of the pump over the life of the E36 and each fail for different reasons. When they fail, the end result is always the same: no coolant flow through the engine. When this happens the engine may overheat and incur substantial damage as a result. Therefore virtually every BMW technician, including technical advisor Mike Miller of the BMWCCA, recommends replacement of the water pump every 60K miles as part of a preventative maintenance program.
For a cost-effective solution I recommend buying the latest revision pump from BMW. If you take your car to the track and/or you don't mind spending a bit more for an upgraded part, then check out the Stewart Components unit. It uses a larger bearing to address one of the failure modes associated with pumps equipped with heavy metal impellers. It also incorporates better seals and a more efficient impeller design to flow more water at any given RPM. The only downside to that pump is the price, but if you can justify paying about double that of the OE pump it's an excellent choice.
BMW foolishly migrated to a plastic water pump pulley in the E36. Failure of this pulley can throw the main accessory belt and thus disable the water pump, alternator and power steering pump simultaneously. Therefore I strongly recommend the plastic OE pulley be replaced with the URO Parts aluminum unit (URO Part number 11511730554) as distributed by BMP Design (BMP part number 176573). I also recommend ordering this part as far in advance as possible as it is occasionally not in stock.
As the engine driven fan must be removed to accomplish this procedure, if the existing fan has over 120K miles in service this would be an ideal time to replace both the fan and clutch. The fan itself is made of a high grade plastic, but it is subject to fatigue resulting from countless heat cycles just like any other plastic part. The fan clutch will most likely fail in one of two ways: it will either freewheel or lock up permanently. If it freewheels cooling efficiency will be diminished but as long as the auxiliary fan is operational you probably won't notice the failure. If the clutch locks up permanently and you rev the engine too high, however, the plastic fan can self-destruct and send projectiles into the radiator, the belt, or even the hood. If it's not obvious, that failure mode can result in damage far more expensive than a fan and a clutch, so you'd be wise not to complain about the cost of parts in this case.
Note that BMW recommends replacement of the belts if they become contaminated with coolant. While it is not strictly necessary to completely remove the belts to replace a water pump I strongly advise that they be removed to avoid this contamination. If the belts have over 60K miles or 3 years in service they should be replaced in any case.
Prerequisites
Tools
- 32mm open-end wrench
- [Optional] Fan counter-holder tool (special BMW tool or aftermarket equivalent)
- 10mm and 13mm shallow and deep sockets with associated ratchet (I used a 3/8 " drive unit)
- [Optional] T30 Torx socket and associated ratchet (only required for fan clutch replacement)
- 16mm hex or T47 Torx socket appropriate breaker bar for detensioning main belt (depends on tensioner installed)
- [Optional] 5mm Socket for removal of upper radiator host clamp (depends on application)
- Appropriate safety equipment (gloves and eye protection at a minimum)
- Drain pan to help catch some of the coolant (you won't catch it all, but this helps reduce the mess)
Parts and Supplies
- BMW OE Water Pump (11517527799) OR Stewart Components aftermarket unit
- [Optional]: Air conditioning belt (11281437873)
- [Optional]: Main accessory belt on vehicle equipped with mechanical tensioner (11281437929)
- [Optional]: Engine driven fan (11521712058)
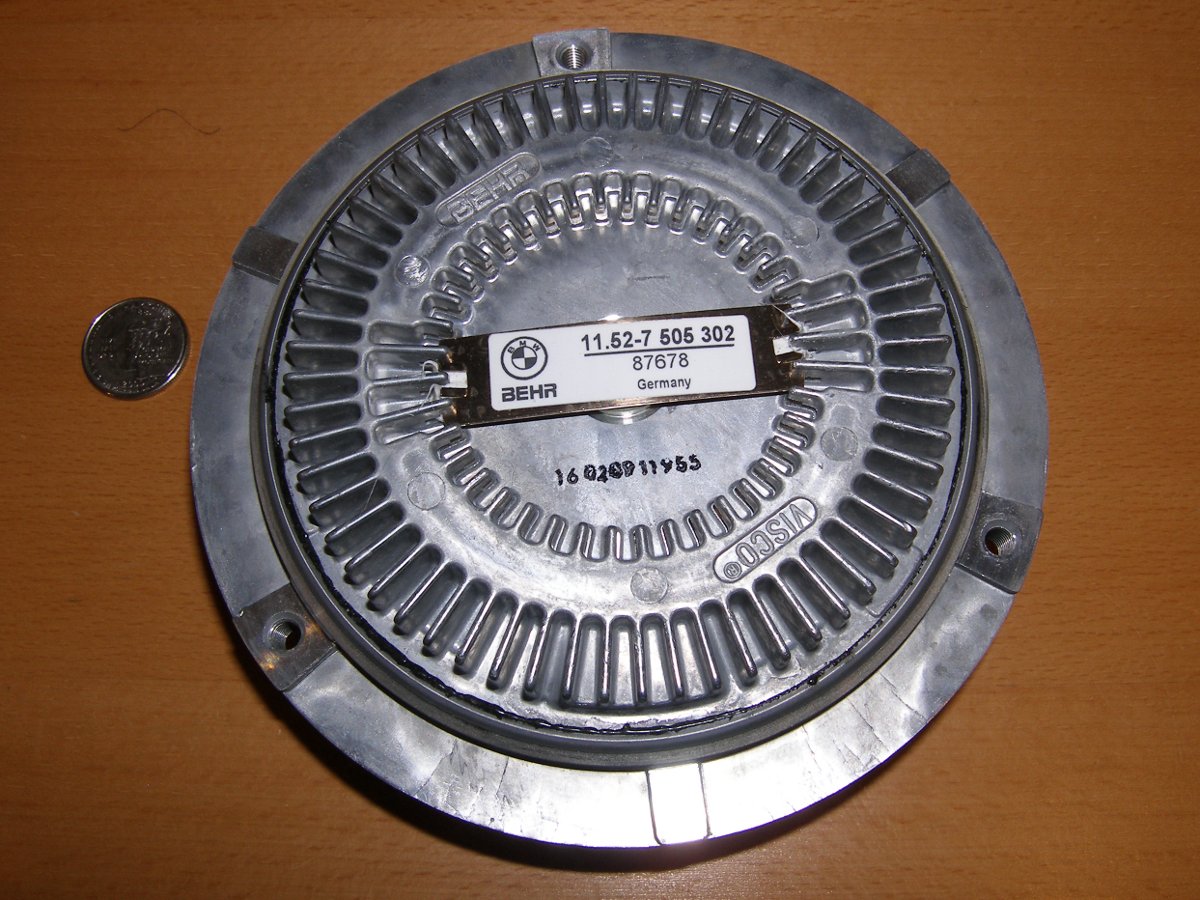
- [Optional]: Engine driven fan clutch (11527505302)
- (1) can of brake cleaner in aerosol form (for decontamination of pulleys)
- (2) M6 bolts at least 1.5" long OR (1) piece of cardboard approximately 18 inches square (see procedure)
- (1) Gallon of distilled water
- (1) Gallon of BMW OE coolant
Removal / Disassembly Procedure
- Remove the cruise control unit and airbox for clearance. This procedure is documented in my Idle Control Valve DIY.
- Drain the engine coolant. This procedure is documented in my Coolant Flush DIY. Note that if you drain only the radiator a significant amount of coolant will exit the block as the water pump is removed in a later step. The flow of coolant cannot be controlled in any practical sense so this explains why the belts must be removed before the pump.
- Remove the engine driven fan. Attach a 32mm wrench to the fan clutch nut such that the wrench extends outward in the 12:30 position and strike the end of the wrench with a hammer in the clockwise direction to loosen it. Note that this is a reversed thread, and by clockwise I mean toward the driver's side in US-specification cars. It will take a bit of effort to get the fan past the radiator hose, but the hose is compressible and it will come out if you are persistent. The reason we leave the radiator hose attached for now is to prevent coolant from contaminating the belts. If you intend to replace the belts and thus don't care about the old belts becoming contaminated, go ahead and remove the radiator hose before pulling the fan.
- Remove the A/C belt. Remove tension from the belt by using a breaker bar equipped with a 13mm shallow socket to grab and rotate the upper tensioner mounting bolt clockwise. The design of the tensioner will require a lot of force to be applied initially, but it will begin to move almost instantly. If it doesn't move at all, the socket is on the wrong bolt.
- Remove the main accessory belt. Take note of the proper belt routing. You'll need it to install the belt later. Remove tension from the belt by attaching a breaker bar equipped with an appropriate socket to the main belt tensioner and rotate it clockwise. This process varies slightly based the specific revision of mechanical belt tensioner in use. Old versions require removal of the protective cap on the tensioner pulley and then use of an appropriate hex (16mm) or torx (T47) socket. Newer versions of the tensioner have a 16mm hex bolt head cast into their body for this purpose so it is not necessary to remove the protective cap in this case.
- Remove the top radiator hose. The hose clamps can be loosened with a small flat blade screwdriver or a 5mm socket and small ratchet. If the hose clamps are original factory equipment and squeezed on, they are best cut off with a pair of diagonal cutters. Little if any coolant should flow from the either hose junction provided the coolant has been drained, but as long as the belts are removed and you have a can of brake cleaner handy to decontaminate the pulleys if necessary, this should be a non-issue.
- Remove the pulley from the water pump. Use a 10mm shallow socket to remove the four retaining bolts. Put them aside somewhere safe, labeled accordingly.
- Remove the water pump from the block. This can be accomplished in two ways I choose to call the "brute force method" and the "screw method". The "brute force" method is actually the simplest and fastest but it doesn't work in all cases. So the goal is to try that first and then proceed to the "screw method" only if necessary. Begin by using a 10mm deep socket to remove the four nuts on the studs holding the water pump to the block. Place a piece of cardboard between the pump and the radiator to protect it, then wiggle and pull the pump out of the block. If this doesn't work, you'll need to use the "screw method", which entails screwing in two M6 screws into the threaded holes provided in the body of the pump and slowly screwing in each side an equal amount to pull the pump squarely out of the block. For the record, I tried the brute force method on a pump installed for 60K miles and was forced to resort to the screw method. Make sure you have the M6 extraction screws handy before you start this job.
Installation / Reassembly Procedure
- Create alignment marks on pump flange and pulley. Temporarily mate the water pump and new pulley. To make installation of the pulley easier when the pump is mounted on the front of the engine, temporarily mount the pulley to the pump, verify the alignment of the mounting holes is correct, and then place a small alignment mark on both the pulley and the pump pulley mounting flange.
- Install new water pump. Coat the o-ring on the pump with a bit of fresh coolant to serve as a lubricant and then press the pump into the block. Install the four nuts on the studs and torque to 10 Nm (7 Fp). Note: This is a very light torque. Most torque wrenches are not accurate near the bottom of their range. Remember to use the correct wrench for this task.
- Install the pulley on the new pump. Rotate the pump so that the alignment mark made on the pump flange is visible. Then, install the pulley with the alignment mark set accordingly. Make sure the bolts are equipped with washers (the factory bolts come with them) and torque the bolts to 10 NM (7 Fp).
- Install the main accessory belt.
- Install the air conditioning belt.
- Install the engine driven fan. Align the fan clutch nut with the water pump and carefully thread the fan until the nut stops spinning. If you have a fan counter-holder tool, use that to hold the water pump pulley steady while you tighten the nut with the 32mm wrench. If you lack the counter-holder, install the wrench at the 11:30 or 12:00 position and sharply strike the end of the wrench so it moves counter-clockwise, and thus tightens the fan clutch nut. Repeat as necessary (I typically find ten sharp and quick blows is sufficient). Eventually, you'll figure out the subtle difference between the nut tightening and the belt slipping on the pulley.
- Install the upper radiator hose. I strongly recommend using BMW OE clamps as they are high quality and will fasten the hose without piercing it. There is no specific torque value for these clamps: it's all by feel. Tighten the clamp until you start to feel solid resistance. That will probably be tight enough, but verify this by trying to pull the hose free of the flange. If it moves even slightly, loosen the clamp, push the hose home again, then tighten the clamp slightly more than last time. It's important not to go overboard here as the clamps can easily crush or crack the mounting flanges. In fact, it is better to slightly under-tighten the clamps and then snug them further if you note coolant seepage or white staining later. Take heed my warning or you'll wind up buying a new thermostat housing -- or worse, a radiator.
- Install airbox and cruise control unit.
- Fill and bleed the cooling system. See my Coolant Flush DIY for more specific information.
Highlights
Note: These pictures were taken during a larger job involving the replacement of the alternator and power steering pump. You may notice some minor differences between selected pictures and the real state of your vehicle as you conduct the repair but these should not affect your ability to complete the repair using the procedure outlined above.
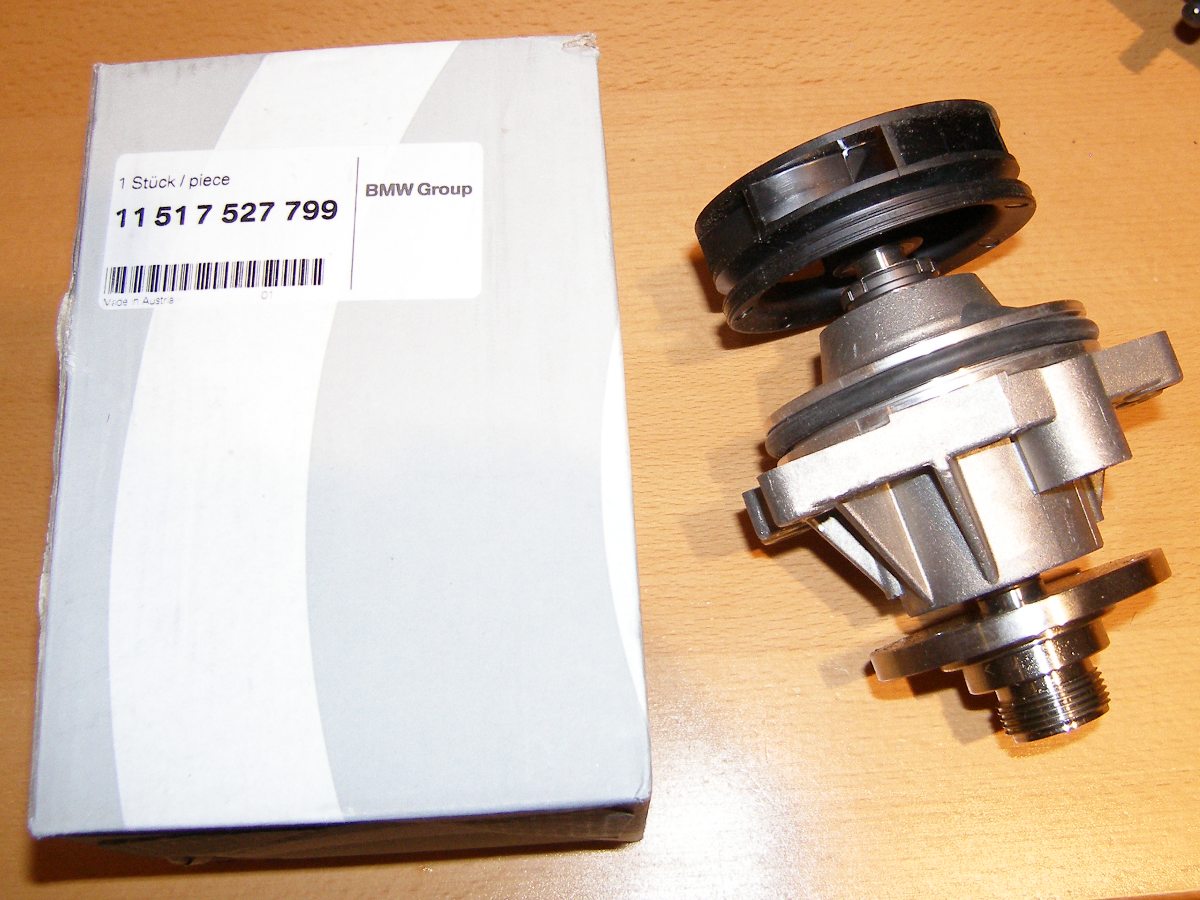 What you get when you buy a BMW OE water pump. All pumps designed for the E36 and E46 are remanufactured at this point, but as such are as good as new. |
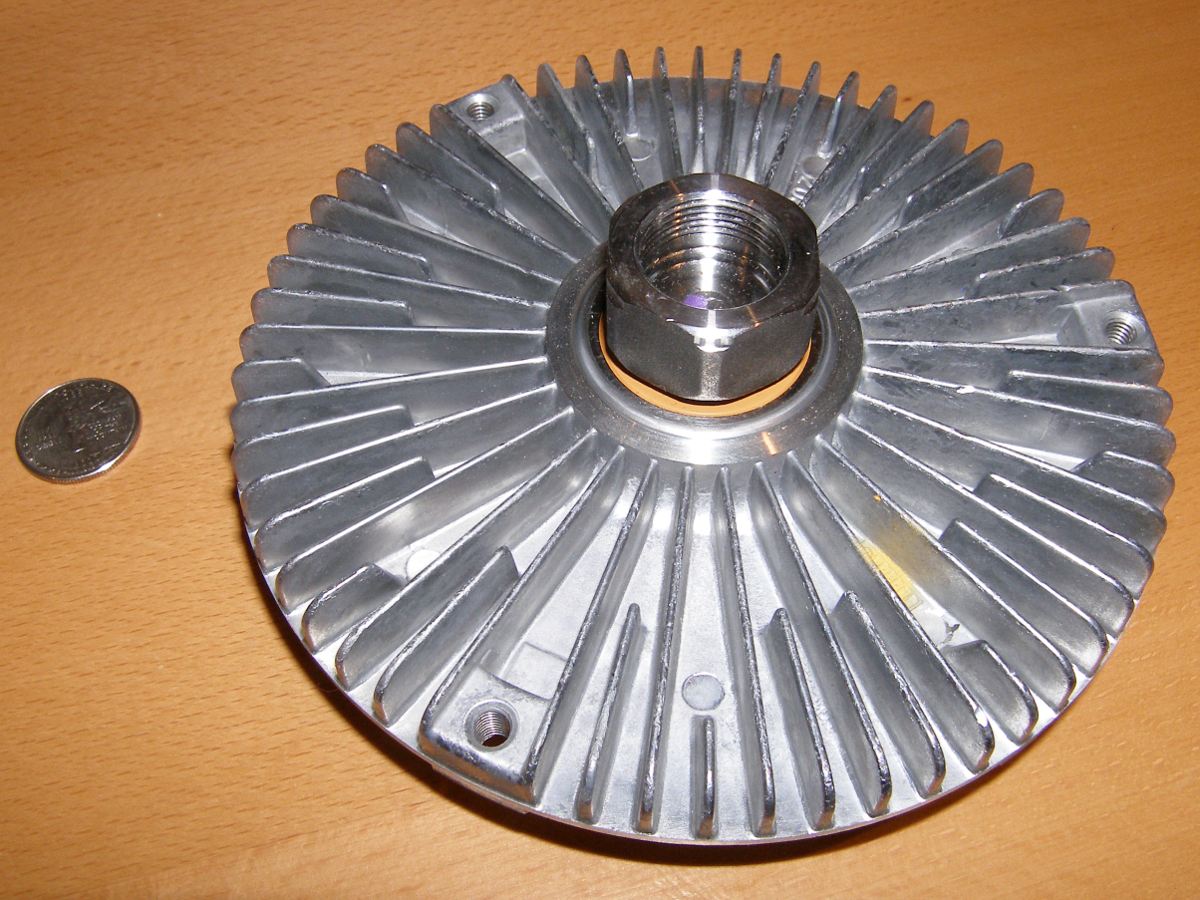
 The front of the fan clutch. Clutches last a long time, but can fail in two ways, one of which is destructive to the fan, so it's best to replace it before it fails. |
 The rear of the fan clutch, showing the 32mm nut that attaches to the water pump. On a new clutch, this nut is hard to rotate by hand when the part is cool. If it rotates easily it's time for a new clutch. |
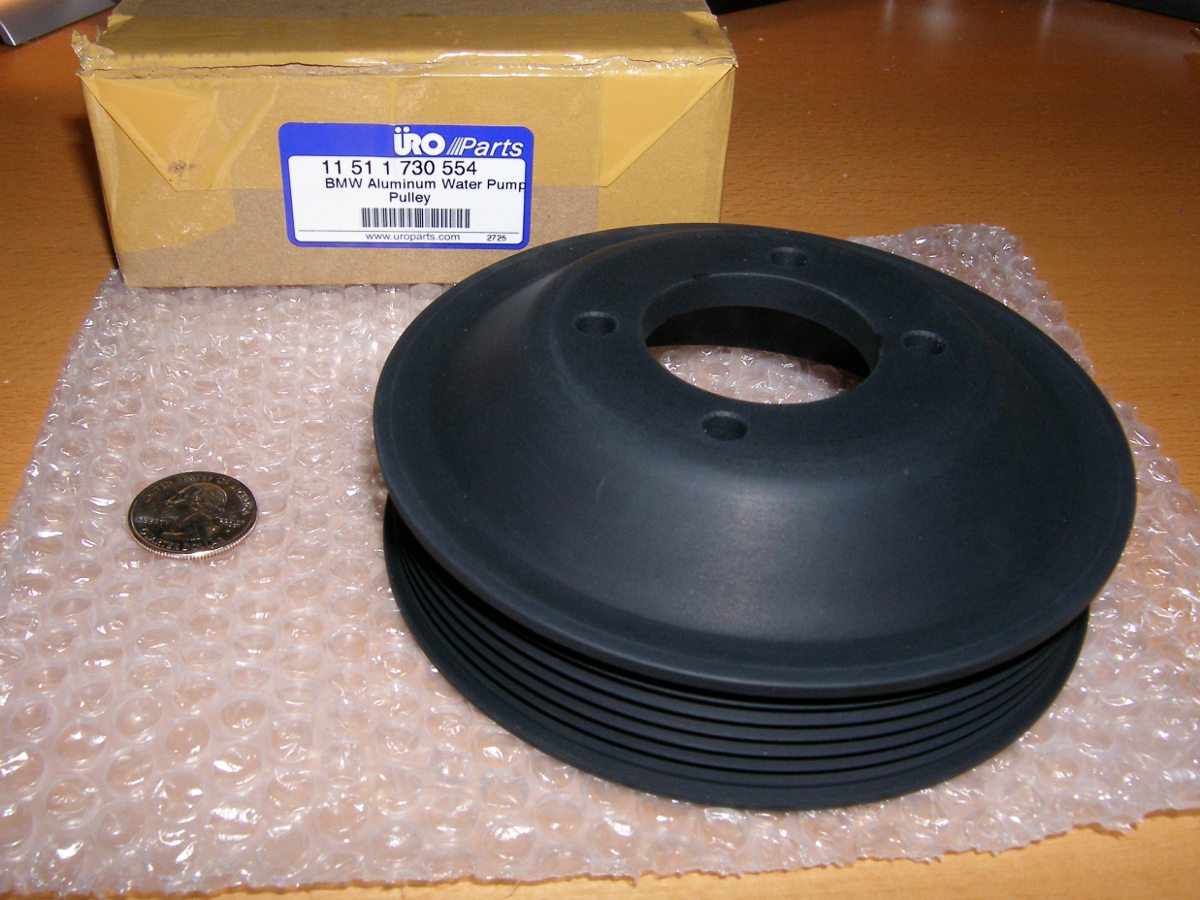 This URO Parts aluminum replacement is the same diameter as stock so it doesn't require a non-standard belt size and will hold up to the stress of repeated heat cycling. It's an essential upgrade. |
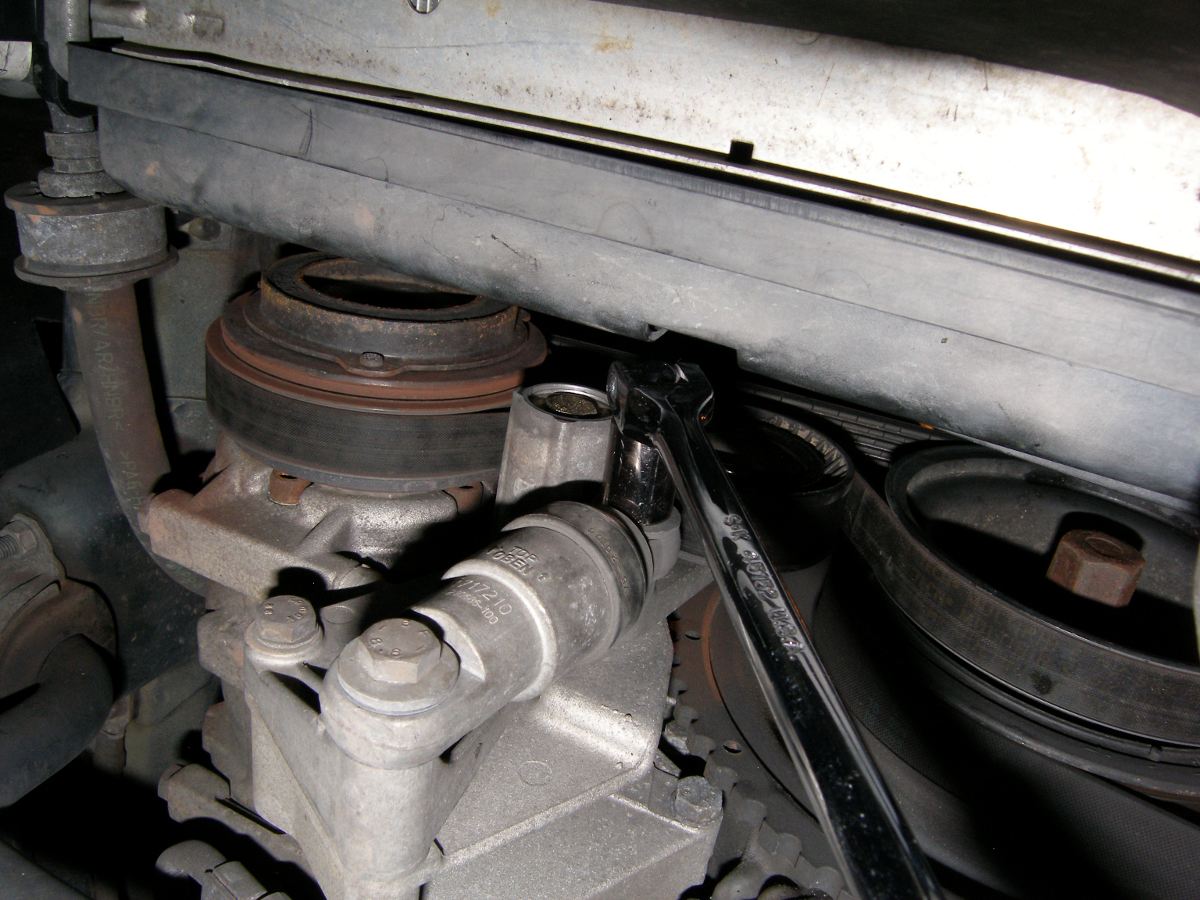 Here's where you need to attach a breaker bar or ratchet with a 13mm socket and apply a clockwise force to detension the air conditioning belt. |
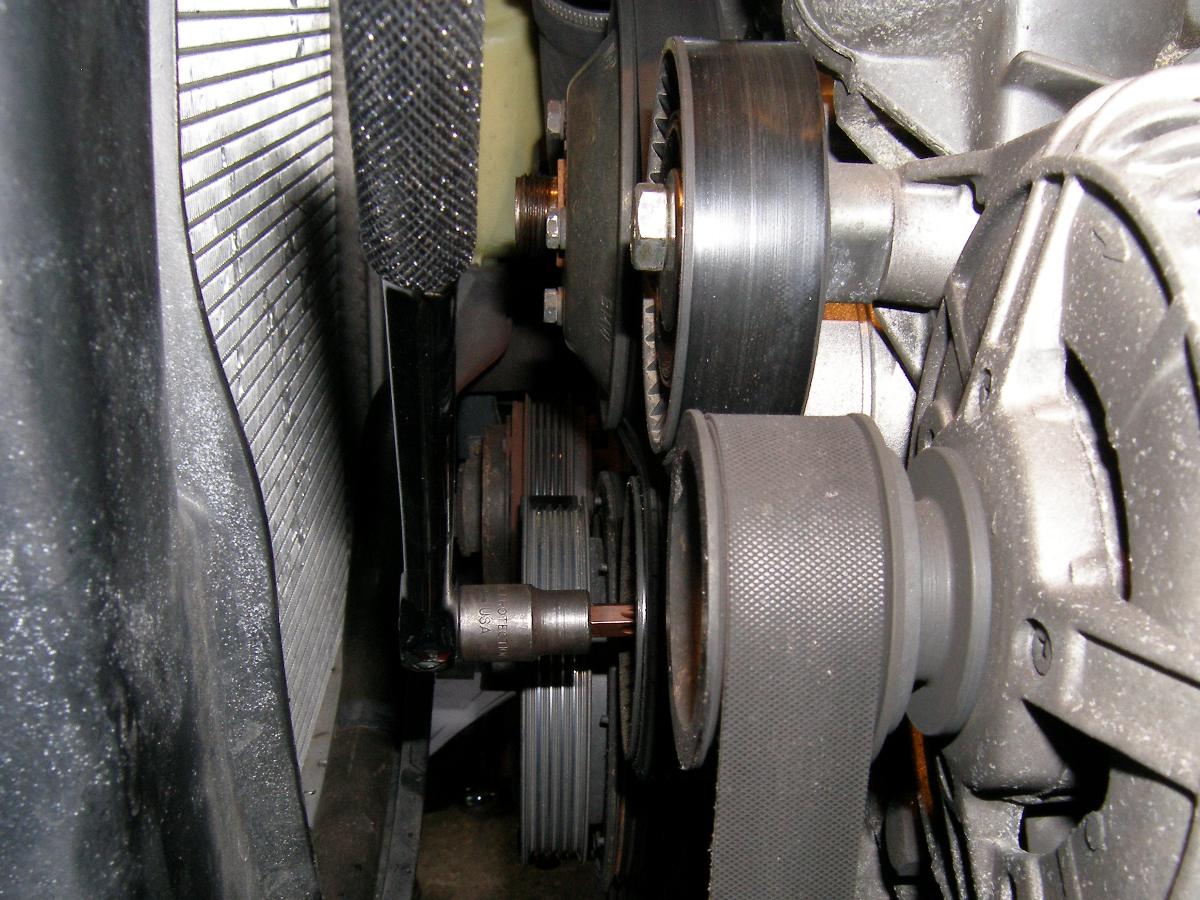 On old-style mechanical main belt tensioners the protective cap on the tensioner must be removed and the bolt rotated clockwise to detension the belt. Contrast with the new style tensioner depicted below. |
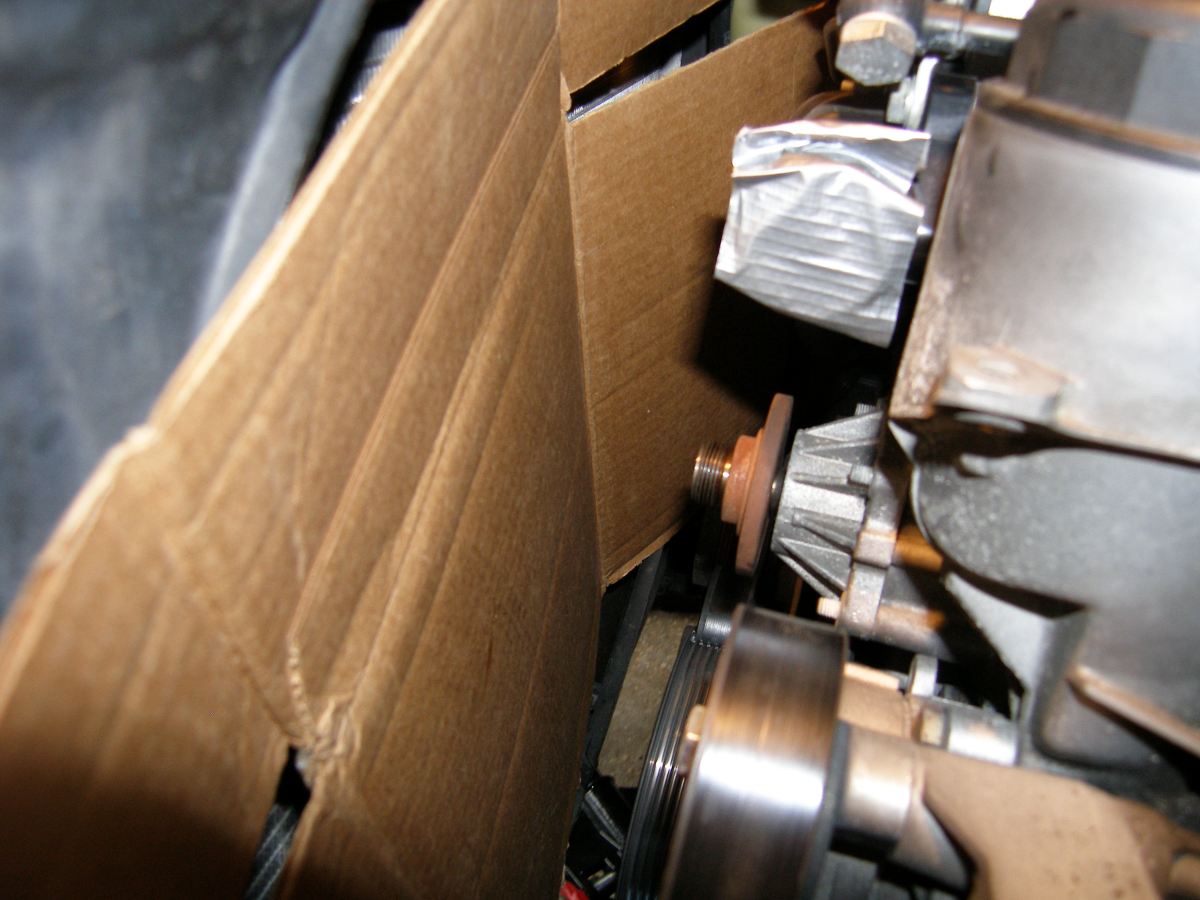 A piece of cardboard is essential to protect the radiator while using the "brute force" method to remove the pump because the pump may release suddenly and smash into the radiator. That would be a Bad Thing™. |
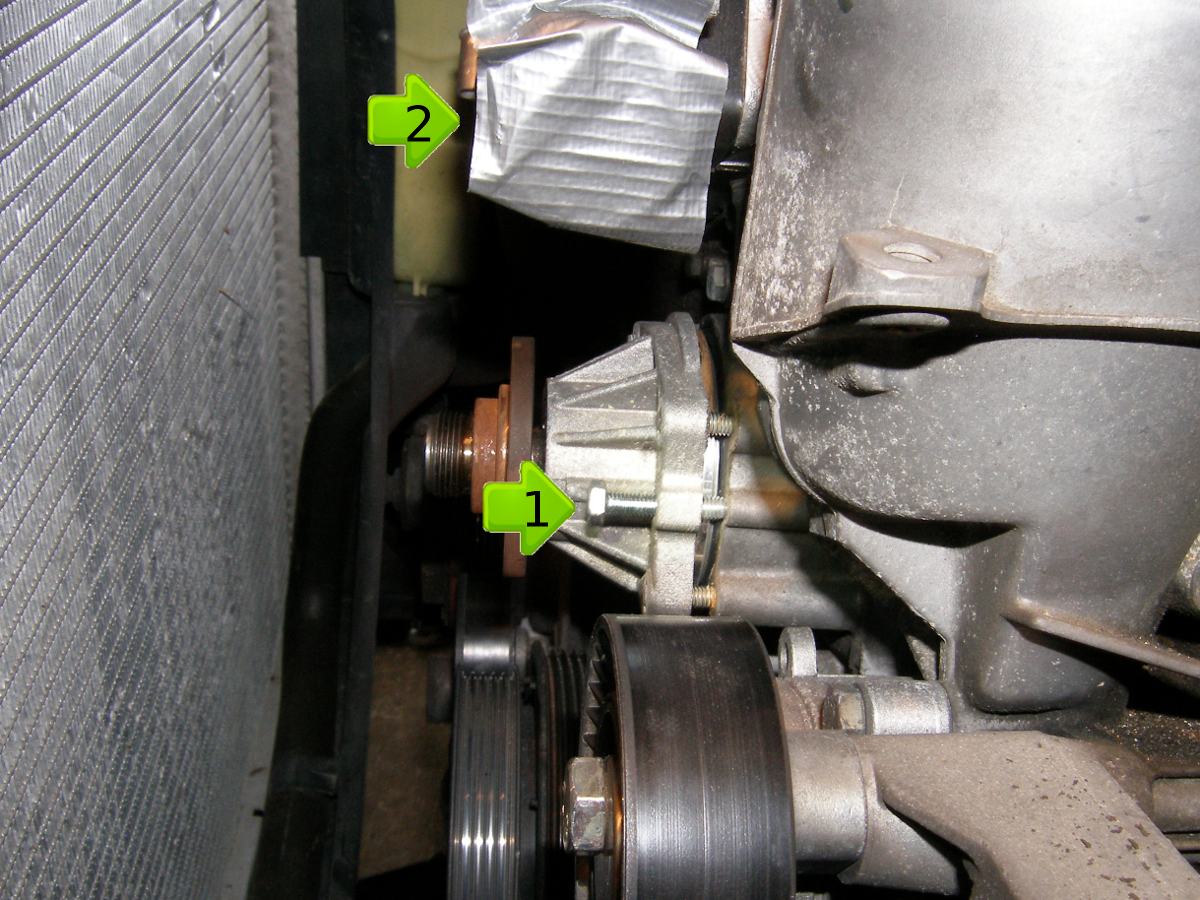 Arrow 1 shows the M6 bolt used to pull the old pump out of the block, while Arrow 2 shows a crude but effective method used to prevent debris from entering the thermostat opening while the radiator hose is removed. |
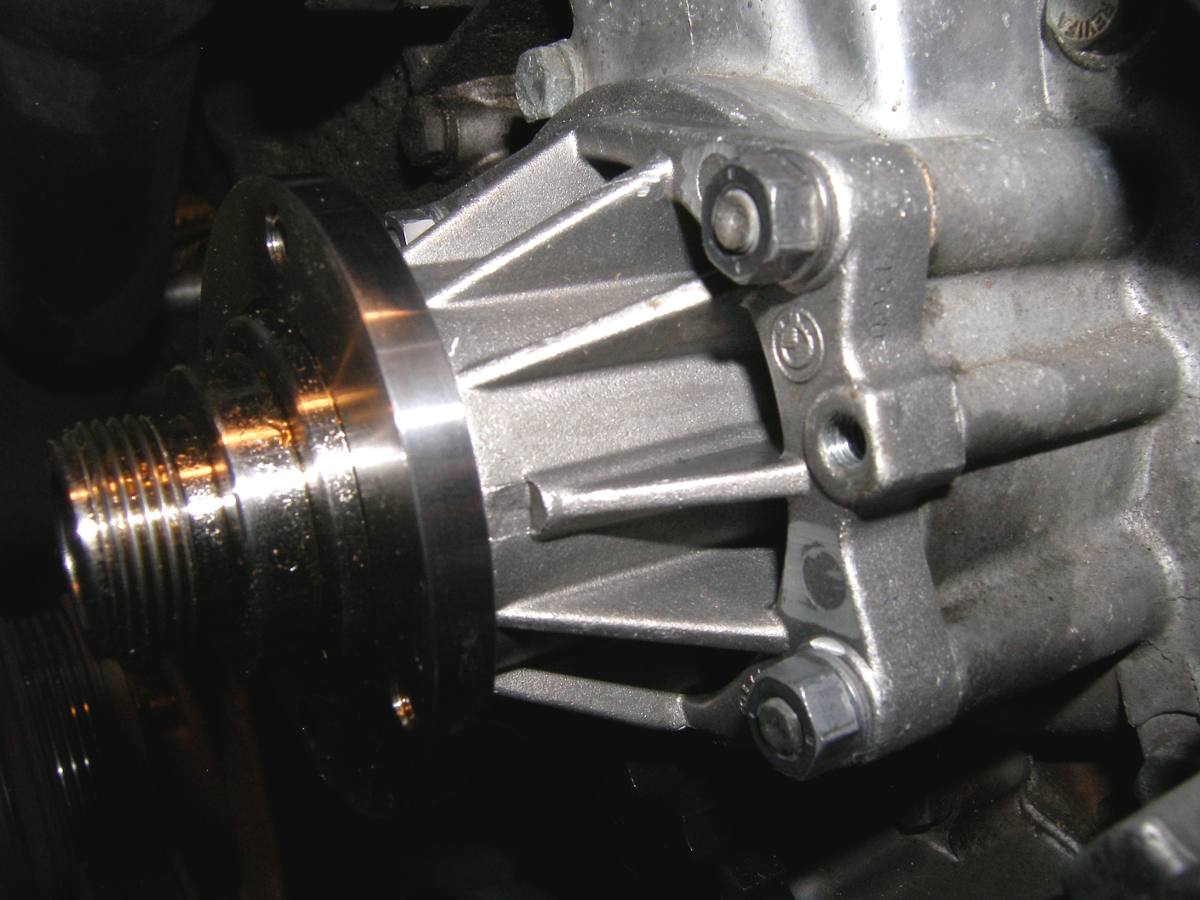 A closeup of the new pump installed. The four nuts incorporate a washer and are torqued to only 10Nm. Make sure to pour a bit of coolant on the o-ring so it slides easily into the block. |
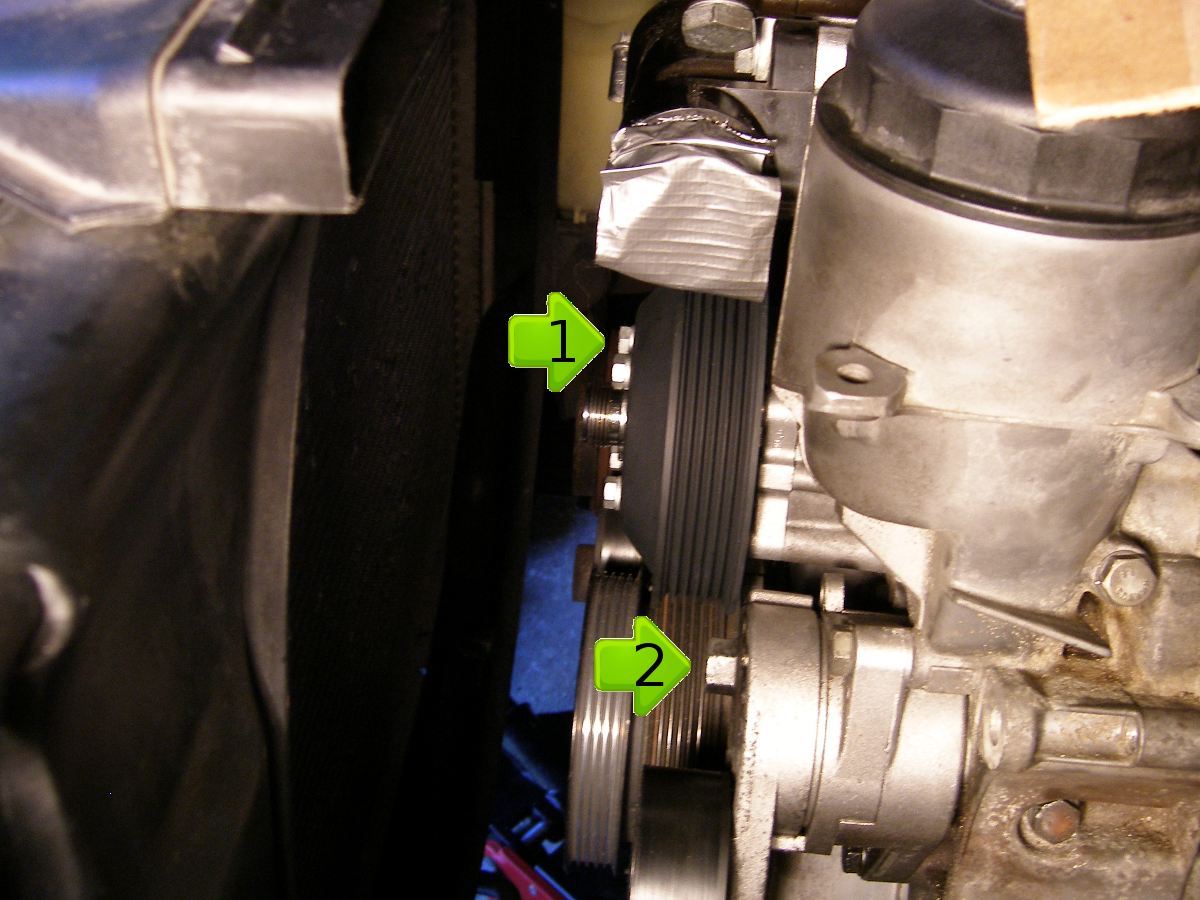 Arrow 1 shows the new aluminum water pump pulley with bolts and washers installed. Arrow 2 shows the new-style mechanical tensioner with hex bolt head cast into the body for densioning the main belt. |
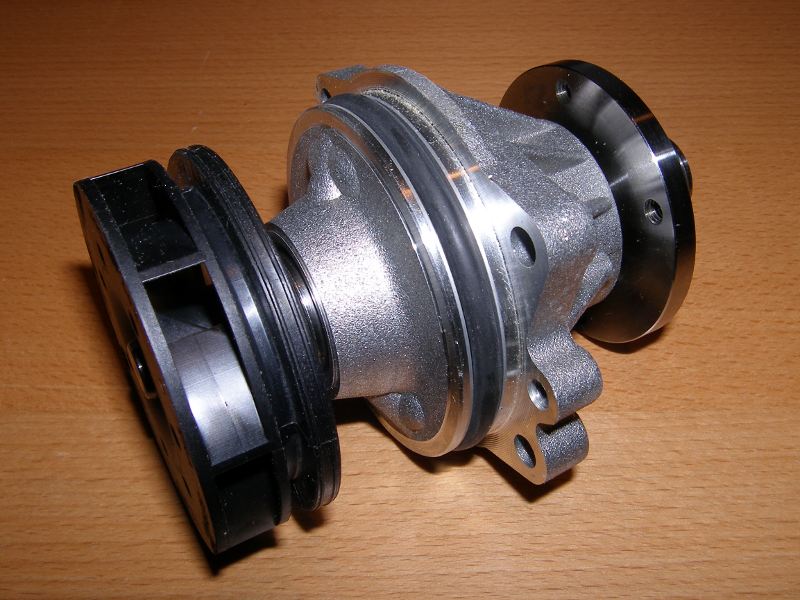
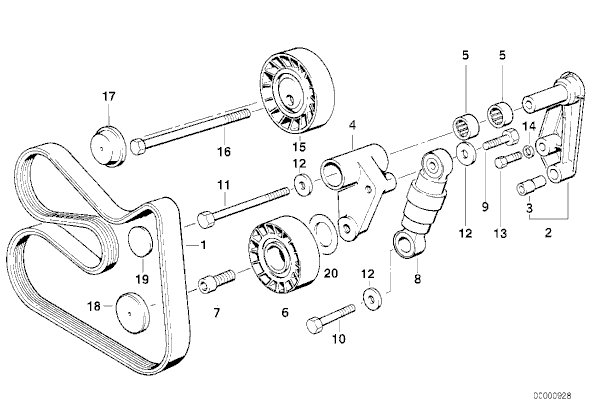 Correct belt routing shown. The alternator pulley goes where part 19 is shown, the idler touches the face of the belt just to the left of it (below part 17), and the tensioner pulley fits in the loop in the belt to the left of part 19. | 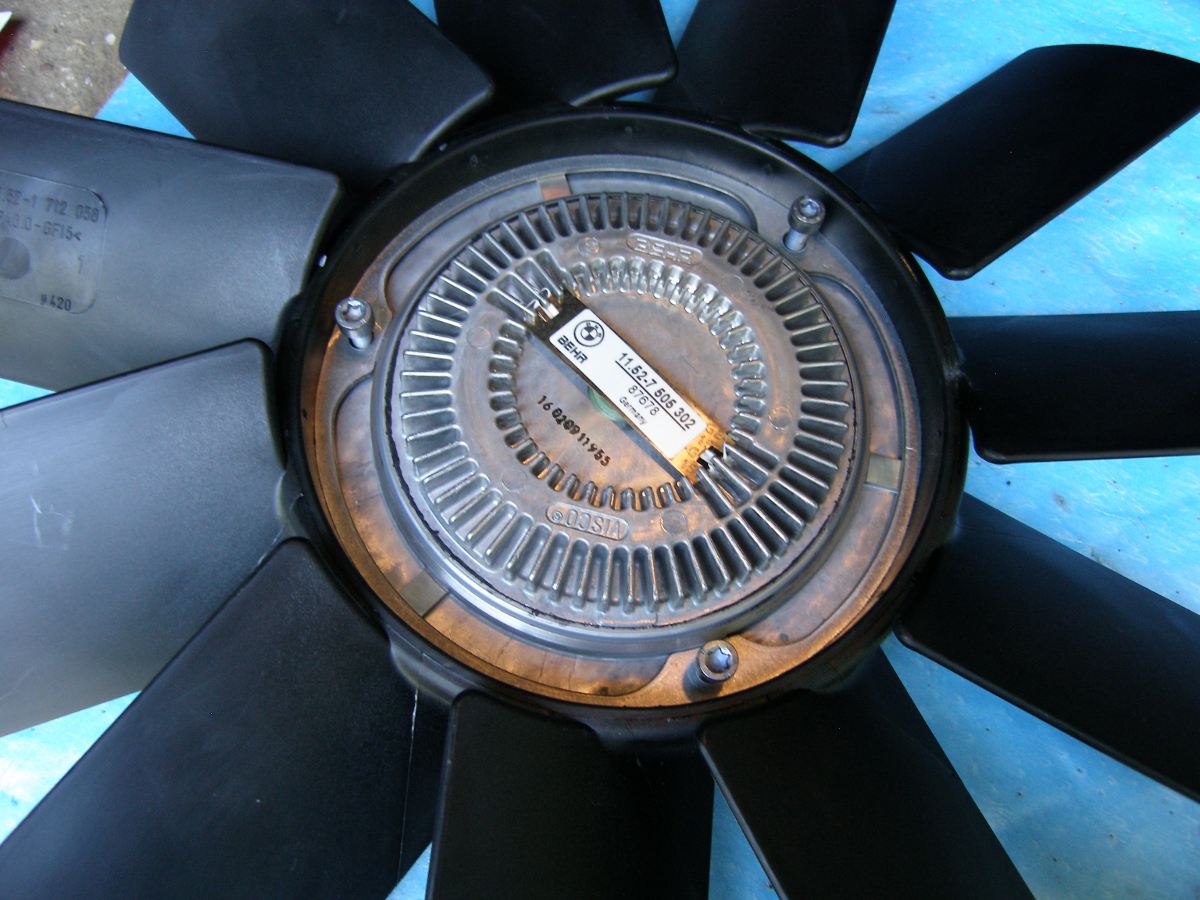 The fan and clutch can be mated two ways. This closeup shows the correct mating. And yes, the screws are loose in this picture but were tightened by feel prior to installation. |
Conclusion
Replacement of the water pump is a relatively simple job that should take no longer than about two hours for the uninitiated. Most people seem to complain more about dealing with the fan than they do about the pump itself. If you want to make your life easier, I recommend buying the counter-holder tool, but it's certainly not required for the job. No technician I know bothers with it.