


Wednesday July 4, 2012
ActiveE Undressed
Yesterday on my "day off" from the overhaul I stopped by the dealer to get some parts and find my technician to ask a few questions related to the steering column. I found him working on a generic 3 series, but knowing my interest in all things technical he directed my attention to the brand new ActiveE up on the adjacent lift with its powertrain removed from the rear of the car. Apparently BMW forgot to install some kind of seal during manufacturing so they were charged with the task to fix that omission.
The first thing that struck me was how modular they had made the car -- to the point that they only had to disconnect some large electrical connectors and remove four large bolts connecting the subframe to the body to drop the entire rear out of the car. My technician pointed out how BMW basically chopped the center out of a traditional 1 series rear subframe and mounted the surprisingly small reduction drive and 170 HP electric motor where the differential would traditionally be. Forward of that was a large, transverse-mounted, water cooled battery enclosure containing nearly 200 cells. Positioned longitudinally in place of the traditional driveshaft was another battery bank and forward of that was a third battery bank positioned where the gas engine would normally be installed.
So what do all of these battery banks get the driver? Between 60-100 miles of range. And that's it. Unlike a Prius, there is no gasoline backup or smaller "range extender" engine that is used to charge the batteries. If you run out of battery power you're calling a tow truck. My technician was quick to point out that while debugging a charging issue he took one of these cars out for an extended trip and the vehicle returned better range than expected due to all the regenerative braking and use of the Eco mode. He also pointed out that while the car has its limitations BMW is working to add elevation data to its navigation systems so the car can better calculate the range the owner will see in real life. For example, the car might help you avoid a "lossy" route like climbing a hill, or perhaps takes the hill into account, knowing that you will recover some range when you leverage regenerative braking on the way down.
As the ActiveE cars are only available for a two year lease it's pretty obvious that this is a beta test for technology that will be integrated with future vehicles. My technician says we'll soon see hybrid vehicles in the BMW lineup equipped with all electric drivetrains and "range extender" gasoline engines that are used only to charge the batteries. While the eco-nazis will pry the keys to my high performance gasoline-burning BMWs from my cold dead hands, I do see a place for all electric vehicles in the life of the average commuter. Whether the general public will accept a car that prioritizes heating of the battery banks over heating of the driver on cold winter mornings, however, remains to be seen.
To balance out all the new technology, on my way out my technician pointed me toward a 1981 E21 that had come in for some fuel injection work. He recommended I take a look under the car because it was something to behold...and he was right. The entire underbody looked like it had just rolled off the showroom floor. I left the dealership secure in the knowledge that other people obsess about their cars as I do. I am not alone. :)
Front Suspension Overhaul - Day 12
I got a late start today but it didn't really matter. By the time I got up the temperature was already in the upper 80's and by Noon it was comfortably in the 90's with high humidity. I wasn't looking forward to going to the garage today but I knew the steering column wouldn't remove itself. I decided to break the ice today by washing the E46 and applying another coat of Menzerna sealant.
A discussion with my technician yesterday revealed that he uses the chisel technique exclusively to remove fracture bolts. He told me to position the chisel on the sloped portion of the head and then pound on the chisel until a groove has formed. Then, turn the chisel 90 degrees and stick the corner of the chisel into the groove about two-thirds of the way down the head (closer to the washer) before hitting the chisel once again to create a notch in the groove. After a few good hits he suggested the bolt would loosen up noticeably and I'd be home free. As it turned out, that's the technique I used and it played out exactly as my technician indicated. Before I extricated myself from the driver's side footwell I did my part for humanity and took a video demonstrating the technique.
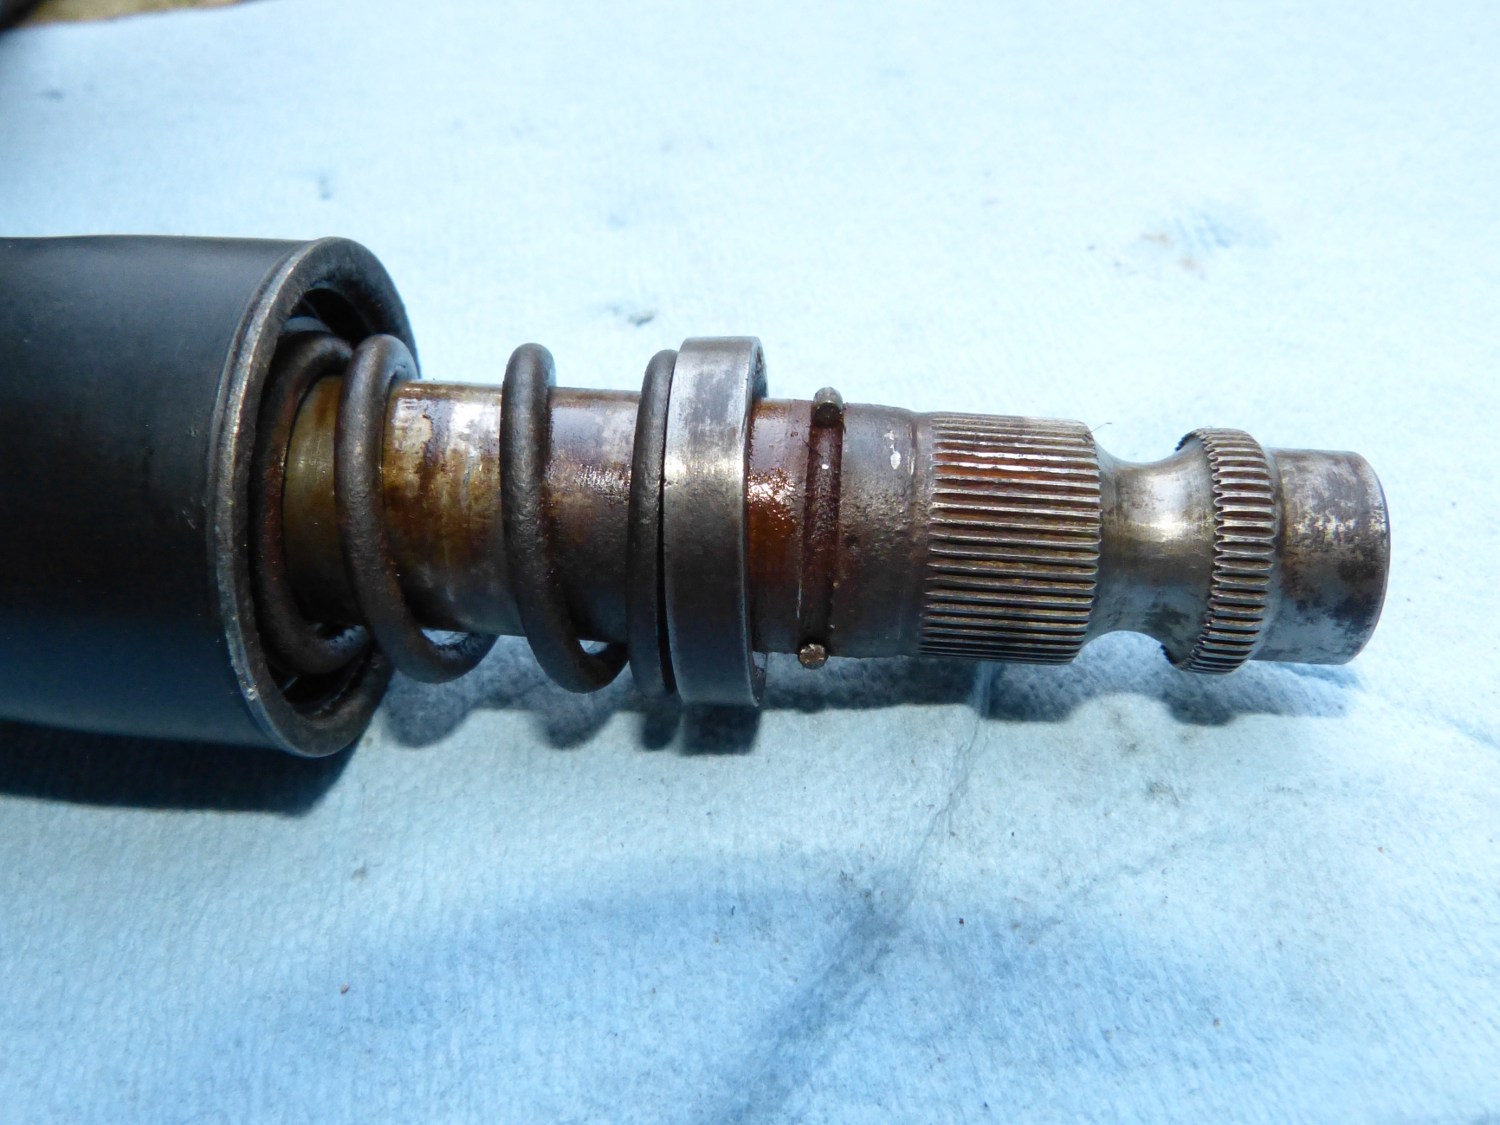
With the steering column out of the car I found the lower portion of the steering shaft was covered in gunk, rusted, and in generally poor shape. To begin the disassembly required to gain access to the bearing I realized I had to pull off the retaining clip that was hugging a groove machined into the steering shaft. I used a screwdriver and hammer to apply some persuasion to the ring partially enclosing the retaining clip to move it up the shaft (toward the steering wheel). That exposed the retaining clip and allowed me to remove it with a pick.
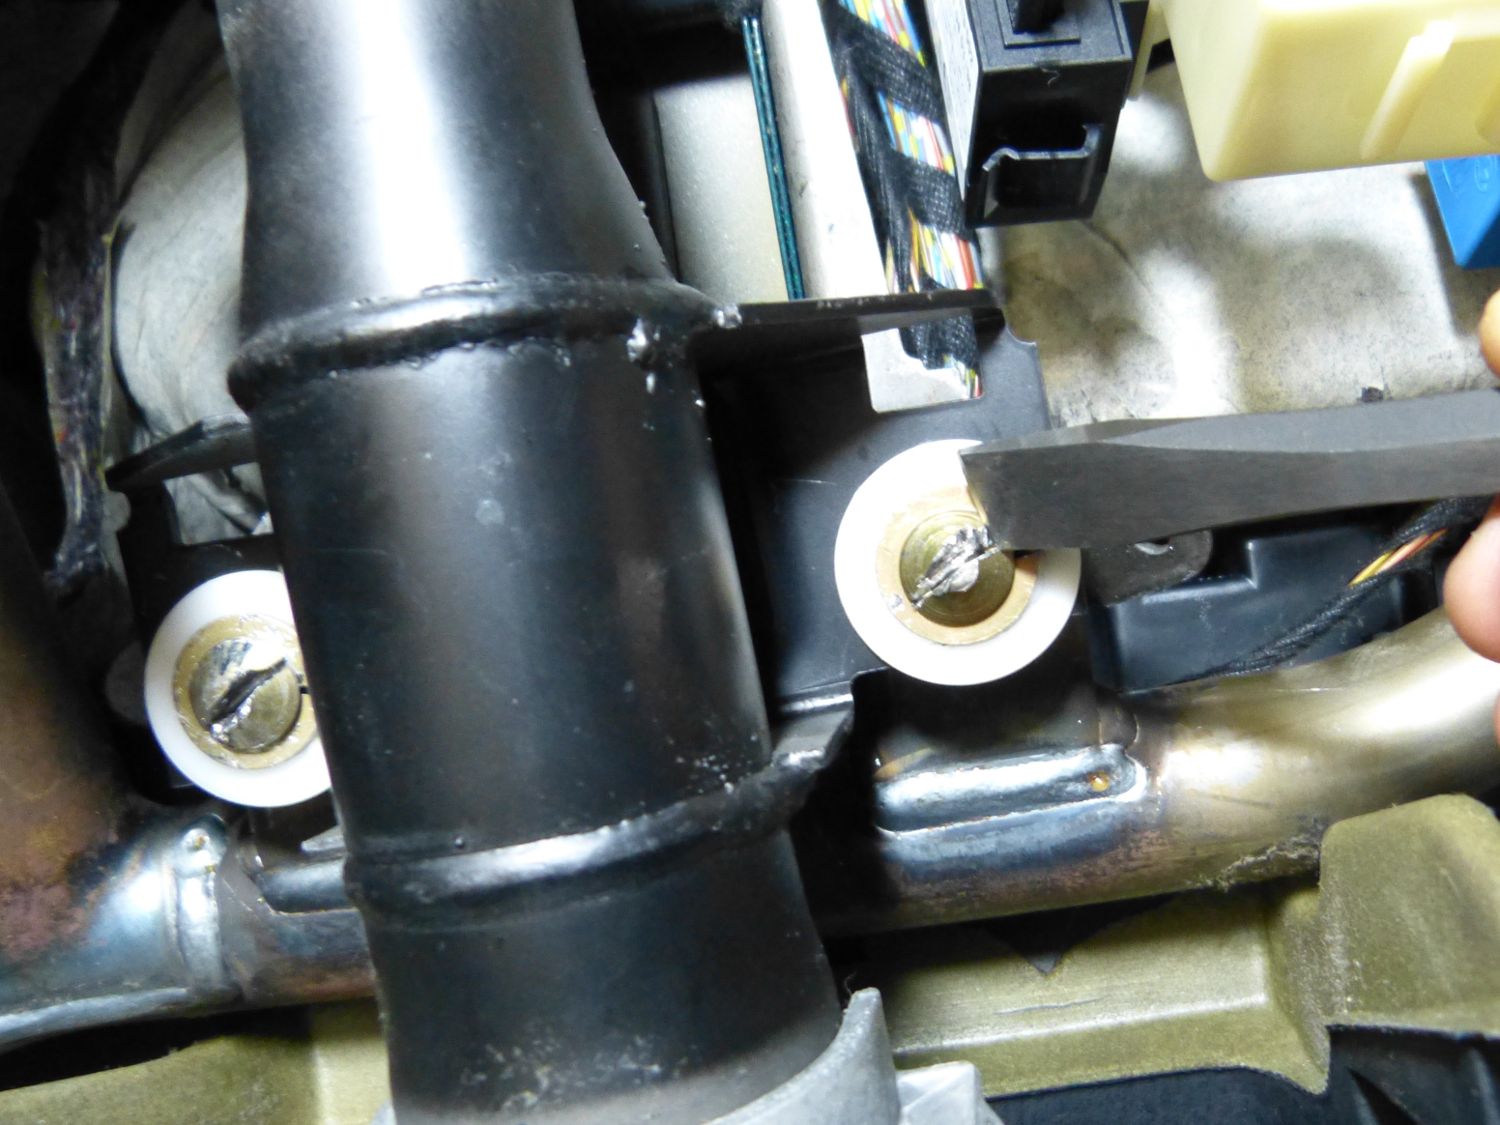 Showing how the chisel is used to loosen the fracture bolts. See the video for the full explanation of the technique. |
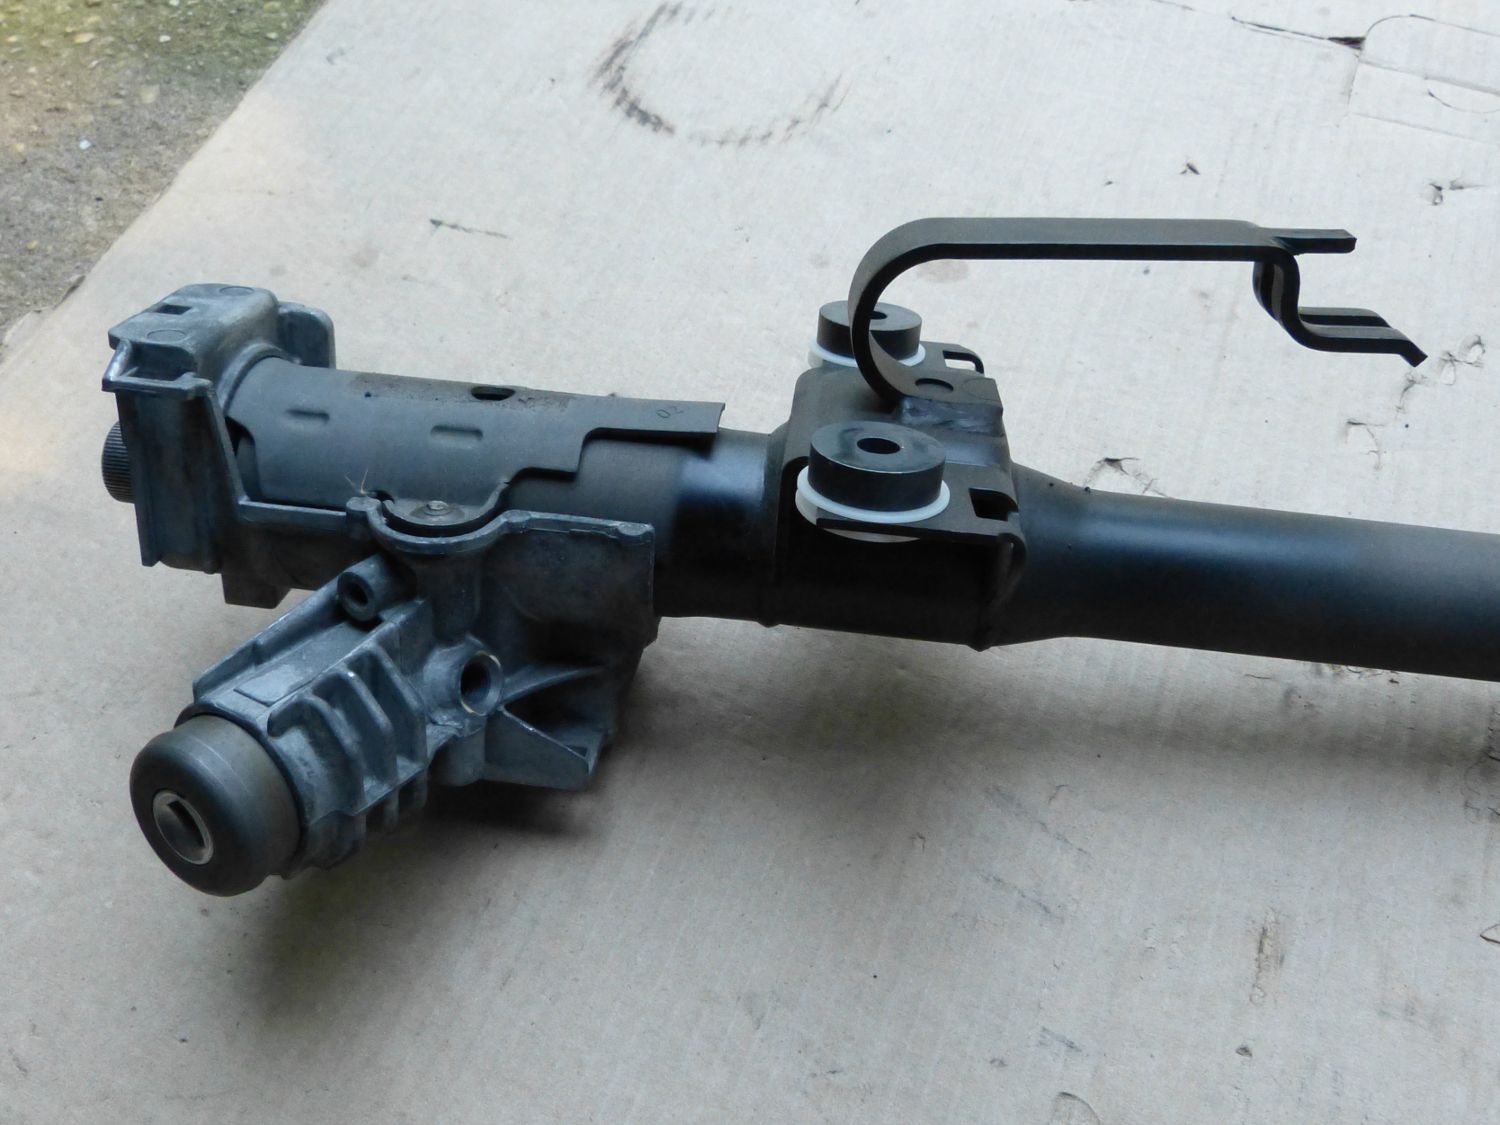 The top of the column as removed. In this picture the lock tumbler and housing fracture bolts remain installed. |
 The lower steering column assembly showing the parts (with the exception of the bearing shield which is hidden). |
When I tried to remove the ring from the shaft it bound just beyond the retaining clip groove but additional work with the hammer and chisel got the job done. With the ring removed I easily pulled the loose-fitting spring and bearing shield off the shaft. All that remained at this point was the bearing. I tried at first to remove it with prejudice but that did little more than dent the bearing shell. As I pulled the steering shaft toward the bottom of the column I felt it hit something. I instinctively pushed the shaft back up the column and then pulled it back down quickly and watched closely. I saw the gap between the steering column tube and bearing shell increase a bit so I repeated the process several times until the bearing came free of the steering column tube.
When I pulled the shaft a bit farther out of the column it became clear why the technique worked -- the shaft increases in diameter a few inches above the point at which the bearing normally rides and I had effectively used that as a drift to push out the bearing. Aside from being pretty weak on grease I found the old bearing to be in relatively good shape for its age.
Before I could install the new parts I knew I had to clean up the shaft. After working for several minutes with dry scotchbrite and achieving questionable results I decided to fire up the compressor and put my die grinder on the job. Because I knew I could do serious damage to the shaft using this method I regulated the pressure down to about 60 PSI (normal operating pressure is 90 PSI) and gingerly applied the trigger as required to keep the RPM as low as practical. That eliminated most of the visible rust but still produced lots of unsightly scuff marks so I decided to apply some PB blaster to the shaft and then use the scotchbrite pad to eliminate those marks. That worked like a charm and produced a brilliantly clean steering shaft worthy of return to the vehicle.
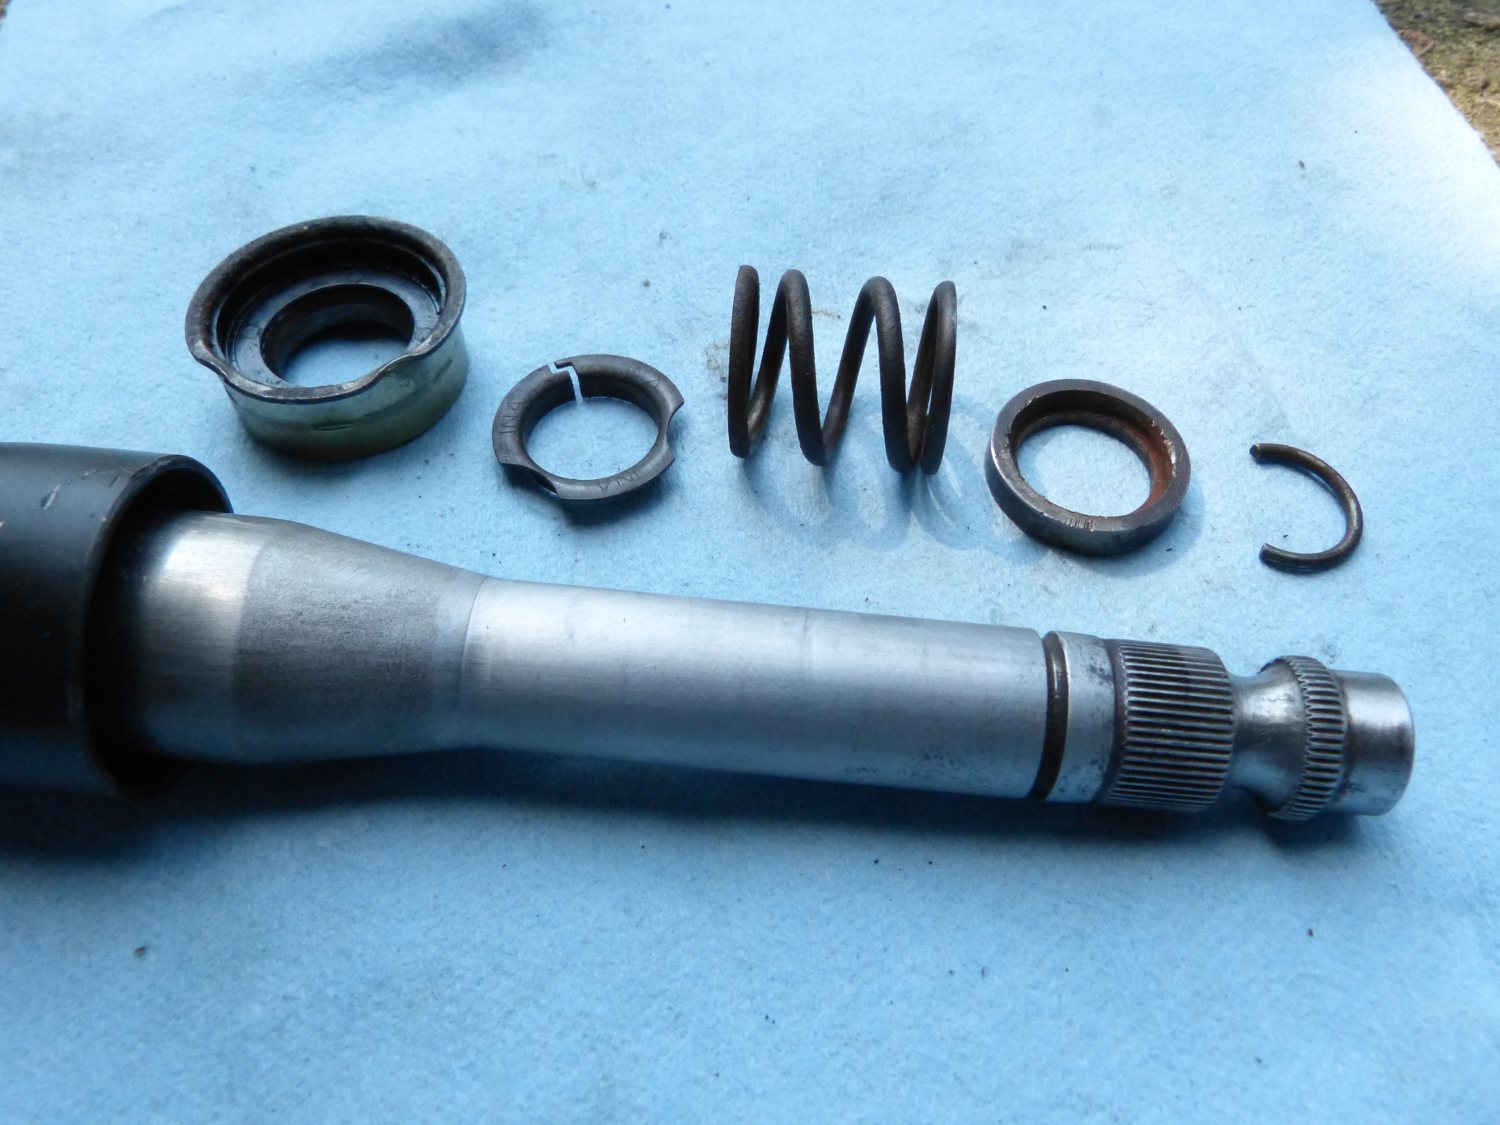 After some die grinding, PB blaster and scotchbrite, the steering shaft now looks like this. The old parts laid above show the order of assembly. |
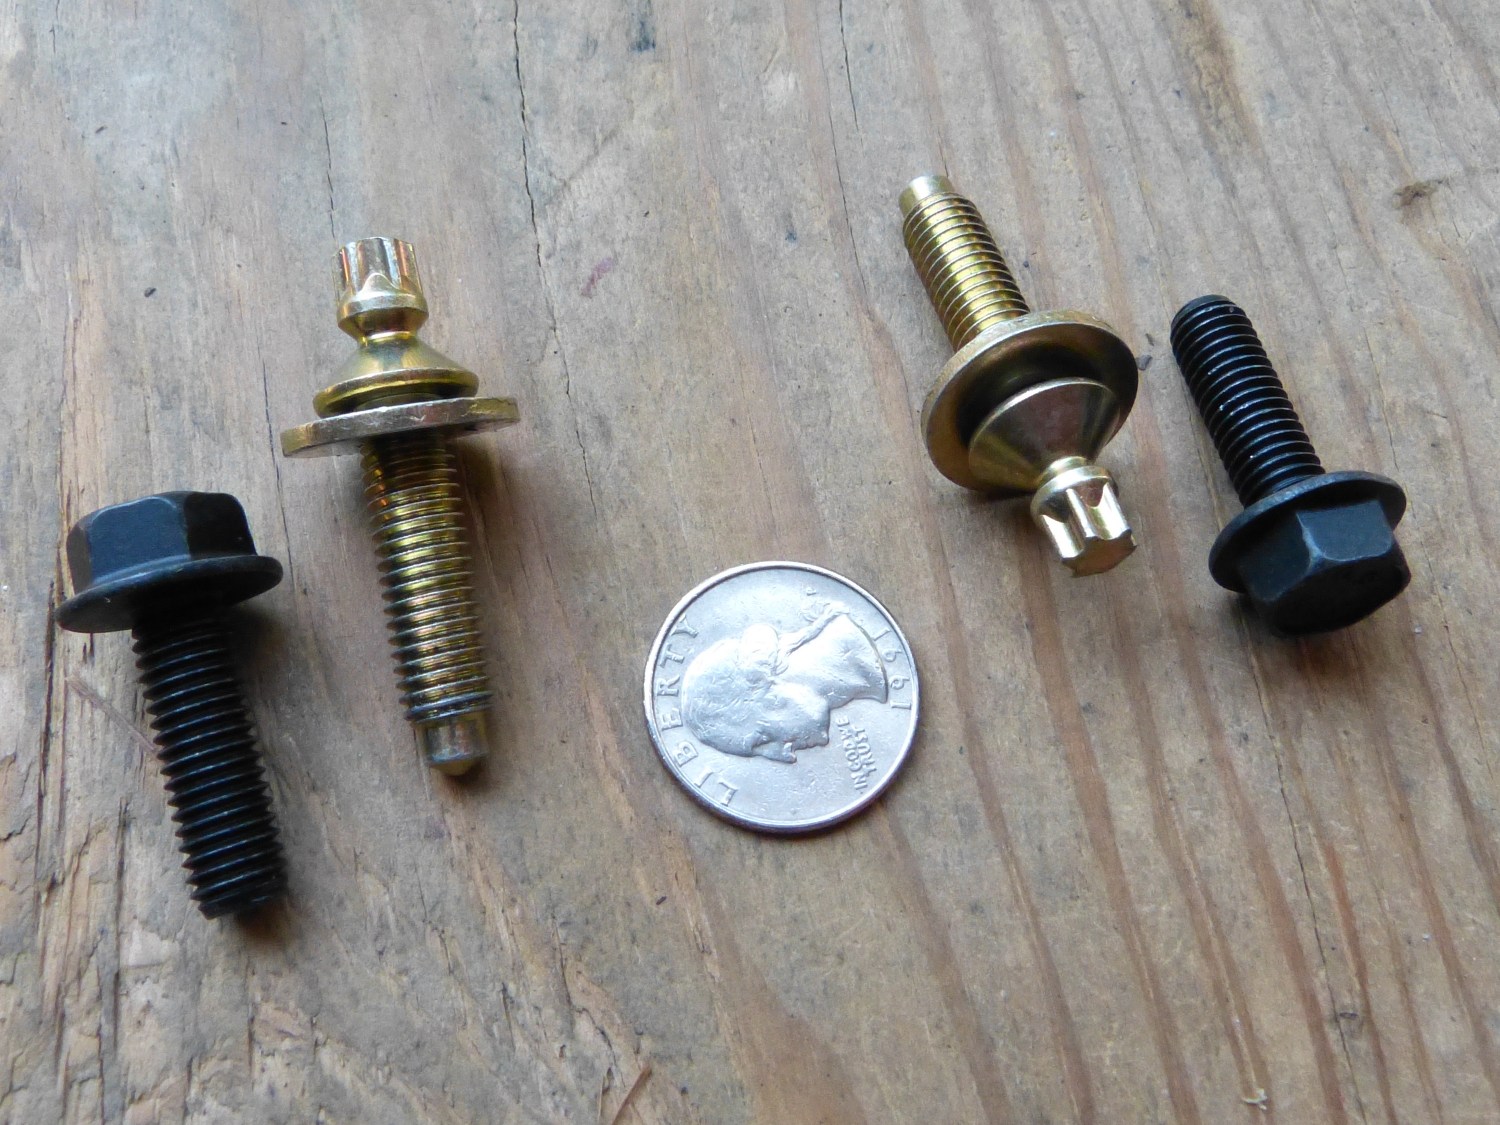 A comparison of the M8x1.25x25 flange head class 10.9 bolts (black) and OE fracture bolts (cad steel). |
 Comparison of the M8x1.25x16 class 10.9 hex head bolt (incorrect for this application as it turns out) and OE fracture bolt removed from the lock housing. |
As I gathered the new parts prior to installation I took a close look at the new bearing and noticed it seemed to be a little weak on grease so I grabbed my jar of CV-2 and packed a bit more grease into the small gap between the inner and outer races. I also put a thin film of grease on the steering shaft where the inner race of the bearing rides, just in case a stubborn bearing in combination with a dry shaft contributed to the squeak. I then applied the bearing shield, spring, ring, and retaining clip to complete the assembly.
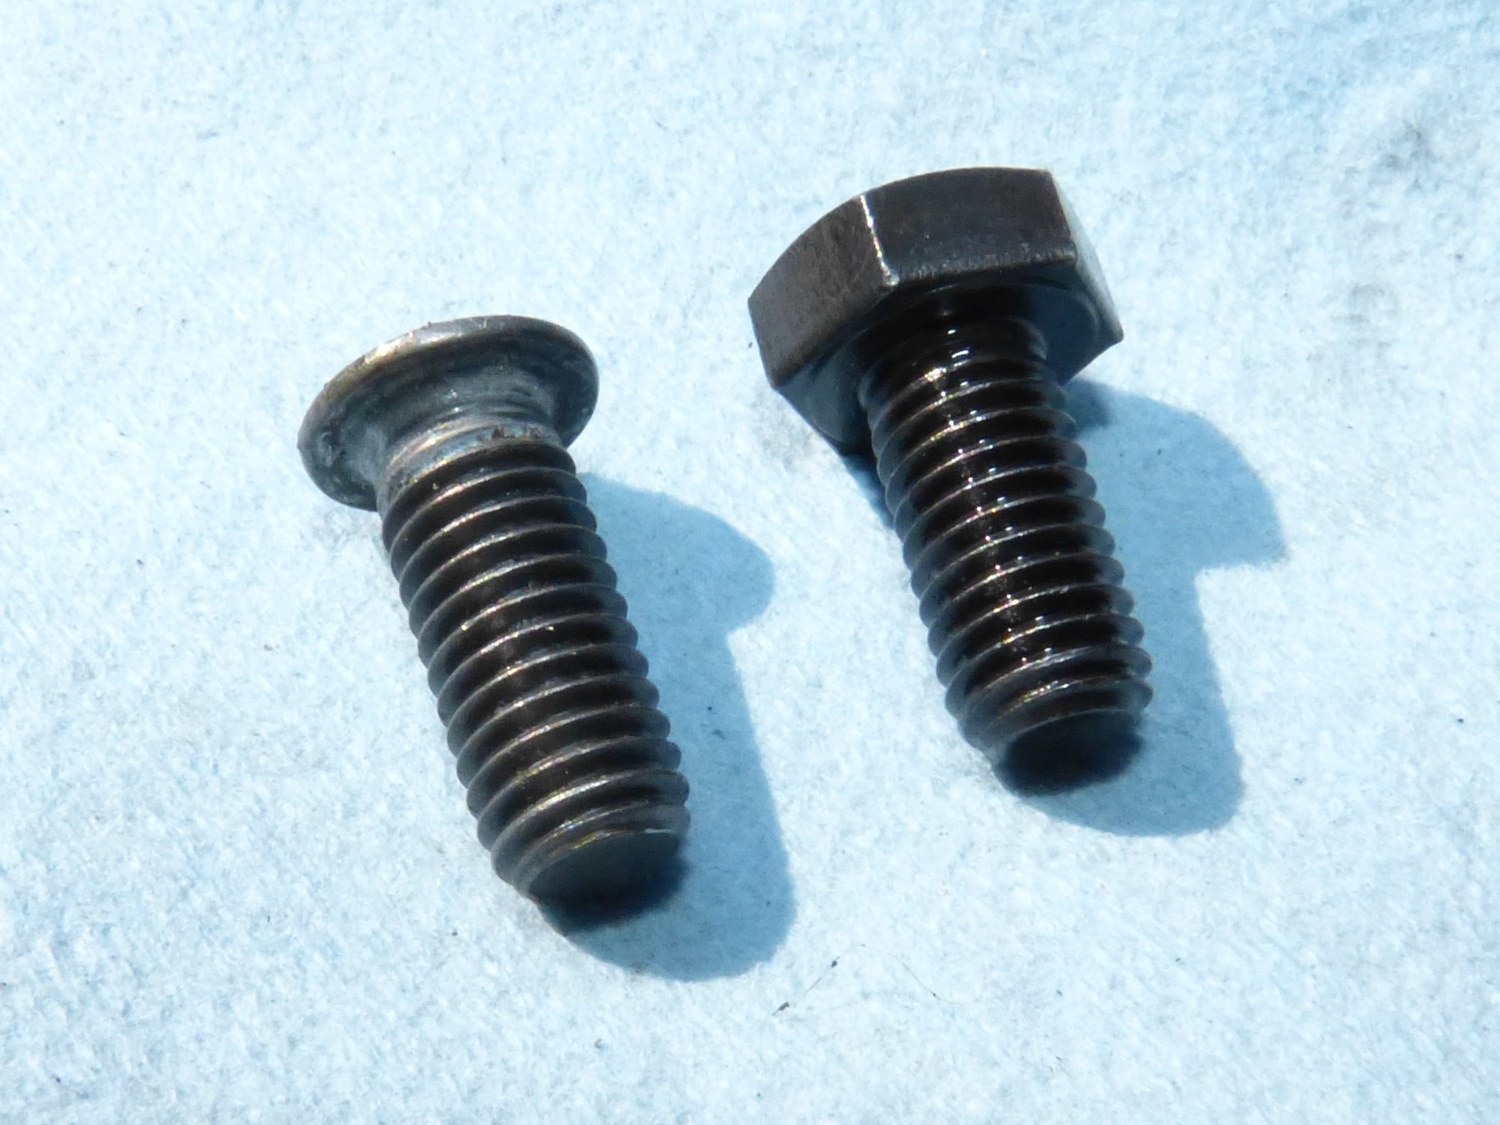
Next, I decided to use the chisel method to remove the fracture bolts on the lock housing. After a few minutes of work on each bolt I had them out of the housing and the housing removed from the steering column. I bought M8x1.25x16 hex head bolts to replace the fracture bolts but upon inserting the new bolts into the holes I realized they would not work due to insufficient clearance between the points on the head and the adjacent steering column structure. I will need to acquire socket cap head bolts (allen heads) to complete this task.
Before I left the garage for the day I decided to remove the old fuel filter cover in order to bring the old fasteners to the parts department for inspection, as they were unable to locate all of the parts via the parts book. I'm hoping they'll have something in stock I can use. If not, we'll have to go on a wild goose chase or I'll simply need to restore and reuse the old fasteners. With the old fuel filter cover removed I noticed a piece of foam insulation attached to the inside front of the cover that appears to protect the fuel lines as they transition into the space protected by the cover. It was pretty beat up and the adhesive was long past its prime. Amazingly, I found its part number so I plan to order that tomorrow. I also found heat damage on one of the vacuum lines leading to the fuel pressure regulator so I'll be ordering a length of that line as well.
If everything goes as planned, I should have the car back in one piece by the end of the weekend, which means I can schedule the alignment with Don for next week and finally return the car to service.
Videos:
- Fracture bolt removal technique
- Steering column removed
- Steering column lower bearing assembly overview
Mileage: 222600