


Sunday, May 22, 2016
Back from the Body Shop
After a mere two weeks I heard from the body shop that the car was done. And as luck would have it, my brother was available to help me pick it up the next day. The only cost? An early meetup at his house to hitch a ride on his way to work.
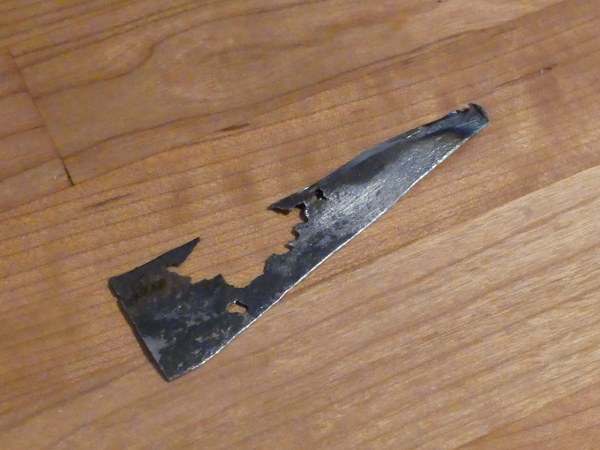
The good news is the shop was able to get to the rust, cut it out and weld in a new section. If you're wondering why it was necessary to do this, check out the picture. That huge hole in the metal is where the biggest rust bubble used to be. If you see rust bubbles, the metal is already gone, and the only (rational) choice is to cut and weld in a new piece. Of course, this does not stop amateurs and hack shops from grinding the rust out and then filling with bondo, hence the magnet test so many buyers of restored classics often use to validate the quality of the restoration.
The rear fascia was removed to allow access to the back side of the affected section, at which point the surface was prepped with a zinc phosphate primer and protective coating, so assuming I keep the car out of the annual salt bath as I did last year the rust should be banished for a long time, if not forever.
Cost to repair the rust? Less than $500. Having no car payments? Priceless.
Summer Tire Swap
With the car back from the shop I wasted no time swapping the Winter Sport 4D for my set of Pilot Super Sports. I wasn't able to use the 2 post lift for this job but it turned out for the best as I was able to avoid lugging the wheels between my brother's garage and mine. So it appears the E46 coolant flush I've been avoiding for far too long will be the first job on the lift.
Less than an hour later I found myself smiling ear to ear as I accelerated toward and through the first turn on my test loop. As if I needed more affirmation, one thing is clear -- when combined with all the suspension improvements I've made over the last five years the Pilot Super Sport makes this E36 officially better than new.
ZKW Projector Alignment Research
I'm finally planning to install the new factory turn signals along with the ZKW projectors and fog lights I covered with Laminex some time ago. However, despite my share of research on the subject of ZKW projector alignment I'm still a bit confused on how to align the headlights. It's not a simple matter of duplicating the light pattern of the existing headlights because reflectors and projectors are different animals and thus have different alignment requirements.
Reflectors produce a relatively wide beam pattern and therefore must be aimed down and to the right of the vehicle centerline to reduce glare. In fact, this is the primary reason why the DOT spec low beams have the crappy reputation they do. The DOT spec reflector high beams, on the other hand, which are aligned more or less straight ahead, are more than adequate on a dark road and almost as good as my E46's HID projectors in high beam mode. When you consider the low and high beam DOT reflectors are loaded with the same 55W bulb it's clear the low beam focus and alignment is the problem.
A projector, on the other hand, focuses the beam to a greater extent, reducing overall output away from the beam centerline, and the hard cutoff more or less eliminates the portion of the beam pattern that would ordinarily blind oncoming drivers. This means that I should be able to point the projectors more or less straight forward and adjust the cutoff to a height that is below most side view mirrors in an effort to offend the least number of drivers. With no hard numbers, procedures, or alignment-specific tools available I am expecting this to be a trial-and-error process.
If my research serves the alignment procedure will look something like this:
-
Measure the distance between the projector assemblies. This will be used to keep the distance between the uptick or center point in the light pattern produced by each projector the same distance apart and thus ensure that the beam patterns are parallel. This won't guarantee any true alignment (the beams might could be equally too high/low or pointing too far left or right) but it will prevent my E36 from going down a dark road cross-eyed, so to speak.
-
With the front of the vehicle 25 feet away from the wall, use the four mounting screw / adjusters to adjust the fit of the assemblies to the car and make all "coarse" alignment adjustments. The goal here is to create a uniform gap to the nearby metal / bumper structure and align the light patterns as closely as possible to the required targets.
-
Use the outer adjusters to fine tune the left/right position of the light pattern such that the distance between the uptick / center point of the beam remains the same as the distance between the projectors (taken in Step #1) as well as mostly straight ahead -- perhaps with a slight bias to the right.
-
Use the inner adjusters to fine tune the height of the cutoff patterns so they overlap and the overall cutoff is sufficiently low so not to blind anyone I'm following.
I ordered a few parts to make the installation more predictable and they should be here in a few days. We have a few nice days coming up so I'm planning the installation for the weekend.
Update 5/26/2016
A reader sent me a link to a helpful article that provides the data I'll need to aim the headlights and fogs.
According to the article it appears that at 25 feet the aiming point for the projectors is 3" below the lamp axis (the height of the headlights above the road surface extended to the wall) or an angle of roughly 1.75 degrees. The data also shows that the correct aiming point for the fog lamps is 1.5" below their lamp axis.
I also stopped by the dealer to pick up the new adjusters and screws for the installation so I think I'm ready to go.
Mileage: 263250